
由于Keras是一种建立在已有深度学习框架上的二次框架,其使用起来非常方便,其后端实现有两种方法,theano和tensorflow。由于自己平时用tensorflow,所以选择后端用tensorflow的Keras,代码写起来更加方便。
1、建立模型
Keras分为两种不同的建模方式,
Sequential models:这种方法用于实现一些简单的模型。你只需要向一些存在的模型中添加层就行了。
Functional API:Keras的API是非常强大的,你可以利用这些API来构造更加复杂的模型,比如多输出模型,有向无环图等等。
这里采用sequential models方法。
构建序列模型。
def define_model():

  model = Sequential()

  # setup first conv layer
  model.add(Conv2D(32, (3, 3), activation="relu",
           input_shape=(120, 120, 3), padding='same')) # [10, 120, 120, 32]

  # setup first maxpooling layer
  model.add(MaxPooling2D(pool_size=(2, 2))) # [10, 60, 60, 32]

  # setup second conv layer
  model.add(Conv2D(8, kernel_size=(3, 3), activation="relu",
           padding='same')) # [10, 60, 60, 8]

  # setup second maxpooling layer
  model.add(MaxPooling2D(pool_size=(3, 3))) # [10, 20, 20, 8]

  # add bianping layer, 3200 = 20 * 20 * 8
  model.add(Flatten()) # [10, 3200]

  # add first full connection layer
  model.add(Dense(512, activation='sigmoid')) # [10, 512]

  # add dropout layer
  model.add(Dropout(0.5))

  # add second full connection layer
  model.add(Dense(4, activation='softmax')) # [10, 4]

  return model
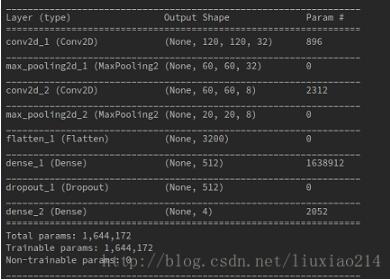
可以看到定义模型时输出的网络结构。
2、准备数据
def load_data(resultpath):
  datapath = os.path.join(resultpath, "data10_4.npz")
  if os.path.exists(datapath):
    data = np.load(datapath)
    X, Y = data["X"], data["Y"]
  else:
    X = np.array(np.arange(432000)).reshape(10, 120, 120, 3)
    Y = [0, 0, 1, 1, 2, 2, 3, 3, 2, 0]
    X = X.astype('float32')
    Y = np_utils.to_categorical(Y, 4)
    np.savez(datapath, X=X, Y=Y)
    print('Saved dataset to dataset.npz.')
  print('X_shape:{}\nY_shape:{}'.format(X.shape, Y.shape))
  return X, Y

3、训练模型
def train_model(resultpath):
  model = define_model()

  # if want to use SGD, first define sgd, then set optimizer=sgd
  sgd = SGD(lr=0.001, decay=1e-6, momentum=0, nesterov=True)

  # select loss\optimizer\
  model.compile(loss=categorical_crossentropy,
         optimizer=Adam(), metrics=['accuracy'])
  model.summary()

  # draw the model structure
  plot_model(model, show_shapes=True,
        to_file=os.path.join(resultpath, 'model.png'))

  # load data
  X, Y = load_data(resultpath)

  # split train and test data
  X_train, X_test, Y_train, Y_test = train_test_split(
    X, Y, test_size=0.2, random_state=2)

  # input data to model and train
  history = model.fit(X_train, Y_train, batch_size=2, epochs=10,
            validation_data=(X_test, Y_test), verbose=1, shuffle=True)

  # evaluate the model
  loss, acc = model.evaluate(X_test, Y_test, verbose=0)
  print('Test loss:', loss)
  print('Test accuracy:', acc)
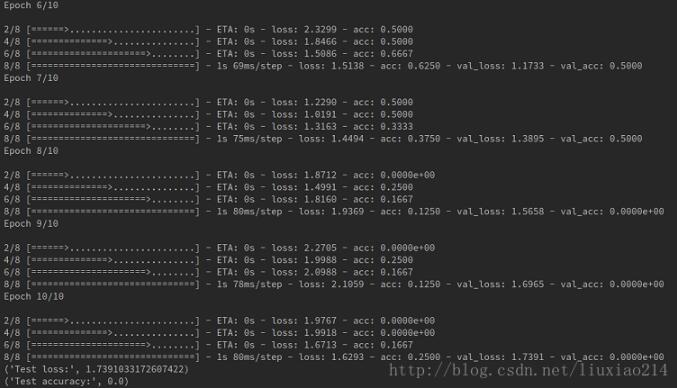
可以看到训练时输出的日志。因为是随机数据,没有意义,这里训练的结果不必计较,只是练习而已。
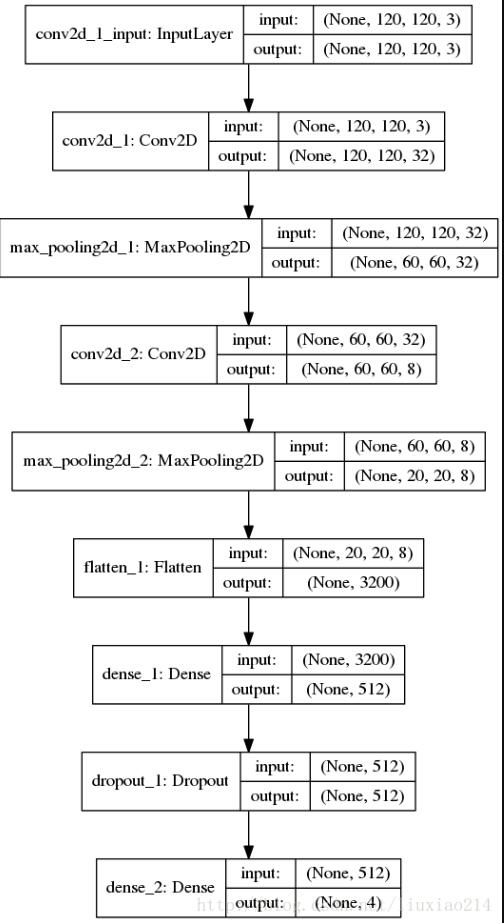
保存下来的模型结构:
4、保存与加载模型并测试
有两种保存方式
4.1 直接保存模型h5
保存:
def my_save_model(resultpath):

  model = train_model(resultpath)

  # the first way to save model
  model.save(os.path.join(resultpath, 'my_model.h5'))
加载:
def my_load_model(resultpath):

  # test data
  X = np.array(np.arange(86400)).reshape(2, 120, 120, 3)
  Y = [0, 1]
  X = X.astype('float32')
  Y = np_utils.to_categorical(Y, 4)

  # the first way of load model
  model2 = load_model(os.path.join(resultpath, 'my_model.h5'))
  model2.compile(loss=categorical_crossentropy,
         optimizer=Adam(), metrics=['accuracy'])

  test_loss, test_acc = model2.evaluate(X, Y, verbose=0)
  print('Test loss:', test_loss)
  print('Test accuracy:', test_acc)

  y = model2.predict_classes(X)
  print("predicct is: ", y)
4.2 分别保存网络结构和权重
保存:
def my_save_model(resultpath):

  model = train_model(resultpath)

  # the secon way : save trained network structure and weights
  model_json = model.to_json()
  open(os.path.join(resultpath, 'my_model_structure.json'), 'w').write(model_json)
  model.save_weights(os.path.join(resultpath, 'my_model_weights.hd5'))
加载:
def my_load_model(resultpath):

  # test data
  X = np.array(np.arange(86400)).reshape(2, 120, 120, 3)
  Y = [0, 1]
  X = X.astype('float32')
  Y = np_utils.to_categorical(Y, 4)

  # the second way : load model structure and weights
  model = model_from_json(open(os.path.join(resultpath, 'my_model_structure.json')).read())
  model.load_weights(os.path.join(resultpath, 'my_model_weights.hd5'))
  model.compile(loss=categorical_crossentropy,
         optimizer=Adam(), metrics=['accuracy'])

  test_loss, test_acc = model.evaluate(X, Y, verbose=0)
  print('Test loss:', test_loss)
  print('Test accuracy:', test_acc)

  y = model.predict_classes(X)
  print("predicct is: ", y)

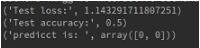
可以看到,两次的结果是一样的。
5、完整代码
from keras.models import Sequential
from keras.layers import Dense, Conv2D, MaxPooling2D, Flatten, Dropout
from keras.losses import categorical_crossentropy
from keras.optimizers import Adam
from keras.utils.vis_utils import plot_model
from keras.optimizers import SGD
from keras.models import model_from_json
from keras.models import load_model
from keras.utils import np_utils
import numpy as np
import os
from sklearn.model_selection import train_test_split

def load_data(resultpath):
  datapath = os.path.join(resultpath, "data10_4.npz")
  if os.path.exists(datapath):
    data = np.load(datapath)
    X, Y = data["X"], data["Y"]
  else:
    X = np.array(np.arange(432000)).reshape(10, 120, 120, 3)
    Y = [0, 0, 1, 1, 2, 2, 3, 3, 2, 0]
    X = X.astype('float32')
    Y = np_utils.to_categorical(Y, 4)
    np.savez(datapath, X=X, Y=Y)
    print('Saved dataset to dataset.npz.')
  print('X_shape:{}\nY_shape:{}'.format(X.shape, Y.shape))
  return X, Y

def define_model():
  model = Sequential()

  # setup first conv layer
  model.add(Conv2D(32, (3, 3), activation="relu",
           input_shape=(120, 120, 3), padding='same')) # [10, 120, 120, 32]

  # setup first maxpooling layer
  model.add(MaxPooling2D(pool_size=(2, 2))) # [10, 60, 60, 32]

  # setup second conv layer
  model.add(Conv2D(8, kernel_size=(3, 3), activation="relu",
           padding='same')) # [10, 60, 60, 8]

  # setup second maxpooling layer
  model.add(MaxPooling2D(pool_size=(3, 3))) # [10, 20, 20, 8]

  # add bianping layer, 3200 = 20 * 20 * 8
  model.add(Flatten()) # [10, 3200]

  # add first full connection layer
  model.add(Dense(512, activation='sigmoid')) # [10, 512]

  # add dropout layer
  model.add(Dropout(0.5))

  # add second full connection layer
  model.add(Dense(4, activation='softmax')) # [10, 4]

  return model

def train_model(resultpath):
  model = define_model()

  # if want to use SGD, first define sgd, then set optimizer=sgd
  sgd = SGD(lr=0.001, decay=1e-6, momentum=0, nesterov=True)

  # select loss\optimizer\
  model.compile(loss=categorical_crossentropy,
         optimizer=Adam(), metrics=['accuracy'])
  model.summary()

  # draw the model structure
  plot_model(model, show_shapes=True,
        to_file=os.path.join(resultpath, 'model.png'))

  # load data
  X, Y = load_data(resultpath)

  # split train and test data
  X_train, X_test, Y_train, Y_test = train_test_split(
    X, Y, test_size=0.2, random_state=2)

  # input data to model and train
  history = model.fit(X_train, Y_train, batch_size=2, epochs=10,
            validation_data=(X_test, Y_test), verbose=1, shuffle=True)

  # evaluate the model
  loss, acc = model.evaluate(X_test, Y_test, verbose=0)
  print('Test loss:', loss)
  print('Test accuracy:', acc)

  return model

def my_save_model(resultpath):

  model = train_model(resultpath)

  # the first way to save model
  model.save(os.path.join(resultpath, 'my_model.h5'))

  # the secon way : save trained network structure and weights
  model_json = model.to_json()
  open(os.path.join(resultpath, 'my_model_structure.json'), 'w').write(model_json)
  model.save_weights(os.path.join(resultpath, 'my_model_weights.hd5'))

def my_load_model(resultpath):

  # test data
  X = np.array(np.arange(86400)).reshape(2, 120, 120, 3)
  Y = [0, 1]
  X = X.astype('float32')
  Y = np_utils.to_categorical(Y, 4)

  # the first way of load model
  model2 = load_model(os.path.join(resultpath, 'my_model.h5'))
  model2.compile(loss=categorical_crossentropy,
          optimizer=Adam(), metrics=['accuracy'])

  test_loss, test_acc = model2.evaluate(X, Y, verbose=0)
  print('Test loss:', test_loss)
  print('Test accuracy:', test_acc)

  y = model2.predict_classes(X)
  print("predicct is: ", y)

  # the second way : load model structure and weights
  model = model_from_json(open(os.path.join(resultpath, 'my_model_structure.json')).read())
  model.load_weights(os.path.join(resultpath, 'my_model_weights.hd5'))
  model.compile(loss=categorical_crossentropy,
         optimizer=Adam(), metrics=['accuracy'])

  test_loss, test_acc = model.evaluate(X, Y, verbose=0)
  print('Test loss:', test_loss)
  print('Test accuracy:', test_acc)

  y = model.predict_classes(X)
  print("predicct is: ", y)

def main():
  resultpath = "result"
  #train_model(resultpath)
  #my_save_model(resultpath)
  my_load_model(resultpath)


if __name__ == "__main__":
  main()
以上这篇使用Keras建立模型并训练等一系列操作方式就是小编分享给大家的全部内容了,希望能给大家一个参考,也希望大家多多支持脚本之家。


