
python各类经纬度转换,具体代码如下所示:
import math
import urllib
import json
x_pi = 3.14159265358979324 * 3000.0 / 180.0
pi = 3.1415926535897932384626 # π
a = 6378245.0 # 长半轴
ee = 0.00669342162296594323 # 扁率
class Geocoding:
  def __init__(self, api_key):
    self.api_key = api_key
  def geocode(self, address):
    """
    利用高德geocoding服务解析地址获取位置坐标
    :param address:需要解析的地址
    :return:
    """
    geocoding = {'s': 'rsv3',
           'key': self.api_key,
           'city': '全国',
           'address': address}
    geocoding = urllib.urlencode(geocoding)
    ret = urllib.urlopen("%s?%s" % ("http://restapi.amap.com/v3/geocode/geo", geocoding))
    if ret.getcode() == 200:
      res = ret.read()
      json_obj = json.loads(res)
      if json_obj['status'] == '1' and int(json_obj['count']) >= 1:
        geocodes = json_obj['geocodes'][0]
        lng = float(geocodes.get('location').split(',')[0])
        lat = float(geocodes.get('location').split(',')[1])
        return [lng, lat]
      else:
        return None
    else:
      return None
def gcj02_to_bd09(lng, lat):
  """
  火星坐标系(GCJ-02)转百度坐标系(BD-09)
  谷歌、高德——>百度
  :param lng:火星坐标经度
  :param lat:火星坐标纬度
  :return:
  """
  z = math.sqrt(lng * lng + lat * lat) + 0.00002 * math.sin(lat * x_pi)
  theta = math.atan2(lat, lng) + 0.000003 * math.cos(lng * x_pi)
  bd_lng = z * math.cos(theta) + 0.0065
  bd_lat = z * math.sin(theta) + 0.006
  return [bd_lng, bd_lat]
def bd09_to_gcj02(bd_lon, bd_lat):
  """
  百度坐标系(BD-09)转火星坐标系(GCJ-02)
  百度——>谷歌、高德
  :param bd_lat:百度坐标纬度
  :param bd_lon:百度坐标经度
  :return:转换后的坐标列表形式
  """
  x = bd_lon - 0.0065
  y = bd_lat - 0.006
  z = math.sqrt(x * x + y * y) - 0.00002 * math.sin(y * x_pi)
  theta = math.atan2(y, x) - 0.000003 * math.cos(x * x_pi)
  gg_lng = z * math.cos(theta)
  gg_lat = z * math.sin(theta)
  return [gg_lng, gg_lat]
def wgs84_to_gcj02(lng, lat):
  """
  WGS84转GCJ02(火星坐标系)
  :param lng:WGS84坐标系的经度
  :param lat:WGS84坐标系的纬度
  :return:
  """
  if out_of_china(lng, lat): # 判断是否在国内
    return lng, lat
  dlat = _transformlat(lng - 105.0, lat - 35.0)
  dlng = _transformlng(lng - 105.0, lat - 35.0)
  radlat = lat / 180.0 * pi
  magic = math.sin(radlat)
  magic = 1 - ee * magic * magic
  sqrtmagic = math.sqrt(magic)
  dlat = (dlat * 180.0) / ((a * (1 - ee)) / (magic * sqrtmagic) * pi)
  dlng = (dlng * 180.0) / (a / sqrtmagic * math.cos(radlat) * pi)
  mglat = lat + dlat
  mglng = lng + dlng
  return [mglng, mglat]
def gcj02_to_wgs84(lng, lat):
  """
  GCJ02(火星坐标系)转GPS84
  :param lng:火星坐标系的经度
  :param lat:火星坐标系纬度
  :return:
  """
  if out_of_china(lng, lat):
    return lng, lat
  dlat = _transformlat(lng - 105.0, lat - 35.0)
  dlng = _transformlng(lng - 105.0, lat - 35.0)
  radlat = lat / 180.0 * pi
  magic = math.sin(radlat)
  magic = 1 - ee * magic * magic
  sqrtmagic = math.sqrt(magic)
  dlat = (dlat * 180.0) / ((a * (1 - ee)) / (magic * sqrtmagic) * pi)
  dlng = (dlng * 180.0) / (a / sqrtmagic * math.cos(radlat) * pi)
  mglat = lat + dlat
  mglng = lng + dlng
  return [lng * 2 - mglng, lat * 2 - mglat]
def bd09_to_wgs84(bd_lon, bd_lat):
  lon, lat = bd09_to_gcj02(bd_lon, bd_lat)
  return gcj02_to_wgs84(lon, lat)
def wgs84_to_bd09(lon, lat):
  lon, lat = wgs84_to_gcj02(lon, lat)
  return gcj02_to_bd09(lon, lat)
def _transformlat(lng, lat):
  ret = -100.0 + 2.0 * lng + 3.0 * lat + 0.2 * lat * lat + \
     0.1 * lng * lat + 0.2 * math.sqrt(math.fabs(lng))
  ret += (20.0 * math.sin(6.0 * lng * pi) + 20.0 *
      math.sin(2.0 * lng * pi)) * 2.0 / 3.0
  ret += (20.0 * math.sin(lat * pi) + 40.0 *
      math.sin(lat / 3.0 * pi)) * 2.0 / 3.0
  ret += (160.0 * math.sin(lat / 12.0 * pi) + 320 *
      math.sin(lat * pi / 30.0)) * 2.0 / 3.0
  return ret
def _transformlng(lng, lat):
  ret = 300.0 + lng + 2.0 * lat + 0.1 * lng * lng + \
     0.1 * lng * lat + 0.1 * math.sqrt(math.fabs(lng))
  ret += (20.0 * math.sin(6.0 * lng * pi) + 20.0 *
      math.sin(2.0 * lng * pi)) * 2.0 / 3.0
  ret += (20.0 * math.sin(lng * pi) + 40.0 *
      math.sin(lng / 3.0 * pi)) * 2.0 / 3.0
  ret += (150.0 * math.sin(lng / 12.0 * pi) + 300.0 *
      math.sin(lng / 30.0 * pi)) * 2.0 / 3.0
  return ret
def out_of_china(lng, lat):
  """
  判断是否在国内,不在国内不做偏移
  :param lng:
  :param lat:
  :return:
  """
  return not (73.66 < lng < 135.05 and lat > 3.86 and lat < 53.55)
def baidu_to_google(lng, lat):
  result5 = bd09_to_wgs84(float(lng), float(lat))
  return result5
def google_to_baidu(lng, lat):
  result5 = wgs84_to_bd09(float(lng), float(lat))
  return result5
知识点扩展:Python设置matplotlib.plot的坐标轴刻度间隔及刻度范围
一、用默认设置绘制折线图
import matplotlib.pyplot as plt
x_values=list(range(11))
#x轴的数字是0到10这11个整数
y_values=[x**2 for x in x_values]
#y轴的数字是x轴数字的平方
plt.plot(x_values,y_values,c='green')
#用plot函数绘制折线图,线条颜色设置为绿色
plt.title('Squares',fontsize=24)
#设置图表标题和标题字号
plt.tick_params(axis='both',which='major',labelsize=14)
#设置刻度的字号
plt.xlabel('Numbers',fontsize=14)
#设置x轴标签及其字号
plt.ylabel('Squares',fontsize=14)
#设置y轴标签及其字号
plt.show()
#显示图表
这样制作出的图表如下图所示:
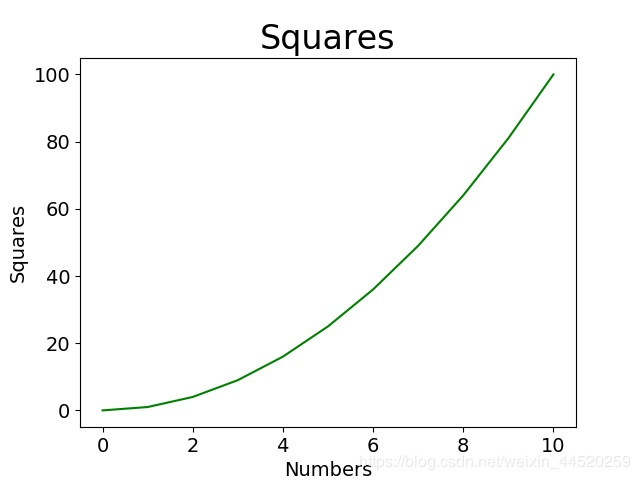
我们希望x轴的刻度是0,1,2,3,4……,y轴的刻度是0,10,20,30……,并且希望两个坐标轴的范围都能再大一点,所以我们需要手动设置。
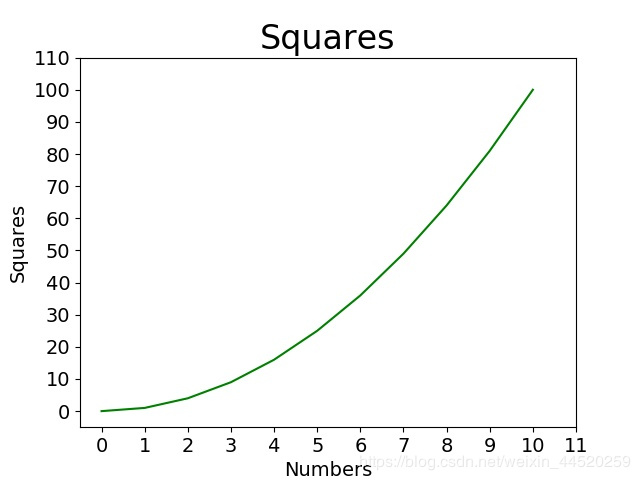
二、手动设置坐标轴刻度间隔以及刻度范围
import matplotlib.pyplot as plt
from matplotlib.pyplot import MultipleLocator
#从pyplot导入MultipleLocator类,这个类用于设置刻度间隔
x_values=list(range(11))
y_values=[x**2 for x in x_values]
plt.plot(x_values,y_values,c='green')
plt.title('Squares',fontsize=24)
plt.tick_params(axis='both',which='major',labelsize=14)
plt.xlabel('Numbers',fontsize=14)
plt.ylabel('Squares',fontsize=14)
x_major_locator=MultipleLocator(1)
#把x轴的刻度间隔设置为1,并存在变量里
y_major_locator=MultipleLocator(10)
#把y轴的刻度间隔设置为10,并存在变量里
ax=plt.gca()
#ax为两条坐标轴的实例
ax.xaxis.set_major_locator(x_major_locator)
#把x轴的主刻度设置为1的倍数
ax.yaxis.set_major_locator(y_major_locator)
#把y轴的主刻度设置为10的倍数
plt.xlim(-0.5,11)
#把x轴的刻度范围设置为-0.5到11,因为0.5不满一个刻度间隔,所以数字不会显示出来,但是能看到一点空白
plt.ylim(-5,110)
#把y轴的刻度范围设置为-5到110,同理,-5不会标出来,但是能看到一点空白
plt.show()
绘制的结果如图所示:
以上所述是小编给大家介绍的Python设置matplotlib.plot的坐标轴刻度间隔及刻度范围,希望对大家有所帮助,如果大家有任何疑问请给我留言,小编会及时回复大家的。在此也非常感谢大家对脚本之家网站的支持!
如果你觉得本文对你有帮助,欢迎转载,烦请注明出处,谢谢!


