
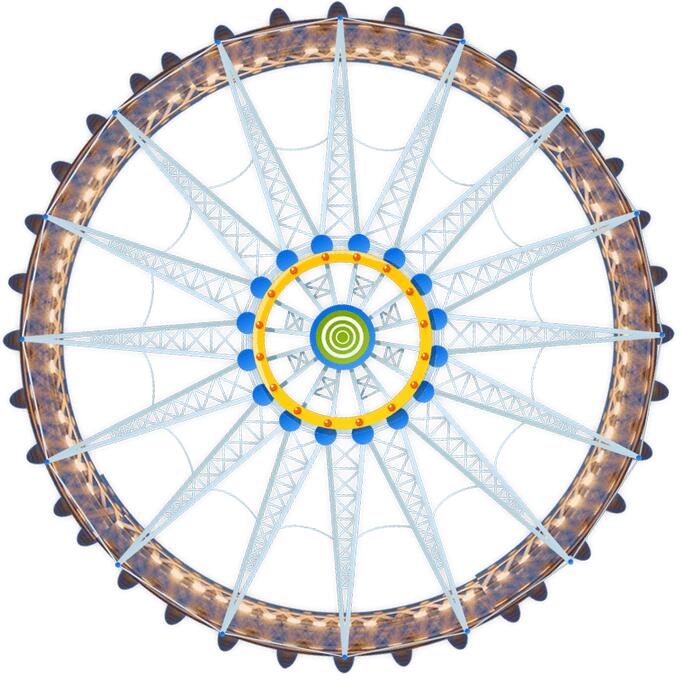
先看效果图:

由于上传的大小原因,只能录制成这种效果,原图是无限循环的转圈。
代码:
<span style="font-size:18px;"><!DOCTYPE html>
<html>
<head>
    <meta charset="utf-8" />
    <title>模拟摩天轮动画</title>
    <style>
    *{margin:0;padding:0;}
    .image{width:80px;height:80px;}
    .image1{width:620px;height:620px;}
    .div1{position:relative;margin:10px auto;width:638px;
            animation:run 20s linear infinite;
            -webkit-animation:run 20s linear infinite;
            -moz-animation:run 20s linear infinite;
            -o-animation:run 20s linear infinite;
        }
    img:nth-child(2){
            position:absolute;top:25px;left:270px;opacity:0.7;
            animation:run2 20s linear infinite;
            -webkit-animation:run2 20s linear infinite;
            -moz-animation:run2 20s linear infinite;
            -o-animation:run2 20s linear infinite;
            transform-origin:top center;
            -webkit-transform-origin:top center;
            -moz-transform-origin:top center;
            -o-transform-origin:top center;
        }
        img:nth-child(3){
            position:absolute;top:580px;left:270px;opacity:0.7;
            animation:run2 20s linear infinite;
            -webkit-animation:run2 20s linear infinite;
            -moz-animation:run2 20s linear infinite;
            -o-animation:run2 20s linear infinite;
            transform-origin:top center;
            -webkit-transform-origin:top center;
            -moz-transform-origin:top center;
            -o-transform-origin:top center;
        }
        img:nth-child(4){
            position:absolute;top:300px;left:550px;opacity:0.7;
            animation:run2 20s linear infinite;
            -webkit-animation:run2 20s linear infinite;
            -moz-animation:run2 20s linear infinite;
            -o-animation:run2 20s linear infinite;
            transform-origin:top center;
            -webkit-transform-origin:top center;
            -moz-transform-origin:top center;
            -o-transform-origin:top center;
        }
        img:nth-child(5){
            position:absolute;top:300px;left:0px;opacity:0.7;
            animation:run2 20s linear infinite;
            -webkit-animation:run2 20s linear infinite;
            -moz-animation:run2 20s linear infinite;
            -o-animation:run2 20s linear infinite;
            transform-origin:top center;
            -webkit-transform-origin:top center;
            -moz-transform-origin:top center;
            -o-transform-origin:top center;
        }
        @keyframes run
        {
            0%{transform:rotate(0deg)}
            100%{transform:rotate(360deg)}
        }
        @-webkit-keyframes run
        {
            0%{-webkit-transform:rotate(0deg)}
            100%{-webkit-transform:rotate(360deg)}
        }
        @-moz-keyframes run
        {
            0%{-moz-transform:rotate(0deg)}
            100%{-moz-transform:rotate(360deg)}
        }
        @-o-keyframes run
        {
            0%{-o-transform:rotate(0deg)}
            100%{-o-transform:rotate(360deg)}
        }

        @keyframes run2
        {
            0%{transform:rotate(0deg)}
            100%{transform:rotate(-360deg)}
        }
        @-webkit-keyframes run2
        {
            0%{-webkit-transform:rotate(0deg)}
            100%{-webkit-transform:rotate(-360deg)}
        }
        @-moz-keyframes run2
        {
            0%{-moz-transform:rotate(0deg)}
            100%{-moz-transform:rotate(-360deg)}
        }
        @-o-keyframes run2
        {
            0%{-o-transform:rotate(0deg)}
            100%{-o-transform:rotate(-360deg)}
        }
    </style>
</head>
<body>
    <div class="div1">
        <img src="1.png" class="image1">
        <img src="1.jpg" class="image">
        <img src="2.jpg" class="image">
        <img src="3.jpg" class="image">
        <img src="4.jpg" class="image">

    </div>
</body>
</html></span>
摩天轮原图:
注释:transform-origin 属性允许您改变被转换元素的位置。
这个属性主要的作用就是选择一个位置,然后绕着这个位置旋转。
以上就是本文的全部内容,希望对大家的学习有所帮助,也希望大家多多支持脚本之家。


