前提条件和预期结果
目前只有少数的浏览器支持 WebGL ,请看我的另外一篇文章:Can I use WebGL?.
下面的例子是在 Windows 下的 Chrome 16/23 以及 Android 下的 Firefox 17 进行测试。如果你使用的是非兼容浏览器访问则会弹出一个警告。
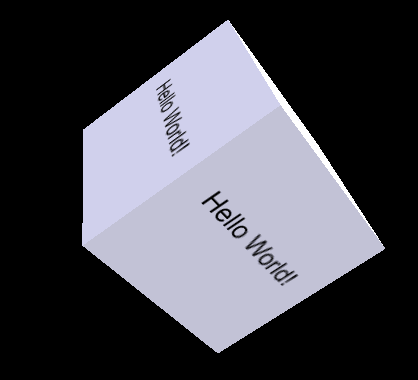
图1:包含 Hello world 文本的动画的 WebGL 立方体
在兼容 HTML5 的浏览器上,你将会看到如下图所示的带动画效果的立方体:

图2: 示例运行的屏幕截图
该代码基于 Lighting in WebGL - How to simulate lighting effects in your WebGL context - 非常感谢这篇教程。在该实例初始运行时,动画的立方体是通过一个静态的 Bitmap 图形对象渲染的。
下面的代码演示如何在程序中动态的渲染文本:
XML/HTML Code复制内容到剪贴板
- // TODO #1 New method to create a texture
- function createCubeTexture(text) {
- ...
- }
在这里使用 gl.pixelStorei(gl.UNPACK_FLIP_Y_WEBGL, true); 是非常重要的,用来确保写文本时不会前后颠倒。剩下的就很容易理解了:
XML/HTML Code复制内容到剪贴板
- // TODO #2 Assign the created texture for display
- cubeTexture = createCubeTexture("Hello World!");
源码
// File #1: webgl-demo.htm
XML/HTML Code复制内容到剪贴板
- <html>
- <head>
- <title>WebGL - Hello World!</title>
- <meta http-equiv="Content-Type" content="text/html; charset=utf-8">
- <script src="sylvester.js" type="text/javascript"></script>
- <script src="glUtils.js" type="text/javascript"></script>
- <script src="webgl-demo.js" type="text/javascript"></script>
-
-
- <script id="shader-fs" type="x-shader/x-fragment">
- varying highp vec2 vTextureCoord;
- varying highp vec3 vLighting;
-
- uniform sampler2D uSampler;
-
- void main(void) {
- highp vec4 texelColor = texture2D(uSampler, vec2(vTextureCoord.s, vTextureCoord.t));
-
- gl_FragColor = vec4(texelColor.rgb * vLighting, texelColor.a);
- }
- </script>
-
-
- <script id="shader-vs" type="x-shader/x-vertex">
- attribute highp vec3 aVertexNormal;
- attribute highp vec3 aVertexPosition;
- attribute highp vec2 aTextureCoord;
-
- uniform highp mat4 uNormalMatrix;
- uniform highp mat4 uMVMatrix;
- uniform highp mat4 uPMatrix;
-
- varying highp vec2 vTextureCoord;
- varying highp vec3 vLighting;
-
- void main(void) {
- gl_Position = uPMatrix * uMVMatrix * vec4(aVertexPosition, 1.0);
- vTextureCoord = aTextureCoord;
-
- // Apply lighting effect
-
- highp vec3 ambientLight = vec3(0.6, 0.6, 0.6);
- highp vec3 directionalLightColor = vec3(0.5, 0.5, 0.75);
- highp vec3 directionalVector = vec3(0.85, 0.8, 0.75);
- highp vec4 transformedNormal = uNormalMatrix * vec4(aVertexNormal, 1.0);
-
- highp float directional = max(dot(transformedNormal.xyz, directionalVector), 0.0);
- vLighting = ambientLight + (directionalLightColor * directional);
- }
- </script>
- </head>
-
- <body onload="start()">
- <canvas id="glcanvas" width="640" height="480">
- Your browser doesn't appear to support the HTML5 <code><canvas></code> element.
- </canvas>
- </body>
- </html>
// File #02: webgl-demo.js
XML/HTML Code复制内容到剪贴板
- var canvas;
- var gl;
-
- var cubeVerticesBuffer;
- var cubeVerticesTextureCoordBuffer;
- var cubeVerticesIndexBuffer;
- var cubeVerticesIndexBuffer;
- var cubeRotation = 0.0;
- var lastCubeUpdateTime = 0;
-
- var cubeImage;
- var cubeTexture;
-
- var mvMatrix;
- var shaderProgram;
- var vertexPositionAttribute;
- var vertexNormalAttribute;
- var textureCoordAttribute;
- var perspectiveMatrix;
-
- //
- // start
- //
- // Called when the canvas is created to get the ball rolling.
- //
- function start() {
- canvas = document.getElementById("glcanvas");
-
- initWebGL(canvas); // Initialize the GL context
-
- // Only continue if WebGL is available and working
-
- if (gl) {
- gl.clearColor(0.0, 0.0, 0.0, 1.0); // Clear to black, fully opaque
- gl.clearDepth(1.0); // Clear everything
- gl.enable(gl.DEPTH_TEST); // Enable depth testing
- gl.depthFunc(gl.LEQUAL); // Near things obscure far things
-
- // Initialize the shaders; this is where all the lighting for the
- // vertices and so forth is established.
-
- initShaders();
-
- // Here's where we call the routine that builds all the objects
- // we'll be drawing.
-
- initBuffers();
-
- // Next, load and set up the textures we'll be using.
-
- // TODO#2 Start
- cubeTexture = createCubeTexture("Hello World!");
- // TODO#2 End
-
- // Set up to draw the scene periodically.
-
- setInterval(drawScene, 15);
- }
- }
-
- //
- // initWebGL
- //
- // Initialize WebGL, returning the GL context or null if
- // WebGL isn't available or could not be initialized.
- //
- function initWebGL() {
- gl = null;
-
- try {
- gl = canvas.getContext("experimental-webgl");
- }
- catch(e) {
- }
-
- // If we don't have a GL context, give up now
-
- if (!gl) {
- alert("Unable to initialize WebGL. Your browser may not support it.");
- }
- }
-
- //
- // initBuffers
- //
- // Initialize the buffers we'll need. For this demo, we just have
- // one object -- a simple two-dimensional cube.
- //
- function initBuffers() {
-
- // Create a buffer for the cube's vertices.
-
- cubeVerticesBuffer = gl.createBuffer();
-
- // Select the cubeVerticesBuffer as the one to apply vertex
- // operations to from here out.
-
- gl.bindBuffer(gl.ARRAY_BUFFER, cubeVerticesBuffer);
-
- // Now create an array of vertices for the cube.
-
- var vertices = [
- // Front face
- -1.0, -1.0, 1.0,
- 1.0, -1.0, 1.0,
- 1.0, 1.0, 1.0,
- -1.0, 1.0, 1.0,
-
- // Back face
- -1.0, -1.0, -1.0,
- -1.0, 1.0, -1.0,
- 1.0, 1.0, -1.0,
- 1.0, -1.0, -1.0,
-
- // Top face
- -1.0, 1.0, -1.0,
- -1.0, 1.0, 1.0,
- 1.0, 1.0, 1.0,
- 1.0, 1.0, -1.0,
-
- // Bottom face
- -1.0, -1.0, -1.0,
- 1.0, -1.0, -1.0,
- 1.0, -1.0, 1.0,
- -1.0, -1.0, 1.0,
-
- // Right face
- 1.0, -1.0, -1.0,
- 1.0, 1.0, -1.0,
- 1.0, 1.0, 1.0,
- 1.0, -1.0, 1.0,
-
- // Left face
- -1.0, -1.0, -1.0,
- -1.0, -1.0, 1.0,
- -1.0, 1.0, 1.0,
- -1.0, 1.0, -1.0
- ];
-
- // Now pass the list of vertices into WebGL to build the shape. We
- // do this by creating a Float32Array from the JavaScript array,
- // then use it to fill the current vertex buffer.
-
- gl.bufferData(gl.ARRAY_BUFFER, new Float32Array(vertices), gl.STATIC_DRAW);
-
- // Set up the normals for the vertices, so that we can compute lighting.
-
- cubeVerticesNormalBuffer = gl.createBuffer();
- gl.bindBuffer(gl.ARRAY_BUFFER, cubeVerticesNormalBuffer);
-
- var vertexNormals = [
- // Front
- 0.0, 0.0, 1.0,
- 0.0, 0.0, 1.0,
- 0.0, 0.0, 1.0,
- 0.0, 0.0, 1.0,
-
- // Back
- 0.0, 0.0, -1.0,
- 0.0, 0.0, -1.0,
- 0.0, 0.0, -1.0,
- 0.0, 0.0, -1.0,
-
- // Top
- 0.0, 1.0, 0.0,
- 0.0, 1.0, 0.0,
- 0.0, 1.0, 0.0,
- 0.0, 1.0, 0.0,
-
- // Bottom
- 0.0, -1.0, 0.0,
- 0.0, -1.0, 0.0,
- 0.0, -1.0, 0.0,
- 0.0, -1.0, 0.0,
-
- // Right
- 1.0, 0.0, 0.0,
- 1.0, 0.0, 0.0,
- 1.0, 0.0, 0.0,
- 1.0, 0.0, 0.0,
-
- // Left
- -1.0, 0.0, 0.0,
- -1.0, 0.0, 0.0,
- -1.0, 0.0, 0.0,
- -1.0, 0.0, 0.0
- ];
-
- gl.bufferData(gl.ARRAY_BUFFER, new Float32Array(vertexNormals),
- gl.STATIC_DRAW);
-
- // Map the texture onto the cube's faces.
-
- cubeVerticesTextureCoordBuffer = gl.createBuffer();
- gl.bindBuffer(gl.ARRAY_BUFFER, cubeVerticesTextureCoordBuffer);
-
- var textureCoordinates = [
- // Front
- 0.0, 0.0,
- 1.0, 0.0,
- 1.0, 1.0,
- 0.0, 1.0,
- // Back
- 0.0, 0.0,
- 1.0, 0.0,
- 1.0, 1.0,
- 0.0, 1.0,
- // Top
- 0.0, 0.0,
- 1.0, 0.0,
- 1.0, 1.0,
- 0.0, 1.0,
- // Bottom
- 0.0, 0.0,
- 1.0, 0.0,
- 1.0, 1.0,
- 0.0, 1.0,
- // Right
- 0.0, 0.0,
- 1.0, 0.0,
- 1.0, 1.0,
- 0.0, 1.0,
- // Left
- 0.0, 0.0,
- 1.0, 0.0,
- 1.0, 1.0,
- 0.0, 1.0
- ];
-
- gl.bufferData(gl.ARRAY_BUFFER, new Float32Array(textureCoordinates),
- gl.STATIC_DRAW);
-
- // Build the element array buffer; this specifies the indices
- // into the vertex array for each face's vertices.
-
- cubeVerticesIndexBuffer = gl.createBuffer();
- gl.bindBuffer(gl.ELEMENT_ARRAY_BUFFER, cubeVerticesIndexBuffer);
-
- // This array defines each face as two triangles, using the
- // indices into the vertex array to specify each triangle's
- // position.
-
- var cubeVertexIndices = [
- 0, 1, 2, 0, 2, 3, // front
- 4, 5, 6, 4, 6, 7, // back
- 8, 9, 10, 8, 10, 11, // top
- 12, 13, 14, 12, 14, 15, // bottom
- 16, 17, 18, 16, 18, 19, // right
- 20, 21, 22, 20, 22, 23 // left
- ]
-
- // Now send the element array to GL
-
- gl.bufferData(gl.ELEMENT_ARRAY_BUFFER,
- new Uint16Array(cubeVertexIndices), gl.STATIC_DRAW);
- }
-
- //
- // initTextures
- //
- // Initialize the textures we'll be using, then initiate a load of
- // the texture images. The handleTextureLoaded() callback will finish
- // the job; it gets called each time a texture finishes loading.
- //
- // TODO#1 Start
- function createCubeTexture(text) {
-
- // create a hidden canvas to draw the texture
- var canvas = document.createElement('canvas');
- canvas.id = "hiddenCanvas";
- canvas.width = 512;
- canvas.height = 512;
- canvas.style.display = "none";
- var body = document.getElementsByTagName("body")[0];
- body.appendChild(canvas);
-
- // draw texture
- var cubeImage = document.getElementById('hiddenCanvas');
- var ctx = cubeImage.getContext('2d');
- ctx.beginPath();
- ctx.rect(0, 0, ctx.canvas.width, ctx.canvas.height);
- ctx.fillStyle = 'white';
- ctx.fill();
- ctx.fillStyle = 'black';
- ctx.font = "65px Arial";
- ctx.textAlign = 'center';
- ctx.fillText(text, ctx.canvas.width / 2, ctx.canvas.height / 2);
- ctx.restore();
-
- // create new texture
- var texture = gl.createTexture();
- gl.bindTexture(gl.TEXTURE_2D, texture);
- gl.texParameteri(gl.TEXTURE_2D, gl.TEXTURE_MAG_FILTER, gl.LINEAR);
- gl.texParameteri(gl.TEXTURE_2D, gl.TEXTURE_MIN_FILTER, gl.LINEAR_MIPMAP_NEAREST);
- gl.pixelStorei(gl.UNPACK_FLIP_Y_WEBGL, true);
- handleTextureLoaded(cubeImage, texture)
-
- return texture;
- }
- // TODO#1 End
-
- function handleTextureLoaded(image, texture) {
- gl.bindTexture(gl.TEXTURE_2D, texture);
- gl.texImage2D(gl.TEXTURE_2D, 0, gl.RGBA, gl.RGBA, gl.UNSIGNED_BYTE, image);
- gl.texParameteri(gl.TEXTURE_2D, gl.TEXTURE_MAG_FILTER, gl.LINEAR);
- gl.texParameteri(gl.TEXTURE_2D, gl.TEXTURE_MIN_FILTER, gl.LINEAR_MIPMAP_NEAREST);
- gl.generateMipmap(gl.TEXTURE_2D);
- gl.bindTexture(gl.TEXTURE_2D, null);
- }
-
- //
- // drawScene
- //
- // Draw the scene.
- //
- function drawScene() {
- // Clear the canvas before we start drawing on it.
-
- gl.clear(gl.COLOR_BUFFER_BIT | gl.DEPTH_BUFFER_BIT);
-
- // Establish the perspective with which we want to view the
- // scene. Our field of view is 45 degrees, with a width/height
- // ratio of 640:480, and we only want to see objects between 0.1 units
- // and 100 units away from the camera.
-
- perspectiveMatrix = makePerspective(45, 640.0/480.0, 0.1, 100.0);
-
- // Set the drawing position to the "identity" point, which is
- // the center of the scene.
-
- loadIdentity();
-
- // Now move the drawing position a bit to where we want to start
- // drawing the cube.
-
- mvTranslate([0.0, 0.0, -6.0]);
-
- // Save the current matrix, then rotate before we draw.
-
- mvPushMatrix();
- mvRotate(cubeRotation, [1, 0, 1]);
-
- // Draw the cube by binding the array buffer to the cube's vertices
- // array, setting attributes, and pushing it to GL.
-
- gl.bindBuffer(gl.ARRAY_BUFFER, cubeVerticesBuffer);
- gl.vertexAttribPointer(vertexPositionAttribute, 3, gl.FLOAT, false, 0, 0);
-
- // Set the texture coordinates attribute for the vertices.
-
- gl.bindBuffer(gl.ARRAY_BUFFER, cubeVerticesTextureCoordBuffer);
- gl.vertexAttribPointer(textureCoordAttribute, 2, gl.FLOAT, false, 0, 0);
-
- // Bind the normals buffer to the shader attribute.
-
- gl.bindBuffer(gl.ARRAY_BUFFER, cubeVerticesNormalBuffer);
- gl.vertexAttribPointer(vertexNormalAttribute, 3, gl.FLOAT, false, 0, 0);
-
- // Specify the texture to map onto the faces.
-
- gl.activeTexture(gl.TEXTURE0);
- gl.bindTexture(gl.TEXTURE_2D, cubeTexture);
- gl.uniform1i(gl.getUniformLocation(shaderProgram, "uSampler"), 0);
-
- // Draw the cube.
-
- gl.bindBuffer(gl.ELEMENT_ARRAY_BUFFER, cubeVerticesIndexBuffer);
- setMatrixUniforms();
- gl.drawElements(gl.TRIANGLES, 36, gl.UNSIGNED_SHORT, 0);
-
- // Restore the original matrix
-
- mvPopMatrix();
-
- // Update the rotation for the next draw, if it's time to do so.
-
- var currentTime = (new Date).getTime();
- if (lastCubeUpdateTime) {
- var delta = currentTime - lastCubeUpdateTime;
-
- cubeRotation += (30 * delta) / 1000.0;
- }
-
- lastCubeUpdateTime = currentTime;
- }
-
- //
- // initShaders
- //
- // Initialize the shaders, so WebGL knows how to light our scene.
- //
- function initShaders() {
- var fragmentShader = getShader(gl, "shader-fs");
- var vertexShader = getShader(gl, "shader-vs");
-
- // Create the shader program
-
- shaderProgram = gl.createProgram();
- gl.attachShader(shaderProgram, vertexShader);
- gl.attachShader(shaderProgram, fragmentShader);
- gl.linkProgram(shaderProgram);
-
- // If creating the shader program failed, alert
-
- if (!gl.getProgramParameter(shaderProgram, gl.LINK_STATUS)) {
- alert("Unable to initialize the shader program.");
- }
-
- gl.useProgram(shaderProgram);
-
- vertexPositionAttribute = gl.getAttribLocation(shaderProgram, "aVertexPosition");
- gl.enableVertexAttribArray(vertexPositionAttribute);
-
- textureCoordAttribute = gl.getAttribLocation(shaderProgram, "aTextureCoord");
- gl.enableVertexAttribArray(textureCoordAttribute);
-
- vertexNormalAttribute = gl.getAttribLocation(shaderProgram, "aVertexNormal");
- gl.enableVertexAttribArray(vertexNormalAttribute);
- }
-
- //
- // getShader
- //
- // Loads a shader program by scouring the current document,
- // looking for a script with the specified ID.
- //
- function getShader(gl, id) {
- var shaderScript = document.getElementById(id);
-
- // Didn't find an element with the specified ID; abort.
-
- if (!shaderScript) {
- return null;
- }
-
- // Walk through the source element's children, building the
- // shader source string.
-
- var theSource = "";
- var currentChild = shaderScript.firstChild;
-
- while(currentChild) {
- if (currentChild.nodeType == 3) {
- theSource += currentChild.textContent;
- }
-
- currentChildcurrentChild = currentChild.nextSibling;
- }
-
- // Now figure out what type of shader script we have,
- // based on its MIME type.
-
- var shader;
-
- if (shaderScript.type == "x-shader/x-fragment") {
- shader = gl.createShader(gl.FRAGMENT_SHADER);
- } else if (shaderScript.type == "x-shader/x-vertex") {
- shader = gl.createShader(gl.VERTEX_SHADER);
- } else { <
CSS配合JavaScript做酷的动态页面效果
利用CSS配合JavaScript的可以做很多更酷的动态页面效果,在本教程的最后给大家简单介绍一下CSS配合JS的应用。首先,要搞清楚事件和动作的概念。在客户端脚本中,JavaScript 通过对事件进行响应来获得与用户的交互。例如,当用户单击一个按钮或者在某段文字上移动鼠标
收藏 0赞 0分享
WEB标准,Web前端开发工程师必备技术列表
想要打造并拥有一流的Web产品开发团队,在团队成员基础能力上一定要下功夫。对于Web前端产品开发来说,仅仅掌握Web1.0时代简单的"网页套接"是完全不够的。我结合自己的团队配备,特此罗列了Web前端产品工程师所涉及的技能列表如下:
通过许多实际项目,
收藏 0赞 0分享
用CSS制作Alpha滤镜测试板
alpha滤镜给制作网页特效提供了较大的创作空间,但由于它控制参数较多,在实际应用时,为了确定一组合适的参数值,不得不反复调整修改,在编辑窗口和预览窗口来回倒腾,甚是麻烦,本文介绍了一种简单的方法。制作一个“Alpha滤镜参数测试板”,在测试板上输入参数
收藏 0赞 0分享
非常流行的所谓的气泡窗口
普通的Alt无法自定义风格,而Sweet Titles通过JS脚本与CSS的集合.自定义了这种伪Alt风格.
前一段时间非常流行的,就所谓的气泡窗口(鼠标移到链接处出现的).
我们这里实现的用的是Sweet Titles的插件.显示效果完全由CSS控制..
先下载Sweet Ti
收藏 0赞 0分享
CSS教程:li和ul标签用法举例
LI代码的格式化:
A).运用CSS格式化列表符: ul li{
list-style-type:none;
}
B).如果你想将列表符换成图像,则: ul li{
list-style-type:none;
list-style-image: url(/blog/images/
收藏 0赞 0分享
CSS教程:CSS中的定位(position)
使用CSS来定位页面内层的位置,一直是比较难以掌握的事情,很多时候,往往被绝对定位的元素,总是以浏览器的左上角为坐标原点,此时,如果浏览器的大小改变,被定义的层就会偏离设计想要的位置,让人很挠头。
其实,要想控制好层的绝对定位,只要理解CSS中关于定位
收藏 0赞 0分享
CSS教程:盒模型(BOX Model)
如果想熟练掌握DIV和CSS的布局方法,首先要对盒模型有足够的了解。每个HTML元素都可以看作一个装了东西的盒子,盒子里面的内容到盒子的边框之间的距离即填充(padding),盒子本身有边框(border),而盒子边框外和其他盒子之间,还有边界(margin),如图1所示。
收藏 0赞 0分享
无延迟翻滚的图形与CSS混合风格按钮
在一个具有图形背景的按钮中添加CSS风格的文本,这种建立按钮的方法结合了具有CSS翻滚(CSS rollover)标记的开发速度和效率,从而有效地提高按钮外表图像的三维效果。
相比于常规的图形按钮,这些图形/CSS混合按钮可易于建立和载入,因为你只需要为空白按钮外面
收藏 0赞 0分享
css里expression实现界面对象的批量控制
用过css样式我们就知道, 可以定义一批对象的class属性来指定同一个样式来统一界面. 但如何统一同类型的对象的事件? 比如:界面有无数个 <img src="**.jpg"> 如何实现鼠标经过此图片, 图片的src变成是**_over.jpg?
收藏 0赞 0分享
CSS教程:水平对齐(text-align)
水平对齐(text-align),用以设定元素内文本的水平对齐方式。
1.语法
text-align具体参数如下:
语法:text-align:left|right|center|justify
说明:设定元素内文本的水平对齐方式。
参数:left:左
收藏 0赞 0分享


