

最近项目完成就开始搞一些有用没用的东西,以前面试的时候有人问我那种圆弧效果怎么做,还问我翻牌效果,我只看过,没有做过,现在有空了,而且想到可能会用到就做个简单的
圆弧很简单,自定义个View,创建个Paint,设置 arcPaint.setStyle(Paint.Style.STROKE)再设置圆弧的宽,再在onDraw内调用canvas.drawArc()就好了
现在只做一个带刻度的圆弧和一个开口地方是圆角的圆弧。其他各种效果以后再摸索
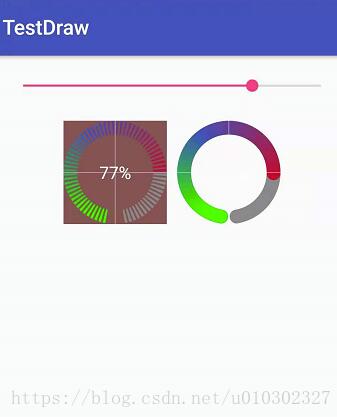
ArcView.java
public class ArcView extends View {
  private Paint textPaint;
  private Paint arcPaint;
  private Shader backGradient;
  private Xfermode xfermode;
  private RectF oval = new RectF();
  public ArcView(Context context) {
    super(context);
    init();
  }

  public ArcView(Context context, @Nullable AttributeSet attrs) {
    super(context, attrs);
    init();
  }
  private int type = 0;

  public void setType(int type) {
    this.type = type;
    if(type == 1){
      start = 10;
    }
  }
  private void init(){
    arcPaint = new Paint();
    arcPaint.setAntiAlias(true);
    if(type == 0){
      xfermode = new PorterDuffXfermode(PorterDuff.Mode.CLEAR);
    }

    textPaint = new Paint();
    textPaint.setAntiAlias(true);
    textPaint.setColor(Color.WHITE);
    textPaint.setTextSize(50);
    textPaint.setStyle(Paint.Style.FILL);
    textPaint.setTextAlign(Paint.Align.CENTER);

  }

  private int strokeWidth = 40;

  public void setStrokeWidth(int strokeWidth) {
    this.strokeWidth = strokeWidth;
  }

  private int max = 100;

  public void setMax(int max) {
    this.max = max;
  }

  private int progress;

  public void setProgress(int progress) {
    this.progress = progress;
    postInvalidate();
  }

  private int start = 0;

  public void setStart(int start) {
    if(type == 1){
      if(start < 10){
        start = 10;
      }
    }else{
      if(start < 0){
        start = 0;
      }
    }

    this.start = start;
  }

  @Override
  protected void onDraw(Canvas canvas) {
    super.onDraw(canvas);
    if(getWidth() != 0){
      int width = getWidth();
      int height = getHeight();
      int cx = width/2;
      int cy = height/2;
      if(backGradient == null){
        oval.set( strokeWidth/2, strokeWidth/2,
            width - strokeWidth/2, height - strokeWidth/2);
        int colorStart = getResources().getColor(R.color.colorPrimary);
        int color2 = Color.GREEN;
        int colorEnd = Color.RED;

        backGradient = new SweepGradient(cx,cy,new int[]{color2 ,colorStart, colorEnd},new float[]{0.1f,0.4f,0.9f});

        postInvalidate();
      }else{
        int sc = 0;
        if(type == 0){
          sc = canvas.saveLayer(0, 0, canvas.getWidth(), canvas.getHeight(), null, Canvas.ALL_SAVE_FLAG);
        }else{
          canvas.save();
        }

        canvas.rotate(90,cx,cy);
        arcPaint.setColor(Color.GRAY);
        arcPaint.setStyle(Paint.Style.STROKE);
        arcPaint.setStrokeWidth(strokeWidth);
        if(type == 1){
          arcPaint.setStrokeCap(Paint.Cap.ROUND);
        }

        int s =start;
        int e = start*2;
        //底色
        canvas.drawArc(oval,s,360 - e,false,arcPaint);
        arcPaint.setShader(backGradient);
        //渐变
        int sweep = (int) (progress*1.0f/max*(360 - e));
        canvas.drawArc(oval,s,sweep,false,arcPaint);

        arcPaint.setShader(null);


        if(type == 0){
          //刻度
          arcPaint.setXfermode(xfermode);
          arcPaint.setStyle(Paint.Style.STROKE);
          arcPaint.setStrokeWidth(5);

          for (int i = 0; i < 36;i++){
            canvas.drawLine(0,cy,getWidth(),cy,arcPaint);
            canvas.rotate(5,cx,cy);
          }
          arcPaint.setXfermode(null);
          canvas.restoreToCount(sc);
        }else{
          canvas.restore();
        }

        Paint.FontMetrics fontMetrics = textPaint.getFontMetrics();
        float top = fontMetrics.top;
        float bottom = fontMetrics.bottom;
        int baseLineY = (int) (cy - top/2 - bottom/2);
        canvas.drawText(progress+"%",cx,baseLineY,textPaint);

        //十字线,用来参考的,可删除
        canvas.drawLine(cx,0,cx,height,textPaint);
        canvas.drawLine(0,cy,width,cy,textPaint);

      }

    }

  }
}
activity_main.xml
<?xml version="1.0" encoding="utf-8"?>
<android.support.constraint.ConstraintLayout xmlns:android="http://schemas.android.com/apk/res/android"
  xmlns:tools="http://schemas.android.com/tools"
  android:layout_width="match_parent"
  android:layout_height="match_parent"
  tools:context="com.hyq.hm.testdraw.MainActivity">

  <LinearLayout
    android:layout_width="match_parent"
    android:layout_height="match_parent"
    android:orientation="vertical"
    android:gravity="center_horizontal">

    <SeekBar
      android:id="@+id/seek_bar"
      android:layout_width="match_parent"
      android:layout_height="wrap_content"
      android:layout_margin="20dp"
      android:max="100"/>
    <LinearLayout
      android:layout_width="wrap_content"
      android:layout_height="wrap_content"
      android:orientation="horizontal">
      <com.hyq.hm.testdraw.ArcView
        android:id="@+id/arc_view_0"
        android:layout_width="100dp"
        android:layout_height="100dp"
        android:layout_margin="5dp"
        android:background="#885453"
        />
      <com.hyq.hm.testdraw.ArcView
        android:id="@+id/arc_view_1"
        android:layout_width="100dp"
        android:layout_height="100dp"
        android:layout_margin="5dp"
        />
    </LinearLayout>
  </LinearLayout>


</android.support.constraint.ConstraintLayout>
MainActivity.java
public class MainActivity extends AppCompatActivity {

  private SeekBar seekBar;
  private ArcView arcView0;
  private ArcView arcView1;

  @Override
  protected void onCreate(Bundle savedInstanceState) {
    super.onCreate(savedInstanceState);
    setContentView(R.layout.activity_main);
    arcView0 = findViewById(R.id.arc_view_0);
    arcView1 = findViewById(R.id.arc_view_1);
    arcView0.setType(0);
    arcView1.setType(1);
    arcView0.setStart(10);
    arcView1.setStart(0);

    seekBar = findViewById(R.id.seek_bar);
    seekBar.setOnSeekBarChangeListener(new SeekBar.OnSeekBarChangeListener() {
      @Override
      public void onProgressChanged(SeekBar seekBar, int progress, boolean fromUser) {
        arcView0.setProgress(progress);
        arcView1.setProgress(progress);
      }

      @Override
      public void onStartTrackingTouch(SeekBar seekBar) {

      }

      @Override
      public void onStopTrackingTouch(SeekBar seekBar) {

      }
    });
  }
}
以上就是本文的全部内容,希望对大家的学习有所帮助,也希望大家多多支持脚本之家。


