

本文实例为大家分享了Android表格布局TableLayout的具体代码,供大家参考,具体内容如下
1.TableLayout
TableLayout表格布局模型以行列的形式管理子控件,每一行为一个TableRow的对象, 当然也可以使一个View的对象
2.TableLayout的属性(全局属性)
android:collapseColumns=”1,2”
隐藏从0开始的索引列,列之间必须用逗号隔开1,2
android:shrinkColumns=”1,2”
收缩从0开始的索引列,当可收缩的列太宽(内容太多时)不会被挤出屏幕,列之间
用逗号隔开1,2,你可以通过”*”代替收缩所有列,注意一列能同时表示收缩和拉伸
android:stretchColumns=”1,2”
拉伸从0开始的索引列,以填满剩下的多余空白空间,列之间必须用逗号隔开,1,2,
你可以通过”*”代替收缩所有列,注意一列能同时表示收缩和拉伸
3.TableLayout的局部属性(内部控件所用属性)
android:layout_column=”1” 该控件显示在第1列
android:layout_span=”2” 该控件占据两列
<?xml version="1.0" encoding="utf-8"?>
<TableLayout xmlns:android="http://schemas.android.com/apk/res/android"
 android:layout_width="match_parent" android:layout_height="match_parent"
 android:collapseColumns="0"
 android:shrinkColumns="4">

 <TableRow
  android:id="@+id/tablerow1"
  android:layout_width="wrap_content"
  android:layout_height="wrap_content" >

  <Button
   android:id="@+id/button4"
   android:layout_width="wrap_content"
   android:layout_height="wrap_content"
   android:text="Button1" />

  <Button
   android:id="@+id/button5"
   android:layout_width="wrap_content"
   android:layout_height="wrap_content"
   android:text="Button2" />

  <Button
   android:id="@+id/button6"
   android:layout_width="wrap_content"
   android:layout_height="wrap_content"
   android:text="Button3" />

  <Button
   android:id="@+id/button7"
   android:layout_width="wrap_content"
   android:layout_height="wrap_content"
   android:text="Button4" />

  <Button
   android:id="@+id/button8"
   android:layout_width="wrap_content"
   android:layout_height="wrap_content"
   android:text="Button555555555555555555555555" />
 </TableRow>
</TableLayout>
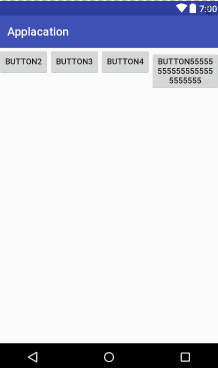
<?xml version="1.0" encoding="utf-8"?>
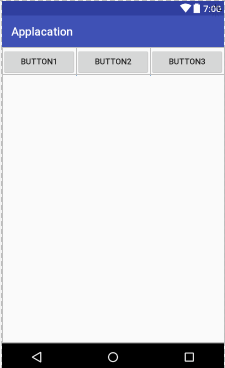
<TableLayout xmlns:android="http://schemas.android.com/apk/res/android"
 android:layout_width="match_parent"
 android:layout_height="match_parent"
 android:stretchColumns="*">

 <TableRow
  android:id="@+id/tablerow1"
  android:layout_width="match_parent"
  android:layout_height="match_parent">

  <Button
   android:id="@+id/button4"
   android:layout_width="wrap_content"
   android:layout_height="wrap_content"
   android:text="Button1" />

  <Button
   android:id="@+id/button5"
   android:layout_width="wrap_content"
   android:layout_height="wrap_content"
   android:text="Button2" />

  <Button
   android:id="@+id/button6"
   android:layout_width="wrap_content"
   android:layout_height="wrap_content"
   android:text="Button3" />

 </TableRow>
</TableLayout>
以上就是本文的全部内容,希望对大家的学习有所帮助,也希望大家多多支持脚本之家。


