
大部分的pytorch入门教程,都是使用torchvision里面的数据进行训练和测试。如果我们是自己的图片数据,又该怎么做呢?
一、我的数据
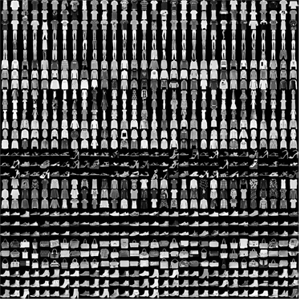
我在学习的时候,使用的是fashion-mnist。这个数据比较小,我的电脑没有GPU,还能吃得消。关于fashion-mnist数据,可以百度,也可以点此 了解一下,数据就像这个样子:
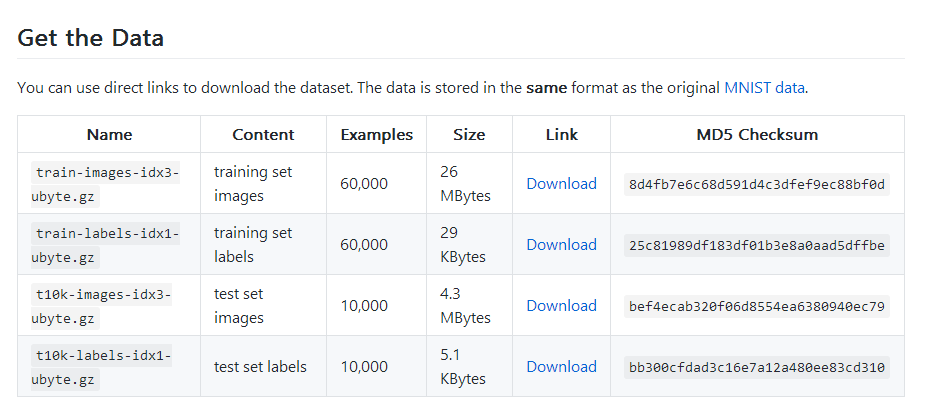
下载地址:https://github.com/zalandoresearch/fashion-mnist
但是下载下来是一种二进制文件,并不是图片,因此我先转换成了图片。
我先解压gz文件到e:/fashion_mnist/文件夹
然后运行代码:
import os
from skimage import io
import torchvision.datasets.mnist as mnist

root="E:/fashion_mnist/"
train_set = (
  mnist.read_image_file(os.path.join(root, 'train-images-idx3-ubyte')),
  mnist.read_label_file(os.path.join(root, 'train-labels-idx1-ubyte'))
    )
test_set = (
  mnist.read_image_file(os.path.join(root, 't10k-images-idx3-ubyte')),
  mnist.read_label_file(os.path.join(root, 't10k-labels-idx1-ubyte'))
    )
print("training set :",train_set[0].size())
print("test set :",test_set[0].size())

def convert_to_img(train=True):
  if(train):
    f=open(root+'train.txt','w')
    data_path=root+'/train/'
    if(not os.path.exists(data_path)):
      os.makedirs(data_path)
    for i, (img,label) in enumerate(zip(train_set[0],train_set[1])):
      img_path=data_path+str(i)+'.jpg'
      io.imsave(img_path,img.numpy())
      f.write(img_path+' '+str(label)+'\n')
    f.close()
  else:
    f = open(root + 'test.txt', 'w')
    data_path = root + '/test/'
    if (not os.path.exists(data_path)):
      os.makedirs(data_path)
    for i, (img,label) in enumerate(zip(test_set[0],test_set[1])):
      img_path = data_path+ str(i) + '.jpg'
      io.imsave(img_path, img.numpy())
      f.write(img_path + ' ' + str(label) + '\n')
    f.close()

convert_to_img(True)
convert_to_img(False)
这样就会在e:/fashion_mnist/目录下分别生成train和test文件夹,用于存放图片。还在该目录下生成了标签文件train.txt和test.txt.
二、进行CNN分类训练和测试
先要将图片读取出来,准备成torch专用的dataset格式,再通过Dataloader进行分批次训练。
代码如下:
import torch
from torch.autograd import Variable
from torchvision import transforms
from torch.utils.data import Dataset, DataLoader
from PIL import Image
root="E:/fashion_mnist/"

# -----------------ready the dataset--------------------------
def default_loader(path):
  return Image.open(path).convert('RGB')
class MyDataset(Dataset):
  def __init__(self, txt, transform=None, target_transform=None, loader=default_loader):
    fh = open(txt, 'r')
    imgs = []
    for line in fh:
      line = line.strip('\n')
      line = line.rstrip()
      words = line.split()
      imgs.append((words[0],int(words[1])))
    self.imgs = imgs
    self.transform = transform
    self.target_transform = target_transform
    self.loader = loader

  def __getitem__(self, index):
    fn, label = self.imgs[index]
    img = self.loader(fn)
    if self.transform is not None:
      img = self.transform(img)
    return img,label

  def __len__(self):
    return len(self.imgs)

train_data=MyDataset(txt=root+'train.txt', transform=transforms.ToTensor())
test_data=MyDataset(txt=root+'test.txt', transform=transforms.ToTensor())
train_loader = DataLoader(dataset=train_data, batch_size=64, shuffle=True)
test_loader = DataLoader(dataset=test_data, batch_size=64)


#-----------------create the Net and training------------------------

class Net(torch.nn.Module):
  def __init__(self):
    super(Net, self).__init__()
    self.conv1 = torch.nn.Sequential(
      torch.nn.Conv2d(3, 32, 3, 1, 1),
      torch.nn.ReLU(),
      torch.nn.MaxPool2d(2))
    self.conv2 = torch.nn.Sequential(
      torch.nn.Conv2d(32, 64, 3, 1, 1),
      torch.nn.ReLU(),
      torch.nn.MaxPool2d(2)
    )
    self.conv3 = torch.nn.Sequential(
      torch.nn.Conv2d(64, 64, 3, 1, 1),
      torch.nn.ReLU(),
      torch.nn.MaxPool2d(2)
    )
    self.dense = torch.nn.Sequential(
      torch.nn.Linear(64 * 3 * 3, 128),
      torch.nn.ReLU(),
      torch.nn.Linear(128, 10)
    )

  def forward(self, x):
    conv1_out = self.conv1(x)
    conv2_out = self.conv2(conv1_out)
    conv3_out = self.conv3(conv2_out)
    res = conv3_out.view(conv3_out.size(0), -1)
    out = self.dense(res)
    return out


model = Net()
print(model)

optimizer = torch.optim.Adam(model.parameters())
loss_func = torch.nn.CrossEntropyLoss()

for epoch in range(10):
  print('epoch {}'.format(epoch + 1))
  # training-----------------------------
  train_loss = 0.
  train_acc = 0.
  for batch_x, batch_y in train_loader:
    batch_x, batch_y = Variable(batch_x), Variable(batch_y)
    out = model(batch_x)
    loss = loss_func(out, batch_y)
    train_loss += loss.data[0]
    pred = torch.max(out, 1)[1]
    train_correct = (pred == batch_y).sum()
    train_acc += train_correct.data[0]
    optimizer.zero_grad()
    loss.backward()
    optimizer.step()
  print('Train Loss: {:.6f}, Acc: {:.6f}'.format(train_loss / (len(
    train_data)), train_acc / (len(train_data))))

  # evaluation--------------------------------
  model.eval()
  eval_loss = 0.
  eval_acc = 0.
  for batch_x, batch_y in test_loader:
    batch_x, batch_y = Variable(batch_x, volatile=True), Variable(batch_y, volatile=True)
    out = model(batch_x)
    loss = loss_func(out, batch_y)
    eval_loss += loss.data[0]
    pred = torch.max(out, 1)[1]
    num_correct = (pred == batch_y).sum()
    eval_acc += num_correct.data[0]
  print('Test Loss: {:.6f}, Acc: {:.6f}'.format(eval_loss / (len(
    test_data)), eval_acc / (len(test_data))))
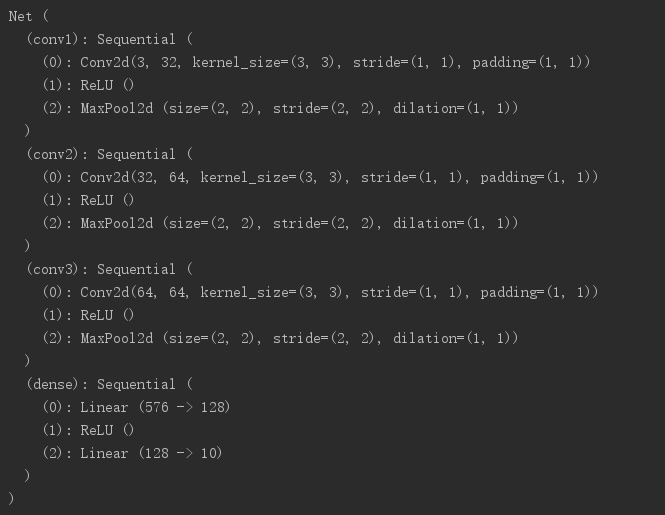
打印出来的网络模型:
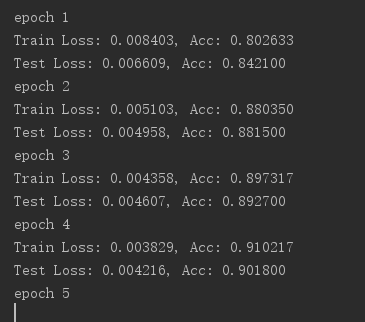
训练和测试结果:
以上就是本文的全部内容,希望对大家的学习有所帮助,也希望大家多多支持脚本之家。


