
Python编写从ZabbixAPI获取信息
此脚本用Python3.6执行是OK的。
# -*- coding: utf-8 -*-
import json
import urllib.request, urllib.error, urllib.parse
class ZabbixAPI:
 def __init__(self):
  self.__url = 'http://192.168.56.102/zabbix/api_jsonrpc.php'
  self.__user = 'admin'
  self.__password = 'zabbix'
  self.__header = {"Content-Type": "application/json-rpc"}
  self.__token_id = self.UserLogin()
 #登陆获取token
 def UserLogin(self):
  data = {
   "jsonrpc": "2.0",
   "method": "user.login",
   "params": {
    "user": self.__user,
    "password": self.__password
   },
   "id": 0,
  }
  return self.PostRequest(data)
 #推送请求
 def PostRequest(self, data):
  request = urllib.request.Request(self.__url,json.dumps(data).encode('utf-8'),self.__header)
  result = urllib.request.urlopen(request)
  response = json.loads(result.read().decode('utf-8'))
  try:
   # print response['result']
   return response['result']
  except KeyError:
   raise KeyError
 #主机列表
 def HostGet(self,hostid=None,hostip=None):
  data = {
   "jsonrpc":"2.0",
   "method":"host.get",
   "params":{
    "output":"extend",
    "selectGroups": "extend",
    "selectParentTemplates": ["templateid","name"],
    "selectInterfaces": ["interfaceid","ip"],
    "selectInventory": ["os"],
    "selectItems":["itemid","name"],
    "selectGraphs":["graphid","name"],
    "selectApplications":["applicationid","name"],
    "selectTriggers":["triggerid","name"],
    "selectScreens":["screenid","name"]
   },
   "auth": self.__token_id,
   "id":1,
  }
  if hostid:
   data["params"]={
    "output": "extend",
    "hostids": hostid,
    "sortfield": "name"
   }
  return self.PostRequest(data)
 #主机列表
 def HostCreate(self,hostname,hostip,groupid=None,templateid=None):
  data = {
   "jsonrpc":"2.0",
   "method":"host.create",
   "params": {
    "host": hostname,
    "interfaces": [
     {
      "type": 1,
      "main": 1,
      "useip": 1,
      "ip": hostip,
      "dns": "",
      "port": "10050"
     }
    ],
    "groups": [
     {
      "groupid": groupid
     }
    ],
    "templates": [
     {
      "templateid": templateid
     }
    ]
   },
   "auth": self.__token_id,
   "id":1,
  }
  return self.PostRequest(data)
 #主机组列表
 def HostGroupGet(self,hostid=None,itemid=None):
  data = {
   "jsonrpc":"2.0",
   "method":"hostgroup.get",
   "params":{
    "output": "extend",
    "hostids": hostid,
    "itemids": itemid,
    "sortfield": "name"
   },
   "auth": self.__token_id,
   "id":1,
  }
  return self.PostRequest(data)
 #监控项列表
 def ItemGet(self,hostid=None,itemid=None):
  data = {
   "jsonrpc":"2.0",
   "method": "item.get",
   "params": {
    "output": "extend",
    "hostids": hostid,
    "itemids": itemid,
    "sortfield": "name"
   },
   "auth": self.__token_id,
   "id":1,
  }
  return self.PostRequest(data)
 #模板列表
 def TemplateGet(self, hostid=None,templateid=None):
  data = {
   "jsonrpc":"2.0",
   "method": "template.get",
   "params": {
    "output": "extend",
    "hostids": hostid,
    "templateids": templateid,
    "sortfield": "name"
   },
   "auth": self.__token_id,
   "id":1,
  }
  return self.PostRequest(data)
 #图像列表
 def GraphGet(self,hostid=None,graphid=None):
  data = {
   "jsonrpc":"2.0",
   "method": "graph.get",
   "params": {
    "output": "extend",
    "hostids": hostid,
    "graphids": graphid,
    "sortfield": "name"
   },
   "auth": self.__token_id,
   "id":1,
  }
  return self.PostRequest(data)
 #历史数据
 def History(self,itemid,data_type):
  data = {
   "jsonrpc": "2.0",
   "method": "history.get",
   "params": {
    "output": "extend",
    "history": data_type,
    "itemids": itemid,
    "sortfield": "clock",
    "sortorder": "DESC",
    "limit": 30
   },
   "auth": self.__token_id,
   "id": 2
  }
  return self.PostRequest(data)
#测试:python manager.py shell ; from ZABBIX.ZabbixAPI import * ; main(),代码修改了要ctrl+Z退出重进
def main():
 zapi=ZabbixAPI()
 token=zapi.UserLogin()
 print(token)
 #39378ec03aa101c2b17d1d2bd6f4ef16
 hosts=zapi.HostGet()
 print(hosts)
 #[{u'host': u'Zabbix server', u'hostid': u'10084', u'interfaces': [{u'interfaceid': u'1', u'ip': u'127.0.0.1'}]}]
if __name__ == '__main__':
 main()
下面看下使用python实现 Zabbix-API 监控的方法
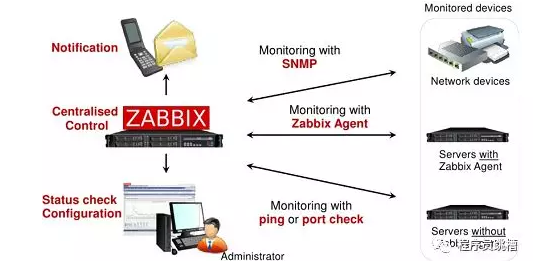
做运维的朋友应该知道,公司IDC机房经常有上架、下架、报修和报废的服务器。如果服务器数量很多的时候很容易造成监控遗漏。
大的互联网公司把监控系统和CMDB(资产管理系统|配置管理数据库系统)集成在一起,当上架一台新机器的时候CMDB里面会记录相关的信息,Zabbix根据CMDB里面信息自动Link相关的模块,添加|删除监控。很多小的公司没有资产管理系统,但作为监控的负责人应该每天知道上架了哪些新的机器,确保能添加到Zabbix监控里面。
首先给大家说一下脚本思路:
1)通过Nmap工具扫描网段,扫描出已经使用的IP地址。
2)通过Nmap检测已经扫描IP的3389或者22端口是否开放,可以判断那些事windows机器,那些是Linux机器。
3)Linux下面通过ssh + hostname命令找出Linux主机名。
4)Windows下面通过nmblookup -A 命令找出Windows主机名。
5)用Python脚本读扫描结果文件,把主机名写到列表里面。
6)用Zabbix python API 调用已经监控的主机名,写到列表里面。
7)两个列表取交集,用for循环判断哪些主机名没有监控。
8)发邮件通知监控负责人。
下面我分享一下我写的Python写的脚本,其中scan_machine.sh是我调用的用Shell写的关于Nmap扫描的脚本,scan_hostname.log是Nmap扫描的结果,里面内容是IP 主机名。
#!/usr/bin/env python#create by:sfzhang 20140820#coding=utf-8import os,sysimport jsonimport urllib2import datetime,timefrom urllib2 import URLError
nmap_cmd = "/shell/machine/scan_machine.sh"def runCmd(command):
global mail_cmd
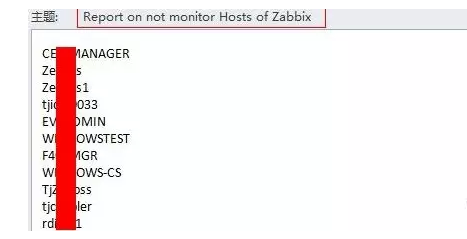
mail_cmd = '''mail -s "Report on not monitor Hosts of Zabbix" shifeng_zhang88 < /shell/machine/result/result.txt'''
return os.system(command)runCmd(nmap_cmd)def nmap_host():
hostiplst = []
hostnamelst = []
f = file('/shell/machine/result/scan_hostname.log')
for line in f.readlines():
hostip = line.split()[0]
hostname = line.split()[1]
hostiplst.append(hostip)
hostnamelst.append(hostname)
hostnamelst.sort()
#print hostiplst
return hostnamelst
f.close()def zabbix_host():
zabbixhostlst= []
#based url and required header
url = "http://192.168.161.128/api_jsonrpc.php"
header = {"Content-Type": "application/json"}
#request json
data = json.dumps(
{
"jsonrpc": "2.0",
"method": "host.get",
"params":{
"output":["hostid","name"],
"filter":{"host":""}
},
#auth id
"auth":"Zabbix Auth ID",
"id": 1,
})
#create request object
request = urllib2.Request(url,data)
for key in header:
request.add_header(key,header[key])
#get host list
try:
result = urllib2.urlopen(request)
except URLError as e:
print "The server could not fulfill the request.",e.reason else:
reponse = json.loads(result.read())
result.close()
#print "Number of Hosts:",len(reponse['result'])
for host in reponse['result']:
#print "Host ID:",host['hostid'],"Host Name:",host['name']
zbxhosts=host['name']
zabbixhostlst.append(zbxhosts)
zabbixhostlst.sort()
return zabbixhostlst def main():
nmaphostlst = nmap_host()
zbxhostlst = zabbix_host()
diff = list(set(nmaphostlst) ^ set(zbxhostlst))
content = "\n"
nomonitorlst = []
if len(diff) != 0:
for host in diff:
if host in nmaphostlst:
nomonitorlst.append(host)
else:
sys.exit()
#print zbxhostlst
string = '\n'.join(nomonitorlst)
f = file('/shell/machine/result/result.txt','w')
f.write(string)
f.flush()
f.close()
runCmd(mail_cmd)if __name__ == "__main__":
main()
把脚本添加到crontab,每台会收到关于那些主机没有添加监控的信息。
总结:
1)Zabbix API相关信息可以查看官方详细资料,看不懂英文的可以参考下面这篇文档。http://paperplane.ruhoh.com/zabbix/intro-to-zabbix-api/
2)通过该脚本可以知道那些主机没有添加监控,希望对大家有帮助,如果有更好的解决方法欢迎多多交流。
以上所述是小编给大家介绍的使用Python脚本实现Zabbix-API 监控,希望对大家有所帮助,如果大家有任何疑问请给我留言,小编会及时回复大家的。在此也非常感谢大家对脚本之家网站的支持!


