
这篇教程是向脚本之家的朋友介绍利用maya打造超有质感的逼真卡通车玩具,教程是一篇来自国外的翻译教程,很经典,教程制作步骤介绍的很详细。但是个人翻译水平有限怕误导学习者,先转过来,期待高手来翻译,先来看看效果图吧: 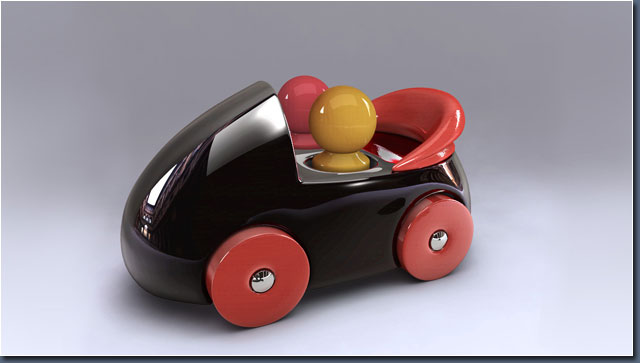
Software Used :
Autodesk Maya 2010
Introduction :
This tutorial is intended to guide you through the workflow of creating a streamliner toy car. The difficult level is intermediate, meaning you need to have a basic understanding of the process involved in modeling and rendering with Autodesk Maya 2010.
This tutorial consists of three parts:
ModelingScene set-up and lightingRendering and composition
Make sure you are working on a New Project. It should be saved correctly and set to Current Project. Applying Mayas incremental save feature is strongly recommended.
Concept :
We are sticking with simple shapes, primitives as in spheres and cylinders. I have created a template to help you start. The template is saved in a separate layer to show our restrictions and the units are set to centimeters (Fig.01):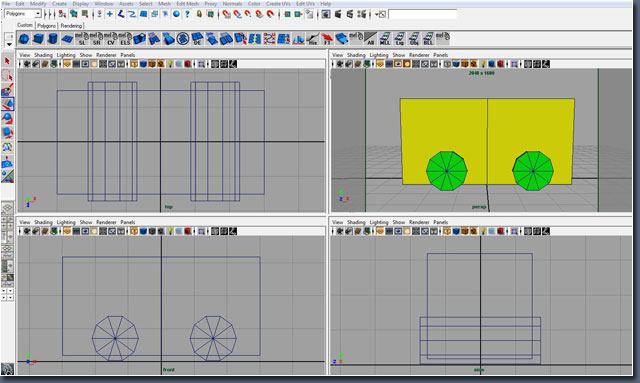 Fig.01
Cube XYZ:
Placement: 0,0,0
Scale: 6,3,3
Subdivision Width: 2
Cylinder:
Place the cylinder as shown in Fig.01
Scale: 0.7,1.7,0.7
Subdivision Axis/Height: 10
Modeling :
Start by creating a polygon sphere; it will work as the chassis part of the cab. Make sure you are only working with the necessary resolution necessary (see Fig.02). Place and fit the sphere according to the template, making sure that the middle edge of the sphere is running along the middle edge of the cube. Delete the bottom part of the sphere and the upper right part as well.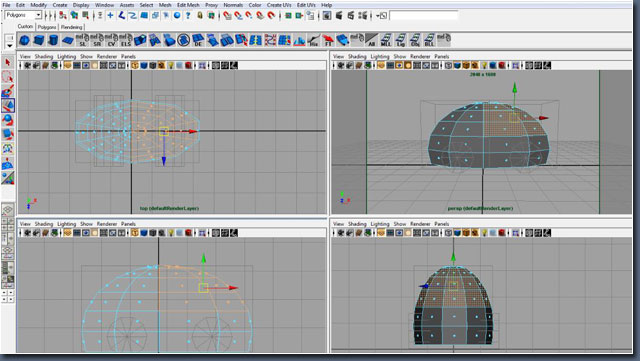
Fig.02
Chassis:
polySphere
Subdivision Axis/Height: 10
Wheels:
polyCylinder
Subdivision Axis/Height: 10
Go to Create Polygon Cylinder and place one cylinder on each side of the chassis. Make sure the cylinders fit the template in size and rotation. Next go to Mesh Combine to combine both cylinders. Delete the history on the chassis and the wheels, making sure that both parts are set to FreezeTransformation. You are now ready to do a Boolean operation.
bolean operation :
step one: select the chassisstep two: shift-select the wheelsstep three: go to mesh booleans differencekeep in mind that we want to keep our mesh smooth and clean meaning quads are preferred. keep triangles in places that wont affect the overall smoothness of the chassis. use edit mesh insert edge loop tool and split polygon tool to connect everything up.
quick tip: after deleting one half of the chassis go to edit duplicate special, choose instance and make sure you duplicate in the negative z axis. now all the modifications you make on one side will automatically be applied to the other half.
have a look at the chassis and apply more resolution where needed. once you are pleased with the shape go to mesh combine to combine both sides and merge the vertices.
you are now ready for the second boolean operation for the sitting area. create a polygon cylinder, keeping in mind how you want the edges to flow, and place it roughly in place.
sitting area:
polycylindersubdivision axis/height: 6follow the boolean operation for the sitting area – its the same principal as above (fig.03).
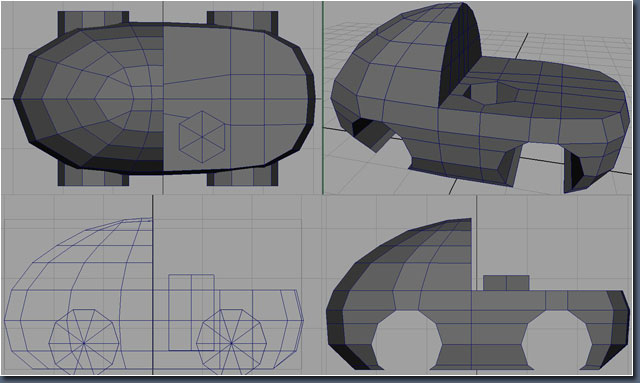
fig.03
you are almost done with the chassis. work with the different smoothing groups, num pad 1-3. now you will be able to see where you need to add edges to keep the shape of the cab (fig.04).
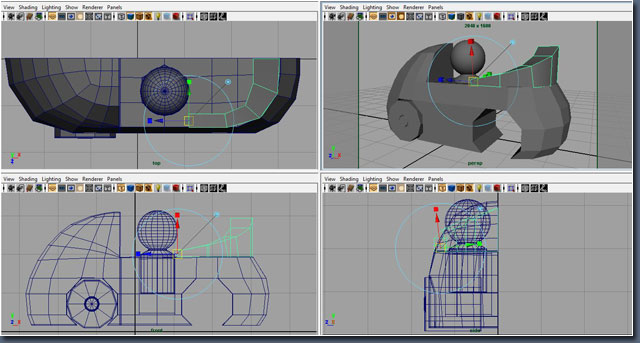
fig.04
there are now only three parts left to model now, the pinhead, wheels and cab-top. the settings are as follows:
pinhead:
polyspheres
subdivision axis/height: 20wheel:
polycylinder
subdivision axis/height: 10
subdivision caps: 2cab-top:
polycube
subdivision depth: 2
the pinhead is simply a sphere; delete the bottom part and extrude the edges down. for the wheels you need a cylinder with two caps. selectthe inner faces and extrude out to create the wheel-hub. the cab-top isa cube; extrude the side face to follow the chassis contour. work only with one half of the cube and duplicate when finished with the shaping of the cab-top.
and were done with the modeling process (fig.05)!
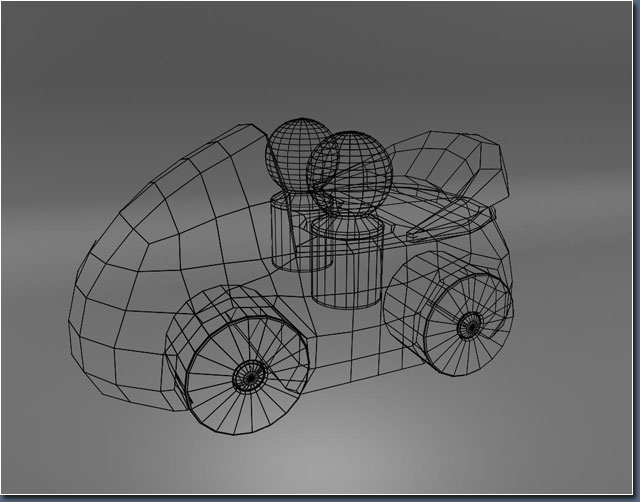
fig.05
scene setup lighting :
select a camera angle and make a bookmark. this enables you to alwaysgo back to your original car pose when rendering. i encourage you to use the layers to hide/show object in your scene to optimize your workflow (fig.06).
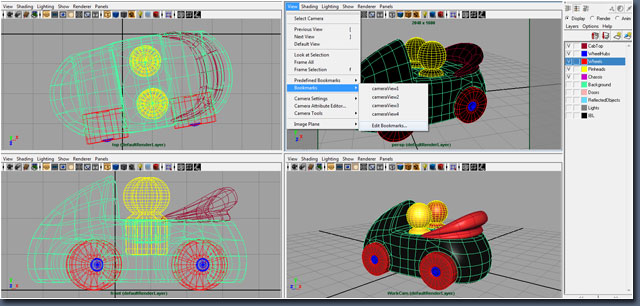
fig.06
for the scene set-up, you need a bright background. skip any hard edges and use a white lambertshader with a high diffuse value. create two side doors on each side of the cab and use a black surfaceshader. also create a top door above the cab to reflect the light downwards and use a white surfaceshader. do not forget to go under renderstats for each door and uncheck castshadows, receiveshadowsandprimaryvisibility. this is done to focus the spreading of the light (fig.07).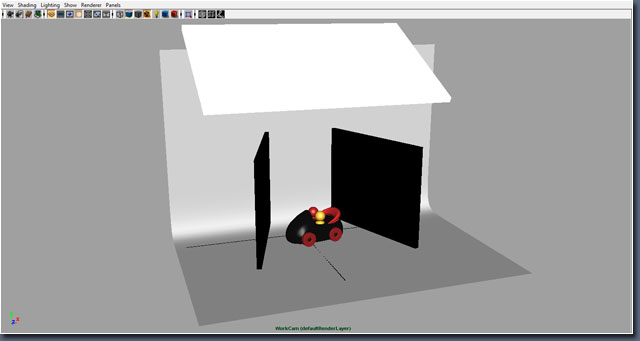
fig.07
lightning placement and render settings :
we will work with mental ray, global illumination and final gather. since we want to see that is actually being rendered in maya we need to do a gamma correction. follow the suggested settings and then place the lights according to fig.08 – 09. 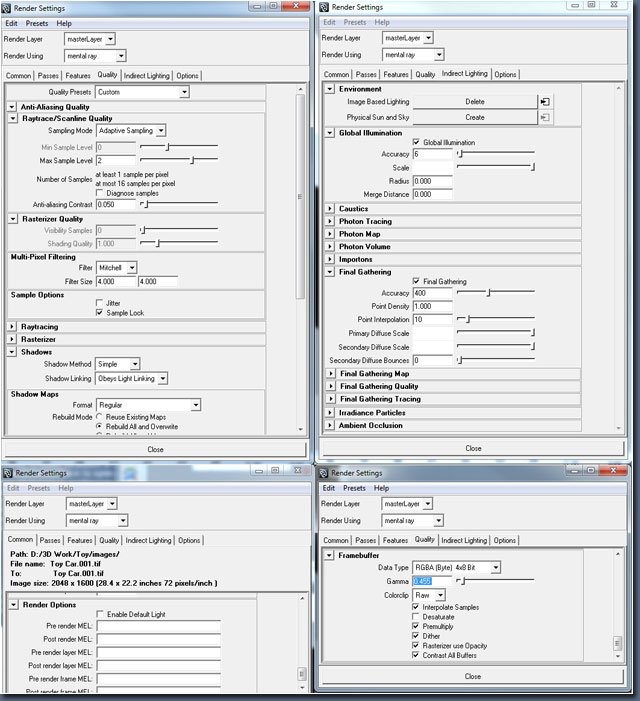
fig.08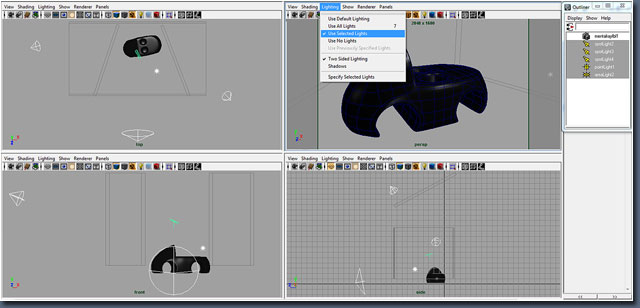
fig.09
make sure you disable mayas enable default light and enable use selected lights. make sure you create one light at a time; it helps you see what is going on in the scene. use the spotlights (sl) in a three-point lighting arrangement and disable emit specularon all three lights. place the area light and point light where you want the highlights to be focused, making sure that theemitdiffuse is disabled onboth light sources.
the light settings are as follows:
front sl:
intensity: 80
decay rate: quadric
cone angle: 130
penumbra angle: 10
dropoff: 2
right sl:
intensity: 140
decay rate: quadric
cone angle: 65
penumbra angle: 40
dropoff: 1
left sl:
intensity: 50
decay rate: quadric
cone angle: 65
penumbra angle: 30
dropoff: 1
point/area l:
intensity: 10
decay rate: quadric
shading :
lets begin with the shading for the different parts of the car. we will be using mayamaterialsand renderpasses.
the most important thing is that we achieve the characteristic reflection that cars have, by which i mean that when viewed from different angles the reflection is greater or less. we achieve that effect by using the sampler info node. the sampler info is outputting facial ratio information by receiving input information of the uvcoordinates of the mesh. the chassis has a ramp connected to the specular (ramp1) and the reflectivity (ramp2) nodes.
the cab-top and the wheels have almost the same material settings; you can go ahead and duplicate when ready with one shader and make slight change in the diffuse and color nodes. adjust to your liking and do not forget to choose a maya granite 3d texture with a negative low bump value between 0.004-0.010 to create some unevenness in the surface –it is very subtle but it makes all the difference (fig.10 – 11)!
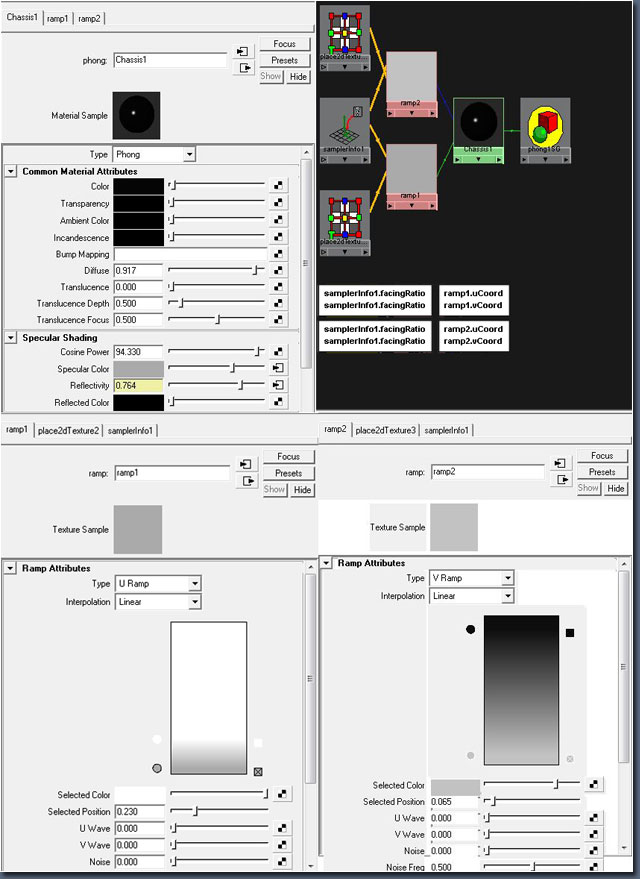
fig.10
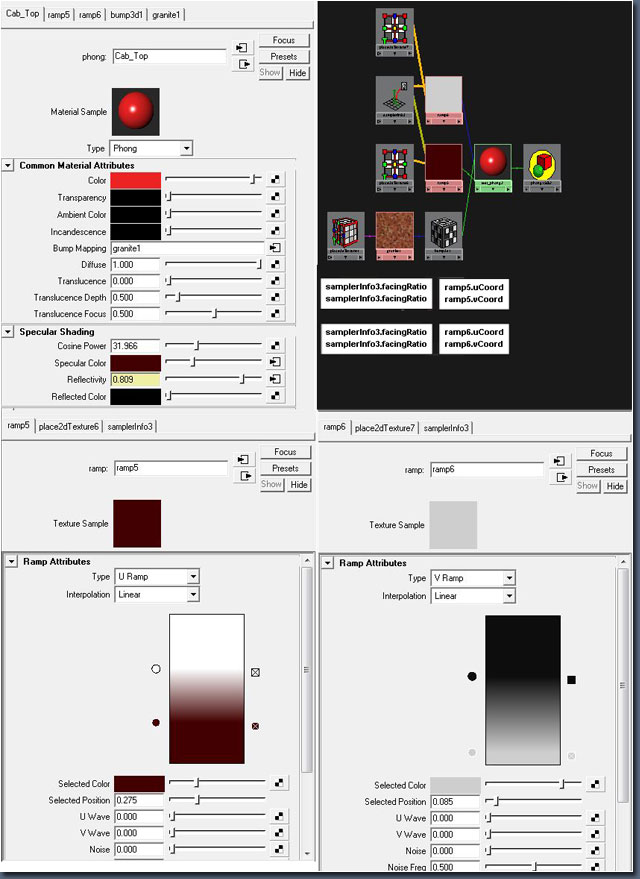
fig.11
now for the pinhead and wheelhub shaders. notice that we are using a mental ray dgs material for the wheel hubs to achieve the chrome look weare looking for. duplicate the pinhead shader and change the color to red to create the second pinhead in our scene (fig.12 – 13).
we have all the shaders in place! make sure you have a couple of objects in the surrounding area to be reflected in the wheel hubs and the chassis. be sure that castshadows, receiveshadowsandprimaryvisibility are turned off so that they do not render or give shadows in our scene.
and now we can move on to the final stage!

fig.12
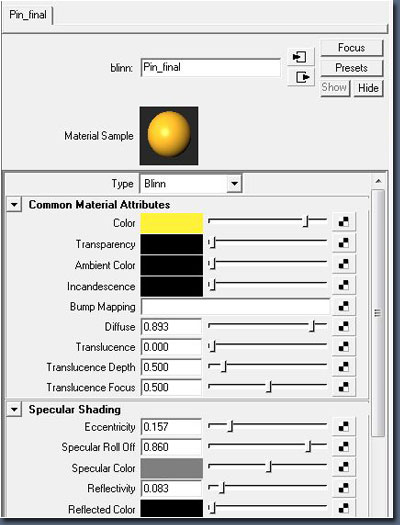
fig.13
srender passes and composition :
you can use mayas render passes function for the diffusematerialcolor, reflection andspecularnoshadow passes. you will automatically get a master beauty. i suggest separate renders for the remaining passes. see fig.14 for the layers used.
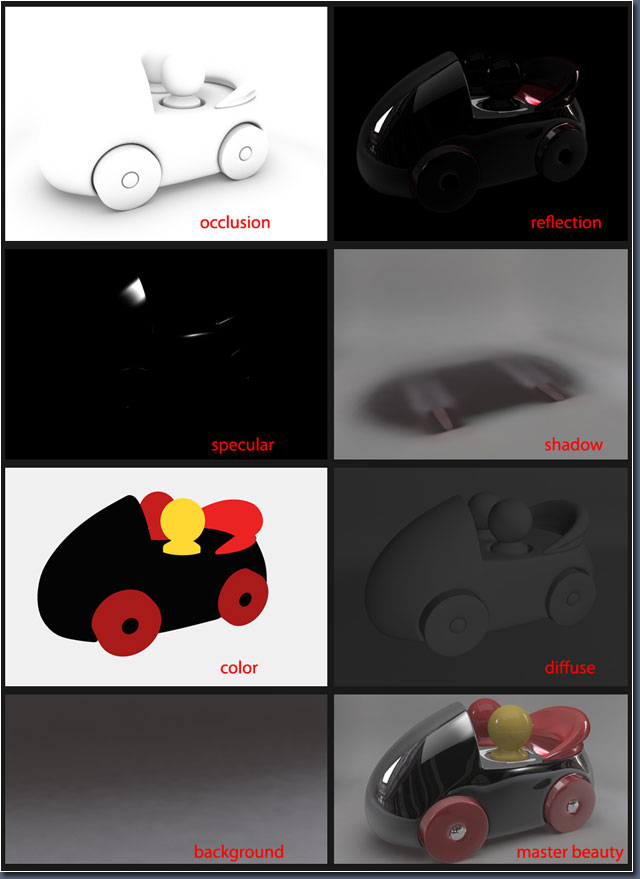
fig.14
you will want to render out several masking layers to have as much control over your image as possible. for that use a white surface shaderfor the parts you want to mask and a black surface shader to hide everything else in the scene. once you have all the passes separated youwill have more control over the different parts and effects in your image (fig.15).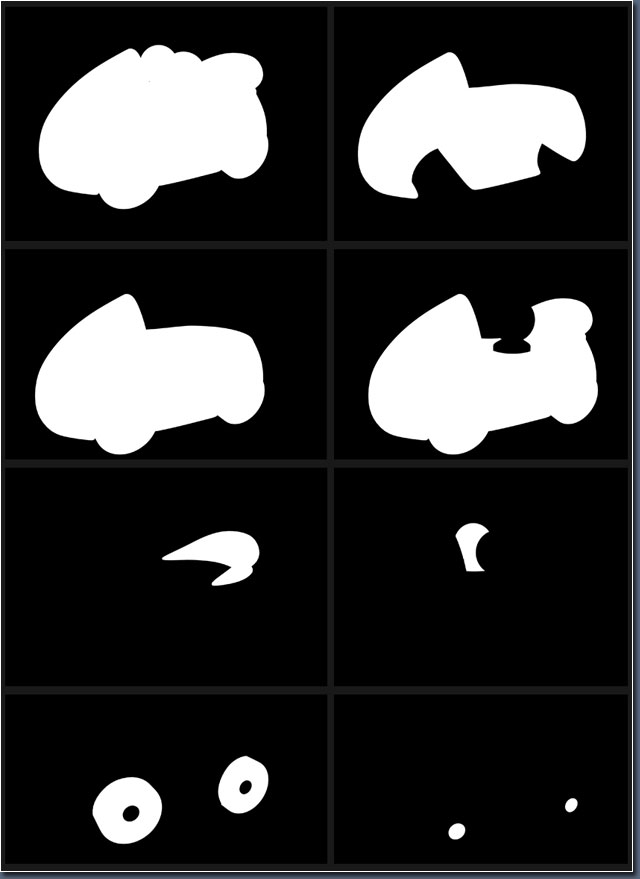
fig.15
you can now open your .tiff files in photoshop and with the help of the different blendingmodes, level-curveadjustments and your masks you will be able to create the final image.
tips: look at you master beauty and think about what you would like to improve. ask questions like:
is the image too bright/dark? (play with the levels/curves).are the colors popping out enough? (play with the contrast and intensity levels).are the shadows strong enough? (apply a mask and adjust with a blending mode)once you have the right questions you can apply the right answers to adjust your image.
this part is where you as an artist decide the final quality.
best of luck (fig.16)!

fig.16
以上就是maya打造超有质感的逼真卡通车玩具过程,希望大家喜欢,对大家有所帮助!


