
Egg.js : 基于KOA2的企业级框架
Kafka:高吞吐量的分布式发布订阅消息系统
本文章将集成egg + kafka + mysql 的日志系统例子
系统要求:日志记录,通过kafka进行消息队列控制
思路图:
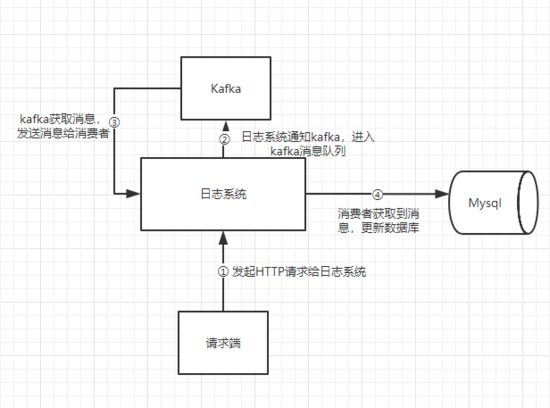
这里消费者和生产者都由日志系统提供
λ.1 环境准备
①Kafka
官网下载kafka后,解压
启动zookeeper:
bin/zookeeper-server-start.sh config/zookeeper.properties
启动Kafka server
这里config/server.properties中将num.partitions=5,我们设置5个partitions
bin/kafka-server-start.sh config/server.properties
② egg + mysql
根据脚手架搭建好egg,再多安装kafka-node,egg-mysql
mysql 用户名root 密码123456
λ.2 集成
1、根目录新建app.js,这个文件在每次项目加载时候都会运作
'use strict';

const kafka = require('kafka-node');

module.exports = app => {
 app.beforeStart(async () => {
 const ctx = app.createAnonymousContext();

 const Producer = kafka.Producer;
 const client = new kafka.KafkaClient({ kafkaHost: app.config.kafkaHost });
 const producer = new Producer(client, app.config.producerConfig);

 producer.on('error', function(err) {
  console.error('ERROR: [Producer] ' + err);
 });

 app.producer = producer;

 const consumer = new kafka.Consumer(client, app.config.consumerTopics, {
  autoCommit: false,
 });

 consumer.on('message', async function(message) {
  try {
  await ctx.service.log.insert(JSON.parse(message.value));
  consumer.commit(true, (err, data) => {
   console.error('commit:', err, data);
  });
  } catch (error) {
  console.error('ERROR: [GetMessage] ', message, error);
  }
 });

 consumer.on('error', function(err) {
  console.error('ERROR: [Consumer] ' + err);
 });
 });
};
上述代码新建了生产者、消费者。
生产者新建后加载进app全局对象。我们将在请求时候生产消息。这里只是先新建实例
消费者获取消息将访问service层的insert方法(数据库插入数据)。
具体参数可以参考kafka-node官方API,往下看会有生产者和消费者的配置参数。
2、controller · log.js
这里获取到了producer,并传往service层
'use strict';

const Controller = require('egg').Controller;

class LogController extends Controller {
 /**
 * @description Kafka控制日志信息流
 * @host /log/notice
 * @method POST
 * @param {Log} log 日志信息
 */
 async notice() {
 const producer = this.ctx.app.producer;
 const Response = new this.ctx.app.Response();

 const requestBody = this.ctx.request.body;
 const backInfo = await this.ctx.service.log.send(producer, requestBody);
 this.ctx.body = Response.success(backInfo);
 }
}

module.exports = LogController;
3、service · log.js
这里有一个send方法,这里调用了producer.send ,进行生产者生产
insert方法则是数据库插入数据
'use strict';

const Service = require('egg').Service;
const uuidv1 = require('uuid/v1');

class LogService extends Service {
 async send(producer, params) {
 const payloads = [
  {
  topic: this.ctx.app.config.topic,
  messages: JSON.stringify(params),
  },
 ];

 producer.send(payloads, function(err, data) {
  console.log('send : ', data);
 });

 return 'success';
 }
 async insert(message) {
 try {
  const logDB = this.ctx.app.mysql.get('log');
  const ip = this.ctx.ip;

  const Logs = this.ctx.model.Log.build({
  id: uuidv1(),
  type: message.type || '',
  level: message.level || 0,
  operator: message.operator || '',
  content: message.content || '',
  ip,
  user_agent: message.user_agent || '',
  error_stack: message.error_stack || '',
  url: message.url || '',
  request: message.request || '',
  response: message.response || '',
  created_at: new Date(),
  updated_at: new Date(),
  });

  const result = await logDB.insert('logs', Logs.dataValues);

  if (result.affectedRows === 1) {
  console.log(`SUCEESS: [Insert ${message.type}]`);
  } else console.error('ERROR: [Insert DB] ', result);
 } catch (error) {
  console.error('ERROR: [Insert] ', message, error);
 }
 }
}

module.exports = LogService;
4、config · config.default.js
一些上述代码用到的配置参数具体在这里,注这里开了5个partition。
'use strict';

module.exports = appInfo => {
 const config = (exports = {});

 const topic = 'logAction_p5';

 // add your config here
 config.middleware = [];

 config.security = {
 csrf: {
  enable: false,
 },
 };

 // mysql database configuration
 config.mysql = {
 clients: {
  basic: {
  host: 'localhost',
  port: '3306',
  user: 'root',
  password: '123456',
  database: 'merchants_basic',
  },
  log: {
  host: 'localhost',
  port: '3306',
  user: 'root',
  password: '123456',
  database: 'merchants_log',
  },
 },
 default: {},
 app: true,
 agent: false,
 };

 // sequelize config
 config.sequelize = {
 dialect: 'mysql',
 database: 'merchants_log',
 host: 'localhost',
 port: '3306',
 username: 'root',
 password: '123456',
 dialectOptions: {
  requestTimeout: 999999,
 },
 pool: {
  acquire: 999999,
 },
 };

 // kafka config
 config.kafkaHost = 'localhost:9092';

 config.topic = topic;

 config.producerConfig = {
 // Partitioner type (default = 0, random = 1, cyclic = 2, keyed = 3, custom = 4), default 0
 partitionerType: 1,
 };

 config.consumerTopics = [
 { topic, partition: 0 },
 { topic, partition: 1 },
 { topic, partition: 2 },
 { topic, partition: 3 },
 { topic, partition: 4 },
 ];

 return config;
};
5、实体类:
mode · log.js
这里使用了 Sequelize
'use strict';

module.exports = app => {
 const { STRING, INTEGER, DATE, TEXT } = app.Sequelize;

 const Log = app.model.define('log', {
 /**
  * UUID
  */
 id: { type: STRING(36), primaryKey: true },
 /**
  * 日志类型
  */
 type: STRING(100),
 /**
  * 优先等级(数字越高,优先级越高)
  */
 level: INTEGER,
 /**
  * 操作者
  */
 operator: STRING(50),
 /**
  * 日志内容
  */
 content: TEXT,
 /**
  * IP
  */
 ip: STRING(36),
 /**
  * 当前用户代理信息
  */
 user_agent: STRING(150),
 /**
  * 错误堆栈
  */
 error_stack: TEXT,
 /**
  * URL
  */
 url: STRING(255),
 /**
  * 请求对象
  */
 request: TEXT,
 /**
  * 响应对象
  */
 response: TEXT,
 /**
  * 创建时间
  */
 created_at: DATE,
 /**
  * 更新时间
  */
 updated_at: DATE,
 });

 return Log;
};
6、测试Python脚本:
import requests

from multiprocessing import Pool
from threading import Thread

from multiprocessing import Process


def loop():
 t = 1000
 while t:
  url = "http://localhost:7001/log/notice"

  payload = "{\n\t\"type\": \"ERROR\",\n\t\"level\": 1,\n\t\"content\": \"URL send ERROR\",\n\t\"operator\": \"Knove\"\n}"
  headers = {
  'Content-Type': "application/json",
  'Cache-Control': "no-cache"
  }

  response = requests.request("POST", url, data=payload, headers=headers)

  print(response.text)

if __name__ == '__main__':
 for i in range(10):
  t = Thread(target=loop)
  t.start()
7、建表语句:
SET NAMES utf8mb4;
SET FOREIGN_KEY_CHECKS = 0;

-- ----------------------------
-- Table structure for logs
-- ----------------------------
DROP TABLE IF EXISTS `logs`;
CREATE TABLE `logs` (
 `id` varchar(36) CHARACTER SET utf8mb4 COLLATE utf8mb4_bin NOT NULL,
 `type` varchar(100) CHARACTER SET utf8mb4 COLLATE utf8mb4_bin NOT NULL COMMENT '日志类型',
 `level` int(11) NULL DEFAULT NULL COMMENT '优先等级(数字越高,优先级越高)',
 `operator` varchar(50) CHARACTER SET utf8mb4 COLLATE utf8mb4_bin NULL DEFAULT NULL COMMENT '操作人',
 `content` text CHARACTER SET utf8mb4 COLLATE utf8mb4_bin NULL COMMENT '日志信息',
 `ip` varchar(36) CHARACTER SET utf8mb4 COLLATE utf8mb4_bin NULL DEFAULT NULL COMMENT 'IP\r\nIP',
 `user_agent` varchar(150) CHARACTER SET utf8mb4 COLLATE utf8mb4_bin NULL DEFAULT NULL COMMENT '当前用户代理信息',
 `error_stack` text CHARACTER SET utf8mb4 COLLATE utf8mb4_bin NULL COMMENT '错误堆栈',
 `url` varchar(255) CHARACTER SET utf8mb4 COLLATE utf8mb4_bin NULL DEFAULT NULL COMMENT '当前URL',
 `request` text CHARACTER SET utf8mb4 COLLATE utf8mb4_bin NULL COMMENT '请求对象',
 `response` text CHARACTER SET utf8mb4 COLLATE utf8mb4_bin NULL COMMENT '响应对象',
 `created_at` datetime(0) NULL DEFAULT NULL COMMENT '创建时间',
 `updated_at` datetime(0) NULL DEFAULT NULL COMMENT '更新时间',
 PRIMARY KEY (`id`) USING BTREE
) ENGINE = InnoDB CHARACTER SET = utf8mb4 COLLATE = utf8mb4_bin ROW_FORMAT = Dynamic;

SET FOREIGN_KEY_CHECKS = 1;
λ.3 后话
网上类似资料甚少,啃各种文档,探寻技术实现方式
以上就是本文的全部内容,希望对大家的学习有所帮助,也希望大家多多支持脚本之家。


