
简介
安装
npm install --save-dev file-loader
用法
默认情况下,生成的文件的文件名就是文件内容的 MD5 哈希值并会保留所引用资源的原始扩展名。
import img from './webpack-logo.png'
webpack.config.js
module.exports = {
 module: {
  rules: [
   {
    test: /\.(png|jpg|gif)$/,
    use: [
     {
      loader: 'file-loader',
      options: {}
     }
    ]
   }
  ]
 }
}
生成文件 bd62c377ad80f89061ea5ad8829df35b.png (默认的文件名为 [hash].[ext]),输出到输出目录并返回 public URL。
"/public/path/bd62c377ad80f89061ea5ad8829df35b.png"
当然如果不想使用默认的文件名,我们也可以通过配置 options.name 选项来设置输出的文件名命名规则,需要注意的是 name 选项支持的类型为: {String|Function} :
String 类型
webpack.config.js
{
 loader: 'file-loader',
 options: {
  name: '[path][name].[ext]'
 }
}
Function 类型
webpack.config.js
{
 loader: 'file-loader',
 options: {
  name (file) {
   if (env === 'development') {
    return '[path][name].[ext]'
   }
   return '[hash].[ext]'
  }
 }
}
以上的示例中,我们使用了 [path] , [name] , [hash] 和 [ext] 占位符,它们对应的含义是:
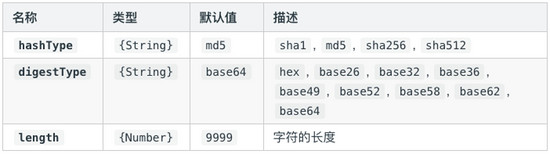
其实除了以上常用的四个占位符之外,还有支持 [N] ,N 是数值类型,表示当前文件名按照查询参数 regExp 匹配后获得到第 N 个匹配结果。介绍完 name 配置项,接下来我们来继续介绍几个常用的配置。
常用配置项 outputPath
outputPath 用于配置自定义 output 输出目录,支持 String|Function 类型,默认值为 ‘undefined',用法如下:
webpack.config.js
{
 loader: 'file-loader',
 options: {
  name: '[path][name].[ext]',
  outputPath: 'images/'
 }
}
需要注意的是,outputPath 所设置的路径,是相对于 webpack 的输出目录。
publicPath
publicPath 用于配置自定义 public 发布目录,支持 String|Function 类型,默认值为 __webpack_public__path__ ,用法如下:
webpack.config.js
{
 loader: 'file-loader',
 options: {
  name: '[path][name].[ext]',
  publicPath: 'assets/'
 }
}
emitFile
emitFile 用于设置是否生成文件,类型是 Boolean,默认值为 true。但我们可以通过将 emitFile 设置为 false 来禁用该默认行为。
webpack.config.js
{
 loader: 'file-loader',
 options: {
  emitFile: false
 }
}
outputPath vs publicPath
outputPath 仅仅告诉 webpack 结果存储在哪里,然而 publicPath 选项则被许多 webpack 的插件用于在生产模式下更新内嵌到 css、html 文件内的 url 值。例如:
// Development: Both Server and the image are on localhost
.image {
 background-image: url('./test.png');
 }

// Production: Server is on Heroku but the image is on a CDN
.image {
 background-image: url('https://some-cdn/test.png');
 }
loader 准则
编写 loader 时应该遵循以下准则:
以上的准则按重要程度排序,但某些仅适用于某些场景。若想进一步了解自定义 loader,可以阅读 编写一个 loader 这个文档。接下来,我们来基于上述的准则分析一下 file-loader 的源码。
file-loader 源码简析
所谓 loader 只是一个导出为函数对象的 JavaScript 模块。 loader runner 会调用这个函数,然后把上一个 loader 产生的结果或者资源文件传入进去。 函数的 this 上下文将由 webpack 填充,并且 loader runner 具有一些有用方法,可以使 loader 改变为异步调用方式,或者获取 query 参数 。
其实本文介绍的 file-loader 并不会对文件的内容进行任何转换,只是复制一份文件内容,并根据相关的配置生成对应的文件名,所生成的文件名一般会带上 hash 值,从而避免文件重名导致冲突。接下来我们来简单分析一下 file-loader 的部分源码。
导入依赖模块
import path from 'path';

import loaderUtils from 'loader-utils';
import validateOptions from 'schema-utils';

import schema from './options.json';
获取配置对象及验证
export default function loader(content) {
 if (!this.emitFile)
  throw new Error('File Loader\n\nemitFile is required from module system');

 const options = loaderUtils.getOptions(this) || {};

 validateOptions(schema, options, 'File Loader');
}
以上代码中,emitFile 是由 loader 上下文提供的方法,用于输出一个文件,对应的函数签名如下:
emitFile(name: string, content: Buffer|string, sourceMap: {...})
在调用 file-loader 时,如果发现 this.emitFile 无效,则会抛出异常。接着 file-loader 会先调用 loaderUtils.getOptions() 方法,获取当前 loader 对应的配置对象,然后基于已定义的 Schema,验证配置对象的有效性。对应的 Schema 定义如下(不包含异常提示信息):
{
 "type": "object",
 "properties": {
  "name": {},
  "regExp": {},
  "context": {
   "type": "string"
  },
  "publicPath": {},
  "outputPath": {},
  "useRelativePath": {
   "type": "boolean"
  },
  "emitFile": {
   "type": "boolean"
  }
 },
 "additionalProperties": true
}
获取 context 及生成文件名称
const context =
  options.context //自定义文件context
  // 从webpack 4开始,原先的this.options.context
  // 被改进为this.rootContext
  || this.rootContext ||
  (this.options && this.options.context);

const url = loaderUtils.interpolateName(
 this,
 options.name, // 默认为"[hash].[ext]"
 {
  context,
  content,
  regExp: options.regExp,
});
loaderUtils 中的 interpolateName 方法,用于生成对应的文件名,该方法的签名如下:
interpolateName(loaderContext, name, options);
其中 loaderContext 为 loader 的上下文对象,name 为文件名称模板,options 为配置对象,支持 context,content 和 regExp 属性。该方法的使用示例如下:
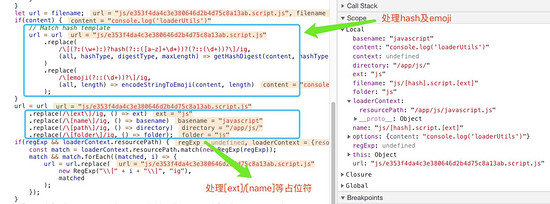
示例一:
// loaderContext.resourcePath = "/app/js/javascript.js";
let interpolatedName = loaderUtils.interpolateName(
 loaderContext,
 "js/[hash].script.[ext]",
 {
   content: "console.log('loaderUtils')"
 });
// => js/e353f4da4c3e380646d2b4d75c8a13ab.script.js
以上示例核心的处理流程如下:
示例二:
// loaderContext.resourcePath = "/app/js/page-home.js"
loaderUtils.interpolateName(
 loaderContext,
 "script-[1].[ext]",
 {
 regExp: "page-(.*)\\.js",
 content: "console.log('loaderUtils')"
 });
// => script-home.js
处理 outputPath
let outputPath = url;

if (options.outputPath) {
  if (typeof options.outputPath === 'function') {
   outputPath = options.outputPath(url);
  } else {
   outputPath = path.posix.join(options.outputPath, url);
  }
}
处理 publicPath
// __webpack_require__.p = "";
let publicPath = `__webpack_public_path__ + ${JSON.stringify(outputPath)}`;

if (options.publicPath) {
  if (typeof options.publicPath === 'function') {
   publicPath = options.publicPath(url);
  } else if (options.publicPath.endsWith('/')) {
   publicPath = options.publicPath + url;
  } else {
   publicPath = `${options.publicPath}/${url}`;
  }

  publicPath = JSON.stringify(publicPath);
}
处理 emitFile
if (options.emitFile === undefined || options.emitFile) {
  // 把文件输出到指定的outputPath路径
  this.emitFile(outputPath, content);
}
导出最终路径
return `module.exports = ${publicPath};`;
参考资源
loader API
webpack-the-confusing-parts
以上就是本文的全部内容,希望对大家的学习有所帮助,也希望大家多多支持脚本之家。


