
本文实例为大家分享了iOS实现图片折叠效果的具体代码,供大家参考,具体内容如下
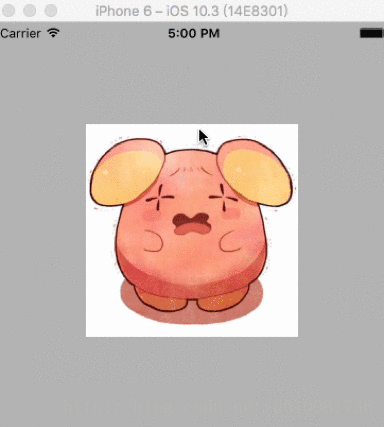
效果图:
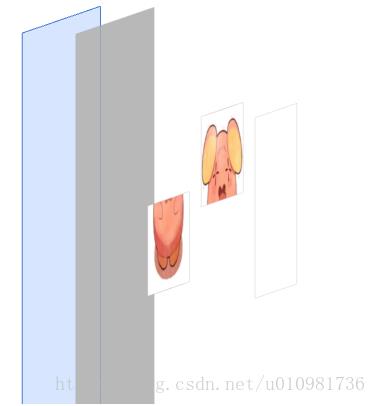
结构布局:拖两个UIImageView到控制器,设置相同的frame和图片,再拖一个大的UIImageView盖在上面,注意把大的imageView.userInteractionEnabled = YES;能够添加手势。
注意层次结构:
核心代码:
//
// ViewController.m
// 图片折叠
//
// Created by llkj on 2017/8/31.
// Copyright © 2017年 LayneCheung. All rights reserved.
//

#import "ViewController.h"

@interface ViewController ()

@property (weak, nonatomic) IBOutlet UIImageView *topImageV;
@property (weak, nonatomic) IBOutlet UIImageView *buttomImageV;
@property (nonatomic, weak) CAGradientLayer *gradientL;
@end

@implementation ViewController

- (void)viewDidLoad {
  [super viewDidLoad];
  //1.让上不图片只显示上半部分
  self.topImageV.layer.contentsRect = CGRectMake(0, 0, 1, 0.5);
  //2.让下不图片只显示下半部分
  self.buttomImageV.layer.contentsRect = CGRectMake(0, 0.5, 1, 0.5);

  self.topImageV.layer.anchorPoint = CGPointMake(0.5, 1);
  self.buttomImageV.layer.anchorPoint = CGPointMake(0.5, 0);

  //设置渐变层
  CAGradientLayer *gradidentL = [CAGradientLayer layer];
  gradidentL.frame = self.buttomImageV.bounds;
  gradidentL.opacity = 0;
  gradidentL.colors = @[(id)[UIColor clearColor].CGColor, (id)[UIColor blackColor].CGColor];
  self.gradientL = gradidentL;
  [self.buttomImageV.layer addSublayer:gradidentL];
}

//这里也可以手动给大的ImageView添加一个UIPanGestureRecognizer手势
- (IBAction)pan:(UIPanGestureRecognizer *)pan {

  //获取移动的偏移量
  CGPoint transP = [pan translationInView:pan.view];
  //让上部图片开始旋转
  CGFloat angle = transP.y * M_PI / 200;

  //近大远小效果
  CATransform3D transform = CATransform3DIdentity;
  //眼睛离屏幕的距离(透视效果)
  transform.m34 = -1 / 300.0;

  self.gradientL.opacity = transP.y * 1 / 200.0;

  self.topImageV.layer.transform = CATransform3DRotate(transform, -angle, 1, 0, 0);


  if (pan.state == UIGestureRecognizerStateEnded) {
    self.gradientL.opacity = 0;
    //上部图片复位
    //usingSpringWithDamping:弹性系数
    [UIView animateWithDuration:0.5 delay:0 usingSpringWithDamping:0.5 initialSpringVelocity:0 options:UIViewAnimationOptionCurveLinear animations:^{
      self.topImageV.layer.transform = CATransform3DIdentity;
    } completion:^(BOOL finished) {

    }];
  }
}

@end
以上就是本文的全部内容,希望对大家的学习有所帮助,也希望大家多多支持脚本之家。


