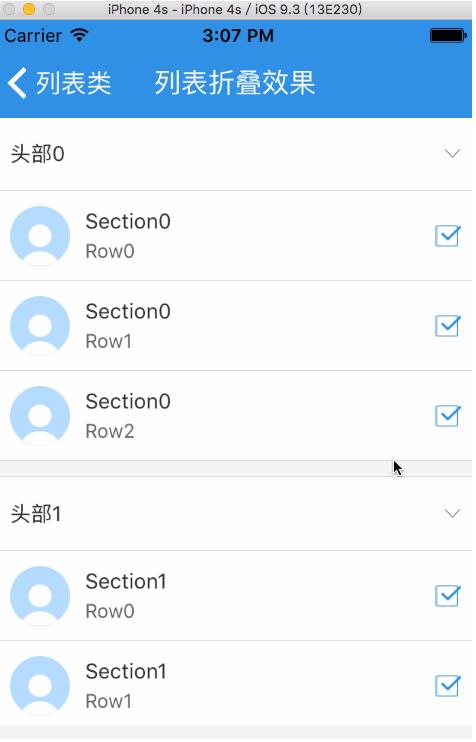
本文实例为大家分享了iOS实现列表折叠效果的具体代码,供大家参考,具体内容如下
实现列表折叠效果其实比较简单,点击列表头部的时候,把返回列表行数设为 0,就是收起列表;再次点击列表头部,显示列表的行数,就展开了列表。
#import "TableDownUpVC.h"
#import "TableViewCell_TableSelect.h"

@interface TableDownUpVC ()
{
 NSMutableDictionary *dicSelet;
 NSArray *arrData;
 NSMutableArray *arrStatus;
 NSInteger selectFlag;

 NSMutableDictionary *dictShow;
}

@property (nonatomic, strong) UIImageView *imgArror;

@end

@implementation TableDownUpVC

- (void)viewDidLoad {
 [super viewDidLoad];
 self.tableView.autoresizingMask = UIViewAutoresizingFlexibleHeight;
 self.title = @"列表折叠效果";

 dictShow = [[NSMutableDictionary alloc] init];
 arrStatus = [[NSMutableArray alloc] init];

 NSDictionary *dict0 = @{@"section":@"头部0",
       @"content":@[@{@"title":@"Section0",@"subTitle":@"Row0",@"avator":@"user_default_blue"},
           @{@"title":@"Section0",@"subTitle":@"Row1",@"avator":@"user_default_blue"},
           @{@"title":@"Section0",@"subTitle":@"Row2",@"avator":@"user_default_blue"}]};

 NSDictionary *dict1 = @{@"section":@"头部1",
       @"content":@[@{@"title":@"Section1",@"subTitle":@"Row0",@"avator":@"user_default_blue"},
           @{@"title":@"Section1",@"subTitle":@"Row1",@"avator":@"user_default_blue"},
           @{@"title":@"Section1",@"subTitle":@"Row2",@"avator":@"user_default_blue"}]};

 NSDictionary *dict2 = @{@"section":@"头部2",
       @"content":@[@{@"title":@"Section2",@"subTitle":@"Row0",@"avator":@"user_default_blue"},
           @{@"title":@"Section2",@"subTitle":@"Row1",@"avator":@"user_default_blue"},
           @{@"title":@"Section2",@"subTitle":@"Row2",@"avator":@"user_default_blue"}]};

 arrData = @[dict0,dict1,dict2];

 dicSelet = [[NSMutableDictionary alloc] init];

 //初始化选中状态(默认都不选择)
 for (NSInteger i=0; i<arrData.count; i++) {
  NSArray *content = arrData[i][@"content"];
  NSMutableDictionary *dict = [[NSMutableDictionary alloc] init];
  for (NSInteger j=0; j<content.count; j++) {
   [dict setObject:@"0" forKey:STR_NUM(j)];
  }
  [arrStatus addObject:dict];
 }

 //初始化列表头部折叠状态
 for (NSInteger i=0; i<arrData.count; i++) {
  [dictShow setObject:@"0" forKey:STR_NUM(i)];
 }
}

#pragma mark - TableViewDataSource,UITableViewDelegate 扩展

- (NSInteger)numberOfSectionsInTableView:(UITableView *)tableView
{
 return arrData.count;
}

- (NSInteger)tableViewEx:(UITableView *)tableView numberOfRowsInSection:(NSInteger)section
{
 NSString *isShow = dictShow[STR_NUM(section)];
 if ([isShow isEqualToString:@"0"]) {
  NSArray *arr = arrData[section][@"content"];
  return arr.count;
 } else {
  return 0;
 }
}

- (CGFloat)tableViewEx:(UITableView *)tableView heightForRowAtIndexPath:(NSIndexPath *)indexPath
{
 return 60;
}

- (UITableViewCell *)tableViewEx:(UITableView *)tableView cellForRowAtIndexPath:(NSIndexPath *)indexPath
{
 static NSString * identifier = @"cellIdentifier";
 TableViewCell_TableSelect *cell = [tableView dequeueReusableCellWithIdentifier:identifier];
 cell.selectionStyle = UITableViewCellSelectionStyleNone;
 if (cell == nil) {
  cell = [[TableViewCell_TableSelect alloc]initWithStyle:UITableViewCellStyleSubtitle reuseIdentifier:identifier];
 }
 [cell setDictInfo:arrData[indexPath.section][@"content"][indexPath.row]];
 [cell setAccessoryImage:arrStatus[indexPath.section][STR_NUM(indexPath.row)]];

 return cell;
}

- (void)tableViewEx:(UITableView *)tableView didSelectRowAtIndexPath:(NSIndexPath *)indexPath
{
 NSMutableDictionary *dict = arrStatus[indexPath.section];
 NSString *str = dict[STR_NUM(indexPath.row)];
 if ([str isEqualToString:@"0"]) {
  [dict setValue:@"1" forKey:STR_NUM(indexPath.row)];
 } else {
  [dict setValue:@"0" forKey:STR_NUM(indexPath.row)];
 }
 [self.tableView reloadData];
}

- (CGFloat)tableView:(UITableView *)tableView heightForHeaderInSection:(NSInteger)section
{
 return 50;
}

- (CGFloat)tableView:(UITableView *)tableView heightForFooterInSection:(NSInteger)section
{
 return 10;
}

- (UIView *)tableView:(UITableView *)tableView viewForHeaderInSection:(NSInteger)section
{

 UIView *headerView = [UICommonCtrl commonViewWithFrame:CGRectMake(0, 0, SCREEN_WIDTH, 50) color:kColor_White];

 UILabel *title = [UICommonCtrl commonLabelWithFrame:CGRectMake(10, 15, 200, 20)
             text:arrData[section][@"section"]
             color:kColor_Black
             font:kFont_Large
           textAlignment:NSTextAlignmentLeft];
 [headerView addSubview:title];

 _imgArror = [UICommonCtrl commonImageViewWithFrame:CGRectMake(SCREEN_WIDTH-20, 22.5, 10, 5) image:nil];
 [headerView addSubview:_imgArror];

 NSString *str = [dictShow objectForKey:STR_NUM(section)];
 if ([str isEqualToString:@"0"]) {
  _imgArror.image = [UIImage imageNamed:@"icon_down"];
 } else {
  _imgArror.image = [UIImage imageNamed:@"icon_up"];
 }

 @weakify(self)
 UIButton *btn = [UICommonCtrl commonButtonWithFrame:CGRectMake(0, 0, SCREEN_WIDTH, 50)
             text:@""
             color:kColor_Black
             font:kFont_Large
          backgroundImage:nil
             block:^(UIButton *btn) {
              @strongify(self)
              NSString *str = [dictShow objectForKey:STR_NUM(section)];
              if ([str isEqualToString:@"0"]) {
               [dictShow setValue:@"1" forKey:STR_NUM(section)];
              } else {
               [dictShow setValue:@"0" forKey:STR_NUM(section)];
              }
              [self refreshSection:section];

             }];
 [headerView addSubview:btn];


 for (NSInteger i=0; i<2; i++) {
  UIView *line = [UICommonCtrl commonLineViewWithFrame:CGRectMake(0, (50-LINE_SIZE)*i, SCREEN_WIDTH, LINE_SIZE) color:kColor_Line];
  [headerView addSubview:line];
 }

 return headerView;
}

- (UIView *)tableView:(UITableView *)tableView viewForFooterInSection:(NSInteger)section
{
 UIView *footerView = [UICommonCtrl commonViewWithFrame:CGRectMake(0, 0, SCREEN_WIDTH, 10) color:kColor_Background];
 return footerView;
}

- (void)refreshSection:(NSInteger)section
{
 NSIndexSet *indexSet=[[NSIndexSet alloc]initWithIndex:section];
 [self.tableView reloadSections:indexSet withRowAnimation:UITableViewRowAnimationFade];
}

@end
效果图

以上就是本文的全部内容,希望对大家的学习有所帮助,也希望大家多多支持脚本之家。