
本文实例为大家分享了opencv实现轮廓高斯滤波平滑的具体代码,供大家参考,具体内容如下
一个小测试的题目:
在图像上点选,找到与点选处相邻的颜色相近的点集合,对该点集合提取轮廓,对该点集合轮廓平滑处理,显示处理结果。
#include <opencv2/opencv.hpp>
#include <iostream>

using namespace std;
using namespace cv;


//************************************
// Method: findRegion 漫水填充
// FullName: findRegion
// Access: public
// Returns: vector<Point>
// Qualifier:
// Parameter: Mat img
// Parameter: Point pos
// Parameter: int LowDifference
// Parameter: int UpDifference
//************************************
vector<Point> findRegion(Mat img, Point pos, int LowDifference, int UpDifference)
{
 Mat image = img.clone();
 Mat imgBack = img.clone();
 Rect ccomp;
 Scalar pixel = image.at<Vec3b>(pos);
 Scalar pixel2 = Scalar(255 - pixel[0], 255 - pixel[1], 255 - pixel[2], pixel[3]);
 floodFill(image, pos, pixel2, &ccomp, Scalar(LowDifference, LowDifference, LowDifference),
 Scalar(UpDifference, UpDifference, UpDifference));

 Mat diff;
 absdiff(image, imgBack, diff);

 //统计所有非零像素
 vector<Point> pt;
 for (int i = 0; i < diff.rows; i++)
 {
 for (int j = 0; j < diff.cols; j++)
 {
 Point newPos(j, i);
 Scalar pixel3 = diff.at<Vec3b>(newPos);
 if (pixel3[0] != 0 || pixel3[1] != 0 || pixel3[2] != 0)
 {
 pt.push_back(newPos);
 }
 }
 }

 return pt;
}

//************************************
// Method: findPerimeter 从点集合中寻找轮廓点
// FullName: findPerimeter
// Access: public
// Returns: vector<Point>
// Qualifier:
// Parameter: vector<Point> pt
// Parameter: Size size
//************************************
vector<Point> findPerimeter(vector<Point> pt, Size size)
{
 Mat imgGray(size, CV_8UC1, Scalar(0));
 for (int i = 0; i < pt.size(); i++)
 {
 imgGray.at<uchar>(pt[i]) = 255;
 }

 std::vector<std::vector<cv::Point>> contours;
 //获取轮廓不包括轮廓内的轮廓
 cv::findContours(imgGray.clone(), contours, CV_RETR_EXTERNAL, CV_CHAIN_APPROX_NONE);

 return contours[0];
}

//************************************
// Method: displayImage 显示图像
// FullName: displayImage
// Access: public
// Returns: void
// Qualifier:
// Parameter: Mat img
// Parameter: vector<Point> contours 轮廓点
// Parameter: Point pos
//************************************
void displayImage(Mat img, vector<Point> contours, Point pos)
{
 Mat imgShow = img.clone();
 for (int i = 0; i < contours.size(); i++)
 {
 imgShow.at<Vec3b>(contours[i])[0] = 0;
 imgShow.at<Vec3b>(contours[i])[1] = 0;
 imgShow.at<Vec3b>(contours[i])[2] = 0;
 }

 circle(imgShow, pos, 3, Scalar(0, 0, 0), 1, 8, 0);//画用户选择的点

 imshow("img", imgShow);
 waitKey(0);
}


//************************************
// Method: findSmoothPeimeter 高斯滤波轮廓点平滑
// FullName: findSmoothPeimeter
// Access: public
// Returns: void
// Qualifier:
// Parameter: Mat img 原图
// Parameter: vector<Point> pt 轮廓点集合
//************************************
void findSmoothPeimeter(Mat img, vector<Point> pt)
{
 vector<Point> contours = findPerimeter(pt, img.size());

 Mat im;
 cvtColor(img, im, CV_BGR2GRAY);

 Mat cont = ~im;
 Mat original = Mat::zeros(im.rows, im.cols, CV_8UC3);
 Mat smoothed = img.clone();

 // contour smoothing parameters for gaussian filter
 int filterRadius = 10;
 int filterSize = 2 * filterRadius + 1;
 double sigma = 10;

 size_t len = contours.size() + 2 * filterRadius;
 size_t idx = (contours.size() - filterRadius);
 vector<float> x, y;
 for (size_t i = 0; i < len; i++)
 {
 x.push_back(contours[(idx + i) % contours.size()].x);
 y.push_back(contours[(idx + i) % contours.size()].y);
 }
 // filter 1-D signals
 vector<float> xFilt, yFilt;
 GaussianBlur(x, xFilt, Size(filterSize, filterSize), sigma, sigma);
 GaussianBlur(y, yFilt, Size(filterSize, filterSize), sigma, sigma);
 // build smoothed contour
 vector<Point> smoothContours;
 for (size_t i = filterRadius; i < contours.size() + filterRadius; i++)
 {
 smoothContours.push_back(Point(xFilt[i], yFilt[i]));
 }

 Scalar color;

 for (int i = 0; i < smoothContours.size(); i++)
 {
 smoothed.at<Vec3b>(smoothContours[i])[0] = 0;
 smoothed.at<Vec3b>(smoothContours[i])[1] = 0;
 smoothed.at<Vec3b>(smoothContours[i])[2] = 0;
 }

 imshow("smoothed", smoothed);
 waitKey(10);
}

void main()
{
 Mat img = imread("4.jpg", 1);

 vector<Point> pt, contours;
 Point pos(1438, 590);//先列后行
 int para1 = 2;
 int para2 = 2;
 pt = findRegion(img, pos, para1, para2);
 findSmoothPeimeter(img, pt);

 contours = findPerimeter(pt, img.size());//轮廓点集合
 displayImage(img, contours, pos);//显示图像
}
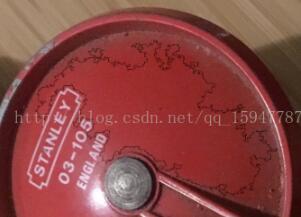
漫水填充找到的轮廓
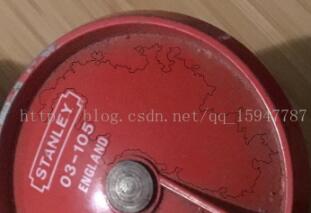
轮廓滤波平滑
以上就是本文的全部内容,希望对大家的学习有所帮助,也希望大家多多支持脚本之家。


