
QT有封装好的UDP协议的类,QUdpSocket,里面有我们想要的函数接口。感兴趣的话,可以看看。
先搞服务端吧,写一个子类,继承QDialog类,起名为UdpServer类。头文件要引用我们上边说的QUdpSocket这个类,还有我们想要的布局的类。
#ifndef UDPSERVER_H
#define UDPSERVER_H

#include <QDialog>
#include <QLabel>
#include <QLineEdit>
#include <QPushButton>
#include <QVBoxLayout>
#include <QtNetwork/QUdpSocket>
#include <QtNetwork/QHostAddress>
#include <QTimer>
class UdpServer : public QDialog
{
 Q_OBJECT
public:
 UdpServer(QWidget *parent = 0,Qt::WindowFlags f= 0);
 ~UdpServer();
private:
 QLabel * TimerLabel;
 QLineEdit * TextLineEdit;
 QPushButton* StartBtn;
 QVBoxLayout * mainLayout;
 public slots:
 void StartBtnClicked();
 void timeout();
 private:
 int port;
 bool isStarted;
 QUdpSocket * udpSocket;
 QTimer *timer;
};
#endif // UDPSERVER_H
在.cpp文件里,我们先是把界面显示出来,然后用udp的writedategram把想要传的写进去。
#include "udpserver.h"


UdpServer::UdpServer(QWidget *parent,Qt::WindowFlags f)
 : QDialog(parent,f)
{
 setWindowTitle(tr("UDP SERVER"));
 TimerLabel = new QLabel(tr("show time:"),this);
 TextLineEdit = new QLineEdit(this);
 StartBtn = new QPushButton(tr("start"),this);

 mainLayout = new QVBoxLayout(this);
 mainLayout-> addWidget(TimerLabel);
 mainLayout-> addWidget(TextLineEdit);
 mainLayout-> addWidget(StartBtn);

 connect(StartBtn,SIGNAL(clicked()),this,SLOT(StartBtnClicked()));
 port = 5555;
 isStarted = false;
 udpSocket = new QUdpSocket(this);
 timer = new QTimer(this);
 connect(timer,SIGNAL(timeout()),this,SLOT(timeout()));

}

UdpServer::~UdpServer()
{

}
void UdpServer::StartBtnClicked()
{
 if(!isStarted)
 {
  StartBtn->setText(tr("STOP"));
  timer->start(1000);
  isStarted = true;
 }
 else
 {
  StartBtn->setText(tr("BEGIN"));
  isStarted = false;
  timer->stop();
 }
}
void UdpServer::timeout()
{
 QString msg = TextLineEdit->text();
 int length=0;
 if(msg=="")
 {
  return;
 }

 if((length=udpSocket->writeDatagram(msg.toLatin1(),msg.length(),QHostAddress::Broadcast,port))!=msg.length())
 {
  qDebug() << msg.toLatin1();
  return;
 }
}
我这里用qDebug把要传的东西打印出来,进行测试,看看是否传过去了。
客户端:
#ifndef UDPCLIENT_H
#define UDPCLIENT_H
#include <QDialog>
#include <QVBoxLayout>
#include <QTextEdit>
#include <QPushButton>
#include <QtNetwork/QUdpSocket>
 class UdpClient : public QDialog
{
 Q_OBJECT
 public:
 UdpClient(QWidget *parent = 0);
 ~UdpClient();
 private:
 QTextEdit* ReceiceTextEdit;
 QPushButton* CloseBtn;
 QVBoxLayout* mainLayout;
 public slots:
 void CloseBtnClicked();
 void dataReceived();
 private:
 int port;
 QUdpSocket* udpSocket;
};
#endif // UDPCLIENT_H
客户端很简单,怎么实现布局,我就不多说了,主要是dataReceive函数。
#include "udpclient.h"
#include <QMessageBox>
#include <QHostAddress>


UdpClient::UdpClient(QWidget *parent)
 :QDialog(parent)
{
 setWindowTitle("UDP CLIENT");

 ReceiceTextEdit = new QTextEdit(this);
 CloseBtn = new QPushButton(tr("Close"),this);

 mainLayout = new QVBoxLayout(this);
 mainLayout->addWidget(ReceiceTextEdit);
 mainLayout->addWidget(CloseBtn);

 connect(CloseBtn,SIGNAL(clicked()),this,SLOT(CloseBtnClicked()));

 port =5555;

 udpSocket = new QUdpSocket(this);

 bool result = udpSocket->bind(port);

 if(!result)
 {
  QMessageBox::information(this,tr("ERROR"),tr("connect error"));
  return;
 }
 connect(udpSocket,SIGNAL(readyRead()),this,SLOT(dataReceived()));

}
 UdpClient:: ~UdpClient()
{


}
void UdpClient::CloseBtnClicked()
{
 close();
}
void UdpClient::dataReceived()
{
 while(udpSocket->hasPendingDatagrams())
 {

  QByteArray datagram;
  datagram.resize(udpSocket->pendingDatagramSize());
  udpSocket->readDatagram(datagram.data(),datagram.size());
  QString msg=datagram.data();
  ReceiceTextEdit->insertPlainText(msg);

 }
}
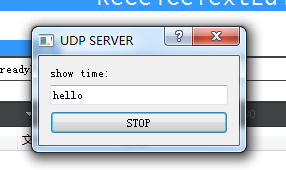
最后显示一下界面,服务端发送hello。
客户端收到的:
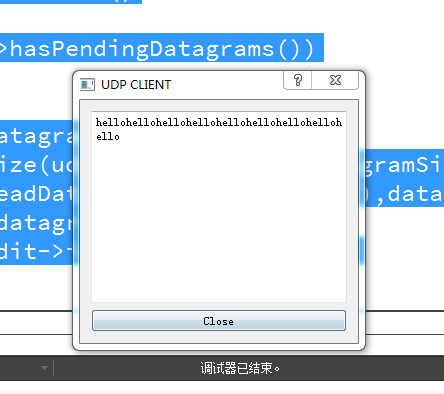
不停的在打印hello。直到点击关闭,或者服务端停止。
以上这篇QT网络编程UDP下C/S架构广播通信(实例讲解)就是小编分享给大家的全部内容了,希望能给大家一个参考,也希望大家多多支持脚本之家。


