
先给大家分享效果图:
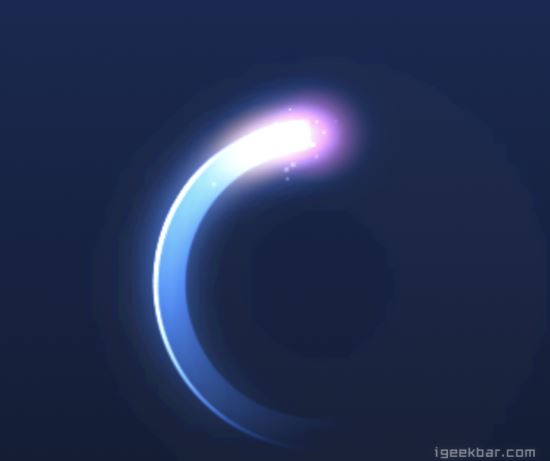
给大家分享一个使用CSS+JS实现的唯美星空轨迹运动效果, 这样的效果不输给Flash 。相关代码如下:
<!doctype html>
<html lang="en">
<head>
  <meta charset="UTF-8">
  <title>cloth</title>
  <style>
   body {
  background: #000;
}
img {
  display: block;
 float: left;
  margin: 0 1px 0 0;
}
canvas {
  background: #131c35 linear-gradient(#192853, #131c35);
 display: block;
  float: left;
  /* uncomment to test overlay */
  /*
  position: absolute;
  left: 0;
  opacity: .5;
  top: 0;
  */
}
  </style>
</head>
<body>
  <div id="container"></div>
  <script type="text/javascript" src="http://cdn.gbtags.com/jquery/1.11.1/jquery.min.js"></script>
  <canvas id="c"></canvas>
  <img src="http://dribbble.s3.amazonaws.com/users/36991/screenshots/674715/game.png" />
  <script>
    var c = document.getElementById('c'),
    ctx = c.getContext('2d'),
    cw = c.width = 400,
  ch = c.height = 300,
    rand = function(a,b){return ~~((Math.random()*(b-a+1))+a);},
    dToR = function(degrees){
        return degrees * (Math.PI / 180);
    },
    circle = {
      x: (cw / 2) + 5,
      y: (ch / 2) + 22,
      radius: 90,
      speed: 2,
      rotation: 0,
      angleStart: 270,
      angleEnd: 90,
      hue: 220,
      thickness: 18,
      blur: 25
    },
    particles = [],
    particleMax = 100,
    updateCircle = function(){
      if(circle.rotation < 360){
       circle.rotation += circle.speed;
      } else {
       circle.rotation = 0;
      }
    },
    renderCircle = function(){
      ctx.save();
      ctx.translate(circle.x, circle.y);
      ctx.rotate(dToR(circle.rotation));
      ctx.beginPath();
      ctx.arc(0, 0, circle.radius, dToR(circle.angleStart), dToR(circle.angleEnd), true);
      ctx.lineWidth = circle.thickness;
      ctx.strokeStyle = gradient1;
      ctx.stroke();
      ctx.restore();
    },
    renderCircleBorder = function(){
      ctx.save();
      ctx.translate(circle.x, circle.y);
      ctx.rotate(dToR(circle.rotation));
      ctx.beginPath();
      ctx.arc(0, 0, circle.radius + (circle.thickness/2), dToR(circle.angleStart), dToR(circle.angleEnd), true);
      ctx.lineWidth = 2;
      ctx.strokeStyle = gradient2;
      ctx.stroke();
      ctx.restore();
    },
  renderCircleFlare = function(){
      ctx.save();
      ctx.translate(circle.x, circle.y);
      ctx.rotate(dToR(circle.rotation+185));
      ctx.scale(1,1);
      ctx.beginPath();
      ctx.arc(0, circle.radius, 30, 0, Math.PI *2, false);
      ctx.closePath();
      var gradient3 = ctx.createRadialGradient(0, circle.radius, 0, 0, circle.radius, 30);
      gradient3.addColorStop(0, 'hsla(330, 50%, 50%, .35)');
      gradient3.addColorStop(1, 'hsla(330, 50%, 50%, 0)');
      ctx.fillStyle = gradient3;
      ctx.fill();
      ctx.restore();
    },
    renderCircleFlare2 = function(){
      ctx.save();
      ctx.translate(circle.x, circle.y);
      ctx.rotate(dToR(circle.rotation+165));
      ctx.scale(1.5,1);
      ctx.beginPath();
      ctx.arc(0, circle.radius, 25, 0, Math.PI *2, false);
      ctx.closePath();
      var gradient4 = ctx.createRadialGradient(0, circle.radius, 0, 0, circle.radius, 25);
      gradient4.addColorStop(0, 'hsla(30, 100%, 50%, .2)');
      gradient4.addColorStop(1, 'hsla(30, 100%, 50%, 0)');
      ctx.fillStyle = gradient4;
      ctx.fill();
      ctx.restore();
    },
     createParticles = function(){
      if(particles.length < particleMax){
        particles.push({
          x: (circle.x + circle.radius * Math.cos(dToR(circle.rotation-85))) + (rand(0, circle.thickness*2) - circle.thickness),
          y: (circle.y + circle.radius * Math.sin(dToR(circle.rotation-85))) + (rand(0, circle.thickness*2) - circle.thickness),
          vx: (rand(0, 100)-50)/1000,
          vy: (rand(0, 100)-50)/1000,
          radius: rand(1, 6)/2,
          alpha: rand(10, 20)/100
        });
      }
    },
    updateParticles = function(){
      var i = particles.length;
      while(i--){
       var p = particles[i];
        p.vx += (rand(0, 100)-50)/750;
        p.vy += (rand(0, 100)-50)/750;
        p.x += p.vx;
        p.y += p.vy;
        p.alpha -= .01;
        if(p.alpha < .02){
          particles.splice(i, 1)
        }
      }
    },
    renderParticles = function(){
      var i = particles.length;
      while(i--){
       var p = particles[i];
        ctx.beginPath();
        ctx.fillRect(p.x, p.y, p.radius, p.radius);
        ctx.closePath();
        ctx.fillStyle = 'hsla(0, 0%, 100%, '+p.alpha+')';
      }
    },
    clear = function(){
      ctx.globalCompositeOperation = 'destination-out';
      ctx.fillStyle = 'rgba(0, 0, 0, .1)';
      ctx.fillRect(0, 0, cw, ch);
      ctx.globalCompositeOperation = 'lighter';
    }
    loop = function(){
      clear();
      updateCircle();
      renderCircle();
      renderCircleBorder();
      renderCircleFlare();
      renderCircleFlare2();
      createParticles();
      updateParticles();
      renderParticles();
    }
/* Append Canvas */
//document.body.appendChild(c);
/* Set Constant Properties */
ctx.shadowBlur = circle.blur;
ctx.shadowColor = 'hsla('+circle.hue+', 80%, 60%, 1)';
ctx.lineCap = 'round'
var gradient1 = ctx.createLinearGradient(0, -circle.radius, 0, circle.radius);
gradient1.addColorStop(0, 'hsla('+circle.hue+', 60%, 50%, .25)');
gradient1.addColorStop(1, 'hsla('+circle.hue+', 60%, 50%, 0)');
var gradient2 = ctx.createLinearGradient(0, -circle.radius, 0, circle.radius);
gradient2.addColorStop(0, 'hsla('+circle.hue+', 100%, 50%, 0)');
gradient2.addColorStop(.1, 'hsla('+circle.hue+', 100%, 100%, .7)');
gradient2.addColorStop(1, 'hsla('+circle.hue+', 100%, 50%, 0)');
/* Loop It, Loop It Good */
setInterval(loop, 16);
  </script>
</body>
</html>
 -
以上所述是小编给大家介绍的利用CSS+JS实现唯美星空轨迹运动效果,希望对大家有所帮助,如果大家有任何疑问请给我留言,小编会及时回复大家的。在此也非常感谢大家对脚本之家网站的支持!


