div+CSS制作类似微信对话气泡效果的实例总结

所属分类: 网页制作 / CSS 阅读数: 1291
收藏 0 赞 0 分享

在聊天的场景中,聊天内容需要用到气泡修饰,如下图。下面一一讲解。
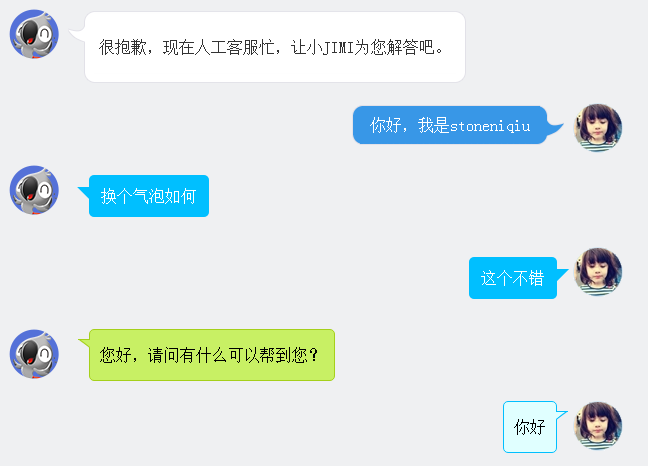
201641111629651.png (648×466)

一、图片式:

第一个样式是京东客服,气泡的圆角和钩子都是用了图片。使用了一个table组合成了一个圆角的框框。lm样式拼出了钩子。


XML/HTML Code复制内容到剪贴板
  1. <div class="jimi_lists clearfix">  
  2.                 <div class="header_img jimi3 fl"></div>  
  3.                 <table class="msg" cellspacing="0" cellpadding="0">  
  4.                     <tbody><tr><td class="lt"></td><td class="tt"></td><td class="rt"></td></tr>  
  5.                     <tr><td class="lm"><span></span></td><td class="mm"><span class="wel"><span class="visitor"><p>很抱歉,现在人工客服忙,让小JIMI为您解答吧。</p></span></span></td><td class="rm"></td></tr>  
  6.                     <tr><td class="lb"></td><td class="bm"></td><td class="rb"></td></tr><tr><td></td></tr>  
  7.                     </tbody>  
  8.                 </table>  
  9.             </div>  
  10.             <div class="customer_lists clearfix">  
  11.                 <div class="header_img jimi3" style="background: url(img/mine.jpg) no-repeat center;">  
  12.                     <div class="header_img_hover"></div>  
  13.                 </div>  
  14.                 <table class="msg" cellspacing="0" cellpadding="0"><tbody><tr><td class="lt"></td><td class="tt"></td><td class="rt"></td></tr><tr><td class="lm"></td><td class="mm">你好,我是stoneniqiu</td><td class="rm"><span></span></td></tr><tr><td class="lb"></td><td class="bm"></td><td class="rb"></td></tr><tr><td></td><td class="time"></td><td></td></tr></tbody></table>  
  15.             </div>  

样式:

CSS Code复制内容到剪贴板
  1. .jimi_lists {   
  2.     margin: 0 -10px 20px 10px;   
  3.     positionrelative;   
  4. }   
  5.  .jimi_lists .header_img.jimi3 {   
  6.     backgroundurl(../img/jimi_50_3.png) no-repeat 0 0;   
  7. }   
  8.  .jimi_lists .header_img {   
  9.     width50px;   
  10.     height50px;   
  11.     positionabsolute;   
  12.     top: 0;   
  13.     left: 0;   
  14. }   
  15. .fl {   
  16.     floatleft;   
  17. }   
  18.  .jimi_lists .msg {   
  19.     margin-left59px;   
  20.     margin-right40px;   
  21.     margin-top2px;   
  22.     floatleft;   
  23.     displayinline;   
  24. }   
  25.  .jimi_lists .lt {   
  26.     backgroundurl(../img/msg_bg_lr.png) no-repeat 0 0;   
  27.     width26px;   
  28.     height10px;   
  29. }   
  30.  .jimi_lists .tt {   
  31.     backgroundurl(../img/msg_bg_tb.png) repeat-x 0 -23px;   
  32.     height10px;   
  33. }   
  34. .jimi_lists .rt {   
  35.     backgroundurl(../img/msg_bg_lr.png) no-repeat -35px 0;   
  36.     width10px;   
  37.     height10px;   
  38. }   
  39. .jimi_lists .lm {   
  40.     backgroundurl(../img/msg_bg_lr.png) repeat-y -94px 0;   
  41.     width26px;   
  42.     vertical-aligntop;   
  43.     positionrelative;   
  44. }   
  45. .jimi_lists .mm {   
  46.     padding: 0 5px;   
  47.     background-color#FFF;   
  48.     word-break: break-all;   
  49.     word-wrap: break-word;   
  50.     color#333;   
  51.     line-height20px;   
  52. }   
  53. .jimi_lists .lm span {   
  54.     backgroundurl(../img/msg_bg_lr.png) no-repeat 0 -14px;   
  55.     displayinline-block;   
  56.     width26px;   
  57.     height16px;   
  58.     positionabsolute;   
  59.     top5px;   
  60. }   
  61. .jimi_lists .rm {   
  62.     backgroundurl(../img/msg_bg_lr.png) repeat-y -113px 0;   
  63.     width10px;   
  64. }   
  65. .jimi_lists .lb {   
  66.     backgroundurl(../img/msg_bg_lr.png) no-repeat 0 -43px;   
  67.     width10px;   
  68.     height10px;   
  69. }   
  70. .jimi_lists .bm {   
  71.     backgroundurl(../img/msg_bg_tb.png) repeat-x 0 -25px;   
  72.     height10px;   
  73. }   
  74. .jimi_lists .rb {   
  75.     backgroundurl(../img/msg_bg_lr.png) no-repeat -35px -43px;   
  76.     width10px;   
  77.     height10px;   
  78. }   
  79.   
  80. .customer_lists {   
  81.     positionrelative;   
  82.     margin: 0 12px 20px 20px;   
  83. }   
  84. .customer_lists .msg {   
  85.     floatrightright;   
  86.     margin-right73px;   
  87.     _margin-rightright38px;   
  88.     margin-top2px;   
  89. }   
  90. .customer_lists .lt {   
  91.     backgroundurl(../img/msg_bg_lr.png) no-repeat -47px -0;   
  92.     width10px;   
  93.     height10px;   
  94. }   
  95. .customer_lists .tt {   
  96.     backgroundurl(../img/msg_bg_tb.png) repeat-x 0 0;   
  97.     height10px;   
  98. }   
  99. .customer_lists .rt {   
  100.     backgroundurl(../img/msg_bg_lr.png) no-repeat -63px 0;   
  101.     width26px;   
  102.     height10px;   
  103. }   
  104. .customer_lists .lm {   
  105.     backgroundurl(../img/msg_bg_lr.png) repeat-y -126px 0;   
  106.     width10px;   
  107. }   
  108. .customer_lists .mm {   
  109.     padding1px 8px;   
  110.     background-color#3897E7;   
  111.     word-break: break-all;   
  112.     word-wrap: break-word;   
  113.     color#FFF;   
  114. }   
  115. .customer_lists .rm {   
  116.     backgroundurl(../img/msg_bg_lr.png) repeat-y -129px 0;   
  117.     width26px;   
  118.     vertical-aligntop;   
  119.     positionrelative;   
  120. }   
  121. .customer_lists .lb {   
  122.     backgroundurl(../img/msg_bg_lr.png) no-repeat -47px -36px;   
  123.     width10px;   
  124.     height10px;   
  125. }   
  126. .customer_lists .bm {   
  127.     backgroundurl(../img/msg_bg_tb.png) repeat-x -106px -4px;   
  128.     height10px;   
  129. }   
  130. .customer_lists .rb {   
  131.     backgroundurl(../img/msg_bg_lr.png) no-repeat -63px -36px;   
  132.     width26px;   
  133.     height10px;   
  134. }   
  135.   
  136. .customer_lists .rm span {   
  137.     backgroundurl(../img/msg_bg_lr.png) no-repeat -63px -14px;   
  138.     displayinline-block;   
  139.     width26px;   
  140.     height16px;   
  141.     positionabsolute;   
  142.     top5px;   
  143. }   
  144.   
  145. .customer_lists .header_img_hover {   
  146.     positionabsolute;   
  147.     backgroundurl(../img/avatar_mask_01.png);   
  148.     top: 0;   
  149.     width50px;   
  150.     height50px;   
  151. }   
  152. .customer_lists .header_img {   
  153.     positionabsolute;   
  154.     top: 0;   
  155.     rightright14px;   
  156.     width50px;   
  157.     height50px;   
  158. }   
  159.  .clearfix:after {   
  160.     content" .";   
  161.     displayblock;   
  162.     clearboth;   
  163.     visibilityhidden;   
  164.     height: 0;   
  165. }  

二、背景式:

第二种主要是使用了:before伪类画出了三角形,然后用定位拼在了一起。

XML/HTML Code复制内容到剪贴板
  1. <div class="jimi_lists clearfix">  
  2.                 <div class="header_img jimi3 fl"></div>  
  3.                 <div class="bkbubble right">  
  4.                      <p>换个气泡如何</p>  
  5.                 </div>  
  6.             </div>  
  7.             <div class="customer_lists clearfix">  
  8.                 <div class="header_img jimi3" style="background: url(img/mine.jpg) no-repeat center;">  
  9.                     <div class="header_img_hover"></div>  
  10.                 </div>  
  11.                 <div class="bkbubble left">  
  12.                     <p>这个不错</p>  
  13.                 </div>  
  14.             </div>  

(至于画三角形的方法稍后文章最后会总结一下)
样式:           

CSS Code复制内容到剪贴板
  1. .bkbubble.rightright p:before, .bkbubble.left p:before {   
  2.       width: 0;   
  3.     positionabsolute;   
  4.     top12px;   
  5.     border-stylesolid;   
  6.     content"";   
  7.   }   
  8.   .bkbubble.left {   
  9.       text-alignrightright;   
  10.   }   
  11.  .bkbubble.rightright p:before {   
  12.      left: -12px;   
  13.     border-colortransparent #00bfff;   
  14.     border-width: 0 12px 12px 0;   
  15.  }   
  16.  .bkbubble.left p:before {   
  17.      rightright: -12px;   
  18.     border-colortransparent #00bfff;   
  19.     border-width: 0 0 12px 12px ;   
  20.  }             

          
三、边框式:

如果要求边框颜色和背景颜色不一样呢?上面的方法就不行了,因为用:before画三角形是利用border的原理,也就是说,在上面这种方式下,气泡边上的小三形是无法呈现两种颜色的,因为他只有一个border的颜色。那就要想办法凑出一个有边框的三角形了。

XML/HTML Code复制内容到剪贴板
  1. <div class="jimi_lists lim_operator clearfix">  
  2.                 <div class="header_img jimi3 fl"></div>  
  3.                 <div class="lim_bubble lim_shadow"><p class="lim_dot">您好,请问有什么可以帮到您?</p></div>  
  4.                 <div class="lim_tale"><div class="radiusborder"></div></div>  
  5.             </div>  

1.先画一个小矩形。

CSS Code复制内容到剪贴板
  1. .lim_operator .lim_tale {   
  2.     left: -1px;   
  3.     background-color#c8f064;   
  4.     border-color#a5d01b;   
  5.     margin-left70px;   
  6. }   
  7. .lim_tale {   
  8.     positionabsolute;   
  9.     width12px;   
  10.     height8px;   
  11.     overflowhidden !important;   
  12.     top10px;   
  13.     z-index: 2;   
  14.     border-top-style: solid;   
  15.     border-top-width1px;   
  16. }  

201641111707634.png (349×82)

2.画出斜线。

css里面是没有斜线的,这里是用了一个园的弧形拼出来的。在一个大圆上,截取一段弧,就是一条斜线了。

CSS Code复制内容到剪贴板
  1. .lim_operator .radiusborder {   
  2.     positionabsolute;   
  3.     background-color#EFF0F2;   
  4.     top: -29px;   
  5.     left: -94px;   
  6.     height160px;   
  7.     width160px;   
  8.     border-top-style: solid;   
  9.     border-top-width1px;   
  10.     border-right-style: solid;   
  11.     border-right-width1px;   
  12.     border-top-rightright-radius: 154px;   
  13.     border-color#a5d01b;   
  14. }  

四、叠加式:

原理就是相当于用before先画出一个有色背景,再用after画出一个白色背景,然后叠加错开顶部1-2px,这样就出现了一个有边框有背景的三角形。web 微信就是这种做法

CSS Code复制内容到剪贴板
  1. .expression:before {   
  2.     content'';   
  3.     positionabsolute;   
  4.     left16px;   
  5.     top: 100%;   
  6.     margin-left: -7px;   
  7.     border7px solid transparent;   
  8.     border-top-color#CFCFCF  
  9. }   
  10.   
  11. .expression:after {   
  12.     content'';   
  13.     positionabsolute;   
  14.     left16px;   
  15.     top: 100%;   
  16.     margin-left: -7px;   
  17.     margin-top: -1px;   
  18.     border7px solid transparent;   
  19.     border-top-color#FFF  
  20. }  

PS:三角形的简单绘制:
1.CSS 边框
201641111800289.png (600×200)

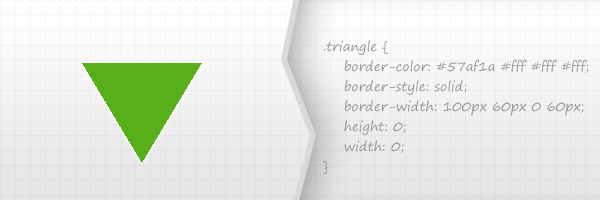
这也是一个常用的使用方式,如tooltips信息提示框和下拉菜单。以上的示例,这是一个我最喜欢的方法创建小而且有用的三角形。

优点:

很容易的通过修改一些CSS代码属性值而更改颜色和大小
这是一个跨浏览器的解决方案。
缺点:

这个方式使用的是border,所以你不能添加阴影、渐变、和其他一些CSS3效果
请记住,IE6是不支持透明边界的-如果你关心这个问题
2.HTML 字符
201641111819677.png (600×200)

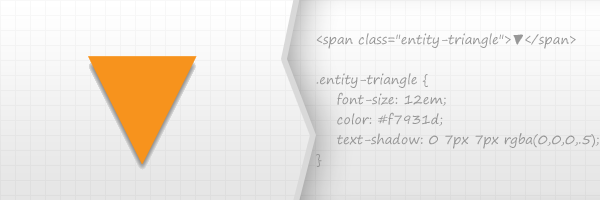
它是基于使用可用的Unicode字符列表的字符。

优点

它是一个跨浏览器的技术
您可以使用CSS3的text-shadow属性添加阴影。
缺点

不能使用太多的CSS3效果,除了使用文字阴影。
在所有的浏览器,这是相当不可能实现像素完美。
3.CSS 旋转正方形
201641111841502.png (600×200)

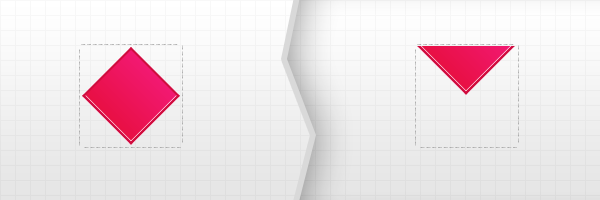
理论上,这种方式,你需要使用两个内容块,但是,并没有限制是使用两个元素,所以可以使用一个元素加一个伪元素。

创建一个内容里。例如100×100像素 – 这将包含旋转块。
旋转包含的这个块45度,从而获得一个菱形
将菱形的块向顶部便宜,然后设置溢出,设置父层容器截断
There you go!
优点:

CSS3阴影,渐变等可以更多的使用
缺点:

这个解决方案不是跨浏览器的,首先是因为CSS3旋转。        

更多精彩内容其他人还在看

CSS入门教程:计算CSS盒模型宽和高

 出处:当我们布局一个网页的时候,经常会遇到这样的一种情况,那就是最终网页成型的宽度或是高度会超出我们预先的计算,其实就就是所谓的CSS的盒模型造成的。 #test{margin:10px;padding:10px;width:100px;height:100px;}
收藏 0 赞 0 分享

在IE流览器中正确显示PNG透明图片

  png图片有很好的品质。阴影效果也不会有杂边,很流畅。如果插入网页的话可以给网站内容增色不少!更重要的是在不增加图片容量大小的情况下提高了页面的图片的质量。对于有复杂背景,如:在有颜色过度背景上插入不规则边框的图片带来极大很便利!   但目前IE中对于插入
收藏 0 赞 0 分享

CSS教程:DIV底部放置文字

  css对文字的布局上没有靠容器底部对齐的参数,目前使用的一个不错的方法也比较好.就是用position属性来解决,看下面的代码,用position的相对和绝对定位功能也轻松的实现了,文字靠近div低部对齐,并且靠近的距离还可以精确到像素,自己可以调节,是不是很不错呢?
收藏 0 赞 0 分享

如何用CSS让文字居于div的底部

  这个问题是别人提出的,因为css对文字的布局上没有靠容器底部对齐的参数,(或许有但是我没有发现)不过目前我使用的一个不错的方法也比较好.就是用position属性来解决,看下面的代码,我用position的相对和绝对定位功能也轻松的实现了,文字靠近div低部对齐,并且靠近
收藏 0 赞 0 分享

从A页面连接到B页面后并直接把B页面的隐藏层显示

  这个效果实现的是,在B页面里有两个层,一个显示层,我们暂定名c层,一个是隐藏层,我们暂定名d层,单独进B页面的时候,c层显示,d层隐藏,然而从A页面连接到B页面的时候,则是让d层显示,c层隐藏,我觉得这个效果对网页设计者以后会有很大帮助,现在把代码发出来,
收藏 0 赞 0 分享

CSS样式表定义标签li前面样式

定义LI前面的小点样式 view plaincopy to clipboardprint? 语法: list-style-type : disc | circle | square | decimal | lower-roman | upper-roman | lowe
收藏 0 赞 0 分享

符合标准的div css制作的弹出菜单

本文介绍了五款符合标准的div css制作的弹出菜单,而且不含有js的. NO.1最基本的:二级dropdown弹出菜单 <!DOCTYPE html PUB
收藏 0 赞 0 分享

CSS实现在文章每段后面加入带连接的隐藏文字

代码主要理解3个参数:createElement、createTextNode、appendChild。这3个js参数分别是创建元素、创建字符、追加节点。代码原理:循环页面段落标签<p>,创建连接元素<a>,创建要显示的连接字符,用SetAttribute
收藏 0 赞 0 分享

CSS:浏览器特定选择器介绍

当你想在一个浏览器里改变样式而不像在其他浏览器中改变时,这些选择器很有用。 IE6以下 *html{} IE 7 以下 *:first-child html {} * html {} 只对IE 7 *:first-child html {} 只对IE 7
收藏 0 赞 0 分享

WEB标准学习,认识两种网页声明的含义

即网页标准推出来以后,我们时常会看到两种不同的网页的声明,一个是Dhtml,一个是Xhtml。如下所示: <!DOCTYPE HTML PUBLIC "-//W3C//DTD HTML 4.01 Transitional//EN" "ht
收藏 0 赞 0 分享
查看更多