
CSS3实现的几个小loading效果
昨晚上闲的没事突然想做几个小loading效果,下面是昨晚上做的几个小案例,分享给大家
1.水波loading:这个loading是我觉得非常简单,但是看上去的效果却非常不错的一个小loading
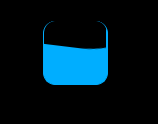
这个是效果图片
下面我直接把代码放上来,大家需要的可以直接拉走
核心思想:(旋转,以及overflow:hidden属性),可以把代码中的overflow属性注释掉,保准你看一眼明白了,看不明白回来找我,我对你负责
<!DOCTYPE html>
<html lang="en">
<head>
    <meta charset="UTF-8">
    <meta name="viewport" content="width=device-width, initial-scale=1.0">
    <meta http-equiv="X-UA-Compatible" content="ie=edge">
    <title>Document</title>
    <style>
        * {
            margin: 0;
            padding: 0
        }
        body {
            background-color: black
        }
        .box {
            margin: 200px auto;
            height: 50px;
            width: 50px;
            border-radius: 10px;
            background-color: rgb(0, 174, 255);
            position: relative;
            overflow: hidden;
            border: 1px solid rgb(0, 174, 255);
            border-top: none;
        }
        .a {
            width: 200px;
            height: 200px;
           background: black;
            position: absolute;
            left: -80px;
            top: -180px;
            border-radius: 80px;
            animation: xuanzhuan 5s linear infinite;
            z-index: 2
        }
        @keyframes xuanzhuan{
            0%{transform: rotate(0deg)}
            100%{transform: rotate(360deg)}
        }
    </style>
</head>
<body>
    <div class="box">
        <div class="a"></div>
        <div class="b"></div>
    </div>
</body>
</html>
2.普通的圆形loading 这个也很简单 没啥好说的,直接上代码了

<!DOCTYPE html>
<html lang="en">
<head>
    <meta charset="UTF-8">
    <meta name="viewport" content="width=device-width, initial-scale=1.0">
    <meta http-equiv="X-UA-Compatible" content="ie=edge">
    <title>Document</title>
    <style>
    *{margin: 0;padding: 0}
    li{list-style: none}
    body,html{
        background-color: black;
    }
    ul{
        height: 40px;
        width: 200px;
        margin: 50px auto;
    }
    ul>li{
        float: left;
        height: 20px;
        width: 20px;
        border-radius: 50%;
        background: white;
        margin-left: 10px;
        animation: move 2s infinite alternate;
        transform: scale(0.5)
    }
    ul>li:nth-of-type(2){
        animation-delay: 0.5s;
    }
    ul>li:nth-of-type(3){
        animation-delay:1s;
    }
    @keyframes move{
        0%{transform: scale(0.5);opacity: 0.5}
        100%{transform: scale(1);opacity: 1;}
    }
    </style>
</head>
<body>
    <ul>
        <li></li>
        <li></li>
        <li></li>
    </ul>
</body>
</html>
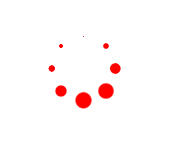
3.圆形转圈loading
思想(把小圆用定位排成圆形,再给每个上添加动画,用delay控制延迟事件即可)
<!DOCTYPE html>
<html>
    <head>
        <meta charset="utf-8" />
        <title></title>
    </head>
    <style>
        *{
            margin: 0;
            padding: 0;
        }
        .d1{
            width: 50px;
            height: 50px;
            position: absolute;
            margin: 100px;
        }
        .d1 p{
            width: 14px;
            height: 14px;
            border-radius: 50%;
            background: red;
            position: absolute;
            animation: dong 1.5s linear infinite;
        }
        .d1 p:nth-child(1){
            top: 0;
            left: 0;
        }
        .d1 p:nth-child(2){
            top: 0;
            right: 0;
        }
        .d1 p:nth-child(3){
            right: 0;
            bottom: 0;
        }
        .d1 p:nth-child(4){
            bottom: 0;
            left: 0;
        }
        .d1:nth-of-type(2){
            transform: rotate(45deg);
        }
        @keyframes dong{
            0%{
                transform: scale(0);
            }
            50%{
                transform: scale(1);
            }
            100%{
                transform: scale(0);
            }
        }
        .d1:nth-of-type(1) p:nth-of-type(1){
            /*负值:动画直接开始,但跳过前...秒动画*/
            animation-delay: -0.1s;
        }
        .d1:nth-of-type(2) p:nth-of-type(1){
            animation-delay: -0.3s;
        }
        .d1:nth-of-type(1) p:nth-of-type(2){
            animation-delay: -0.5s;
        }
        .d1:nth-of-type(2) p:nth-of-type(2){
            animation-delay: -0.7s;
        }
        .d1:nth-of-type(1) p:nth-of-type(3){
            animation-delay: -0.9s;
        }
        .d1:nth-of-type(2) p:nth-of-type(3){
            animation-delay: -1.1s;
        }
        .d1:nth-of-type(1) p:nth-of-type(4){
            animation-delay: -1.3s;
        }
        .d1:nth-of-type(2) p:nth-of-type(4){
            animation-delay: -1.5s;
        }
    </style>
    <body>
        <div class="d1">
            <p></p>
            <p></p>
            <p></p>
            <p></p>
        </div>
        <div class="d1">
            <p></p>
            <p></p>
            <p></p>
            <p></p>
        </div>
    </body>
</html>
4.交叉效果
这个稍微复杂一点,其实只要捋明白思路,也挺简单的(PS:大家可以把动画挨个取消试试,你就会发现好像并不是很难)

<!doctype html>
<html lang="zh-cn">
<head>
    <meta charset="UTF-8">
    <meta name="renderer" content="webkit">
</head>
<body>
    <style>
        body {
            background-color: #F5F5F5;
            padding: 100px 120px;
        }
        .box {
            margin-left: 500px;
            display: block;
            width: 64px;
            height: 64px;
            transform-origin: 16px 16px;
            /* 旋转 */
            animation: xuanzhuan 5s infinite;
        }
        /* 平移 */
        .ping {
            animation: pingyi 2.5s infinite;
            position: absolute;
        }
       .hang {
            width: 64px;
            height: 24px;
            position: absolute;
        }
        .hang:nth-child(0) {
            transform: rotate(0deg);
        }
        .hang:nth-child(1) {
            transform: rotate(90deg);
        }
        .hang:nth-child(2) {
            transform: rotate(180deg);
        }
        .hang:nth-child(3) {
            transform: rotate(270deg);
        }
        /* 第一个小珠子 */
       .ping:nth-child(1) {
            width: 8px;
            height: 8px;
            top: 50%;
            left: 50%;
            margin-top: -4px;
            margin-left: -4px;
            border-radius: 4px;
            animation-delay: -0.3s;
        }
        /* 第二个小珠子 */
        .ping:nth-child(2) {
            width: 16px;
            height: 16px;
            top: 50%;
            left: 50%;
            margin-top: -8px;
            margin-left: -8px;
            border-radius: 8px;
            -webkit-animation-delay: -0.6s;
            animation-delay: -0.6s;
        }
         /* 第三个小珠子 */
        .ping:nth-child(3) {
            width: 24px;
            height: 24px;
            top: 50%;
            left: 50%;
            margin-top: -12px;
            margin-left: -12px;
            border-radius: 12px;
            animation-delay: -0.9s;
        }
        .blue {
            background-color: #1f4e5a;
        }
        .red {
            background-color: #ff5955;
        }
        .yellow {
            background-color: #ffb265;
        }
        .green {
            background-color: #00a691;
        }
        @keyframes xuanzhuan {
            0% { transform: rotate(0deg);}
            100% { transform: rotate(360deg);}
     }
        @keyframes pingyi {
            0% {transform: translateX(0);}
             25% { transform: translateX(-64px); }
            75% { transform: translateX(32px);}
            100% {transform: translateX(0);}
        }
    </style>
        <div class="box">
            <div class="hang">
                <div class="ping blue"></div>
                <div class="ping blue"></div>
                <div class="ping blue"></div>
            </div>
            <div class="hang">
                <div class="ping yellow"></div>
                <div class="ping yellow"></div>
                <div class="ping yellow"></div>
            </div>
            <div class="hang">
                <div class="ping red"></div>
                <div class="ping red"></div>
                <div class="ping red"></div>
            </div>
            <div class="hang">
                <div class="ping green"></div>
                <div class="ping green"></div>
                <div class="ping green"></div>
            </div>
        </div>
</body>
</html>
5.圆形正方形切换小loading

这个是真的简单!!!!!
<!doctype html>
<html lang="zh-cn">
<head>
<meta charset="UTF-8">
<meta name="renderer" content="webkit">
<link rel="shortcut icon" type="images/x-icon" href="/template/images/ufw.ico">
<title>loading-04</title>
</head>
<body>
<style>
    body{
        padding: 80px 100px;
    }
    .csshub-loading-icon{
        padding:10px;
        width:10px;
        height:10px;
        border-top:20px solid #ED5548;
        border-right:20px solid #599CD3;
        border-bottom: 20px solid #5CBD5E;
        border-left:20px solid #FDD901;
        background:transparent;
        animation: csshub-rotate-right-round 1.2s ease-in-out infinite  alternate ;
    }
    @keyframes csshub-rotate-right-round
        {
        0% { transform: rotate(0deg);}
        50% {transform: rotate(180deg); }
        100% {transform: rotate(360deg);border-radius:50%;}
    }
</style>
    <div class="csshub-loading-icon"></div>
</body>
</html>
我没做兼容,要是再某些浏览器不能运行,加一下浏览器前缀就好啦!
以上所述是小编给大家介绍的CSS3实现的几个小loading效果 ,希望对大家有所帮助,如果大家有任何疑问请给我留言,小编会及时回复大家的。在此也非常感谢大家对脚本之家网站的支持!


