
这次主要实现管理后台界面用户资料的修改和删除,修改用户资料和角色是经常用到的功能,但删除用户的情况比较少,为了功能的完整性还是坐上了。主要用到两个action “Modify”和“Delete”。
一、用户资料修改(Modify)
此功能分两个部分:
public ActionResult Modify(int id) 用于显示用户信息
[httppost]
public ActionResult Modify(FormCollection form)用户就收前台传来的信息并修改
1、显示用户信息
/// <summary>
  /// 修改用户信息
  /// </summary>
  /// <param name="id">用户主键</param>
  /// <returns>分部视图</returns>
  public ActionResult Modify(int id)
  {
   //角色列表
   var _roles = new RoleManager().FindList();
   List<SelectListItem> _listItems = new List<SelectListItem>(_roles.Count());
   foreach (var _role in _roles)
   {
    _listItems.Add(new SelectListItem() { Text = _role.Name, Value = _role.RoleID.ToString() });
   }
   ViewBag.Roles = _listItems;
   //角色列表结束
   return PartialView(userManager.Find(id));
  }
此action有一个参数id,接收传入的用户ID,在action中查询角色信息,并利用viewBage传递到视图,并通过return PartialView(userManager.Find(id))向视图传递用户模型返回分部视图。
视图代码如下:
@model Ninesky.Core.User

@using (Html.BeginForm())
{
 @Html.AntiForgeryToken()

 <div class="form-horizontal">
  @Html.ValidationSummary(true, "", new { @class = "text-danger" })
  @Html.HiddenFor(model => model.UserID)

  <div class="form-group">
   @Html.LabelFor(model => model.RoleID, htmlAttributes: new { @class = "control-label col-md-2" })
   <div class="col-md-10">
    @Html.DropDownListFor(model => model.RoleID, (IEnumerable<SelectListItem>)ViewBag.Roles, new { @class = "form-control" })
    @Html.ValidationMessageFor(model => model.RoleID, "", new { @class = "text-danger" })
   </div>
  </div>

  <div class="form-group">
   @Html.LabelFor(model => model.Username, htmlAttributes: new { @class = "control-label col-md-2" })
   <div class="col-md-10">
    @Html.EditorFor(model => model.Username, new { htmlAttributes = new { @class = "form-control", disabled = "disabled" } })
    @Html.ValidationMessageFor(model => model.Username, "", new { @class = "text-danger" })
   </div>
  </div>

  <div class="form-group">
   @Html.LabelFor(model => model.Name, htmlAttributes: new { @class = "control-label col-md-2" })
   <div class="col-md-10">
    @Html.EditorFor(model => model.Name, new { htmlAttributes = new { @class = "form-control" } })
    @Html.ValidationMessageFor(model => model.Name, "", new { @class = "text-danger" })
   </div>
  </div>

  <div class="form-group">
   @Html.LabelFor(model => model.Sex, htmlAttributes: new { @class = "control-label col-md-2" })
   <div class="col-md-10">
    @Html.RadioButtonFor(model => model.Sex, 1) 男
    @Html.RadioButtonFor(model => model.Sex, 0) 女
    @Html.RadioButtonFor(model => model.Sex, 2) 保密
    @Html.ValidationMessageFor(model => model.Sex, "", new { @class = "text-danger" })
   </div>
  </div>

  <div class="form-group">
   @Html.LabelFor(model => model.Password, htmlAttributes: new { @class = "control-label col-md-2" })
   <div class="col-md-10">
    @Html.EditorFor(model => model.Password, new { htmlAttributes = new { @class = "form-control" } })
    @Html.ValidationMessageFor(model => model.Password, "", new { @class = "text-danger" })
   </div>
  </div>

  <div class="form-group">
   @Html.LabelFor(model => model.Email, htmlAttributes: new { @class = "control-label col-md-2" })
   <div class="col-md-10">
    @Html.EditorFor(model => model.Email, new { htmlAttributes = new { @class = "form-control" } })
    @Html.ValidationMessageFor(model => model.Email, "", new { @class = "text-danger" })
   </div>
  </div>

  <div class="form-group">
   @Html.LabelFor(model => model.LastLoginTime, htmlAttributes: new { @class = "control-label col-md-2" })
   <div class="col-md-10">
    @Html.EditorFor(model => model.LastLoginTime, new { htmlAttributes = new { @class = "form-control", disabled = "disabled" } })
    @Html.ValidationMessageFor(model => model.LastLoginTime, "", new { @class = "text-danger" })
   </div>
  </div>

  <div class="form-group">
   @Html.LabelFor(model => model.LastLoginIP, htmlAttributes: new { @class = "control-label col-md-2" })
   <div class="col-md-10">
    @Html.EditorFor(model => model.LastLoginIP, new { htmlAttributes = new { @class = "form-control", disabled = "disabled" } })
    @Html.ValidationMessageFor(model => model.LastLoginIP, "", new { @class = "text-danger" })
   </div>
  </div>

  <div class="form-group">
   @Html.LabelFor(model => model.RegTime, htmlAttributes: new { @class = "control-label col-md-2" })
   <div class="col-md-10">
    @Html.EditorFor(model => model.RegTime, new { htmlAttributes = new { @class = "form-control", disabled = "disabled" } })
    @Html.ValidationMessageFor(model => model.RegTime, "", new { @class = "text-danger" })
   </div>
  </div>

 </div>
}
2、修改用户资料的后台处理
[HttpPost]
  [ValidateAntiForgeryToken]
  public ActionResult Modify(int id,FormCollection form)
  {
   Response _resp = new Auxiliary.Response();
   var _user = userManager.Find(id);
   if (TryUpdateModel(_user, new string[] { "RoleID", "Name", "Sex", "Email" }))
   {
    if (_user == null)
    {
     _resp.Code = 0;
     _resp.Message = "用户不存在,可能已被删除,请刷新后重试";
    }
    else
    {
     if (_user.Password != form["Password"].ToString()) _user.Password = Security.SHA256(form["Password"].ToString());
     _resp = userManager.Update(_user);
    }
   }
   else
   {
    _resp.Code = 0;
    _resp.Message = General.GetModelErrorString(ModelState);
   }
   return Json(_resp);
  }
此方法有两个参数id 和FormCollection form,不用User直接做模型的原因是因为user会把前台所有数据都接收过来,这里我并不想允许修改用户名,所以在方法中使用TryUpdateModel绑定允许用户修改的属性。TryUpdateModel在绑定失败时同样会在在ModelState中记录错误,可以利用自定义方法GetModelErrorString获取到错误信息并反馈给视图。
2、前台显示和处理
打开Index视图找到表格初始化方法,格式化列“Username”使其显示一个连接,代码红线部分。
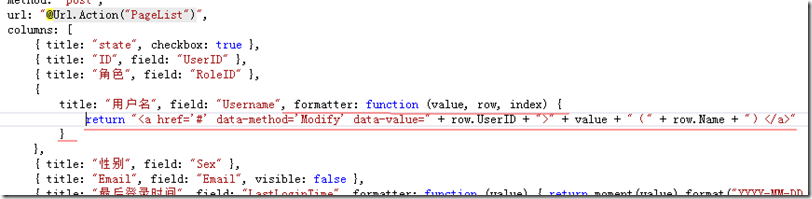
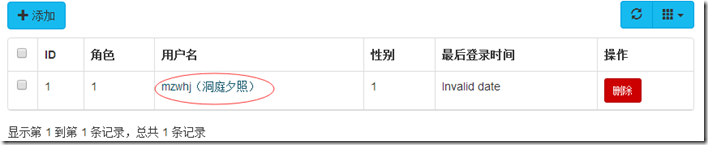
使其看起来这个样子,当用户点击连接的时候可以显示修改对话框
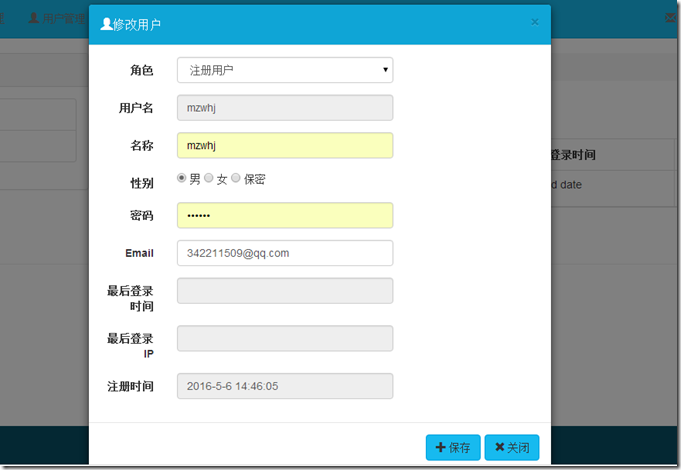
弹出窗口和发送到服务器的js代码写到表格的onLoadSuccess方法里
onLoadSuccess: function () {

     //修改
     $("a[data-method='Modify']").click(function () {
      var id = $(this).attr("data-value");
      var modifyDialog = new BootstrapDialog({
       title: "<span class='glyphicon glyphicon-user'></span>修改用户",
       message: function (dialog) {
        var $message = $('<div></div>');
        var pageToLoad = dialog.getData('pageToLoad');
        $message.load(pageToLoad);

        return $message;
       },
       data: {
        'pageToLoad': '@Url.Action("Modify")/' + id
       },
       buttons: [{
        icon: "glyphicon glyphicon-plus",
        label: "保存",
        action: function (dialogItself) {
         $.post($("form").attr("action"), $("form").serializeArray(), function (data) {
          if (data.Code == 1) {
           BootstrapDialog.show({
            message: data.Message,
            buttons: [{
             icon: "glyphicon glyphicon-ok",
             label: "确定",
             action: function (dialogItself) {
              $table.bootstrapTable("refresh");
              dialogItself.close();
              modifyDialog.close();
             }
            }]

           });
          }
          else BootstrapDialog.alert(data.Message);
         }, "json");
         $("form").validate();
        }
       }, {
        icon: "glyphicon glyphicon-remove",
        label: "关闭",
        action: function (dialogItself) {
         dialogItself.close();
        }
       }]
      });
      modifyDialog.open();
     });
     //修改结束
}
显示效果如下图
二、删除用户
UserController中添加删除方法
/// <summary>
  /// 删除
  /// </summary>
  /// <param name="id">用户ID</param>
  /// <returns></returns>
  [HttpPost]
  public ActionResult Delete(int id)
  {
   return Json(userManager.Delete(id));
  }
打开Index视图找到表格初始化方法,添加“操作”列格式化列使其显示一个删除按钮,代码红框部分。

前台显示效果

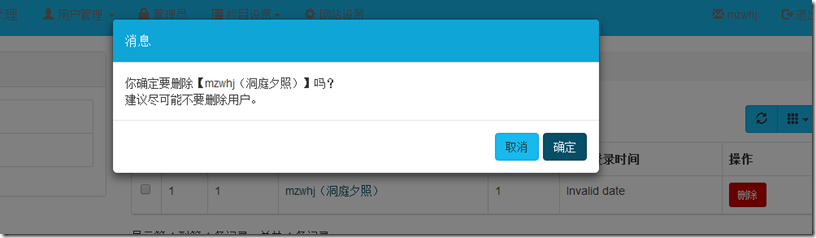
然后在表格的onLoadSuccess方法里刚写的修改用户信息的js代码后面写删除用户的js代码
//修改结束

     //删除按钮
     $("a[data-method='Delete']").click(function () {
      var id = $(this).attr("data-value");
      BootstrapDialog.confirm("你确定要删除" + $(this).parent().parent().find("td").eq(3).text() + "吗?\n 建议尽可能不要删除用户。", function (result) {
       if (result) {
        $.post("@Url.Action("Delete", "User")", { id: id }, function (data) {
         if (data.Code == 1) {
          BootstrapDialog.show({
           message: "删除用户成功",
           buttons: [{
            icon: "glyphicon glyphicon-ok",
            label: "确定",
            action: function (dialogItself) {
             $table.bootstrapTable("refresh");
             dialogItself.close();
            }
           }]

          });
         }
         else BootstrapDialog.alert(data.Message);
        }, "json");
       }
      });
     });
     //删除按钮结束
    }
   });
   //表格结束
前台显示效果
代码下载请见链接
以上就是本文的全部内容,希望对大家的学习有所帮助,也希望大家多多支持脚本之家。


