

在学习安卓的最初过程中我们学的都是最基本的一个活动,只有一个活动的应用也太简单了吧,没错我们的最求应该更高点,不管你创建多少个活动,接下里我们介绍的这种方法能解决我们在创建活动之间的跳转.
使用显示Intent
刚入门学习Android的小伙伴们已经能很娴熟的使用Android studio 创建一个项目了,接下来我把我自己创建的目录先展示下
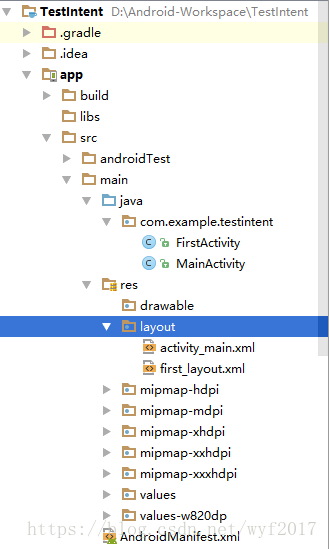
首先创建一个名叫TestIntent的project然后在main--java下面创建了2个类分别是FirstActivity和MainActivity,其次再是创建2个布局分别是activity_main.xml 和first_layout.xml
现在我将这创建好的布局代码展示下
<?xml version="1.0" encoding="utf-8"?>
<LinearLayout xmlns:android="http://schemas.android.com/apk/res/android"
 xmlns:tools="http://schemas.android.com/tools"
 android:id="@+id/activity_main"
 android:layout_width="match_parent"
 android:layout_height="wrap_content"
 android:orientation="vertical"
 tools:context="com.example.testintent.MainActivity">
 <Button
 android:text="无返回结果的页面跳转"
 android:layout_width="match_parent"
 android:layout_height="wrap_content"
 android:id="@+id/button1"
 />

 <Button
 android:text="有结果的页面跳转"
 android:layout_width="match_parent"
 android:layout_height="wrap_content"
 android:id="@+id/button2"
 />

 <TextView
 android:id="@+id/text"
 android:layout_width="match_parent"
 android:layout_height="wrap_content"
 android:text="初始界面"
 />

</LinearLayout>
<?xml version="1.0" encoding="utf-8"?>
<LinearLayout xmlns:android="http://schemas.android.com/apk/res/android"
 android:orientation="vertical"
 android:layout_width="match_parent"
 android:layout_height="wrap_content">

 <Button
 android:text="这是第二个界面"
 android:layout_width="match_parent"
 android:layout_height="wrap_content"
 android:id="@+id/button" />
</LinearLayout>
上面2个就是我们基本的布局,然后就是活动里面需要编写的逻辑了首先是MainActivity
package com.example.testintent;

import android.content.Intent;
import android.support.v7.app.AppCompatActivity;
import android.os.Bundle;
import android.view.View;
import android.widget.Button;

public class MainActivity extends AppCompatActivity {
 private Button bt;//初始化控件
 @Override
 protected void onCreate(Bundle savedInstanceState) {
 super.onCreate(savedInstanceState);
 setContentView(R.layout.activity_main);
 bt = (Button) findViewById(R.id.button1);
 bt.setOnClickListener(new View.OnClickListener() {//创建监听器
  @Override
  public void onClick(View view) {
  Intent intent = new Intent(MainActivity.this,FirstActivity.class);
  startActivity(intent);
  }
 });
 }
}
接下来我们的重点是Intent intent = new Intent(MainActivity.this,FirstActivity.class);
Intent有多个构造函数的重载,其中一个是Intent(Context packageContext,Class<?>cls).这个构造函数接受两个参数,第一个参数Context要求提供一个启动活动的上下文,第二个参数Class则是指定想要启动的目标活动,通过这个构造函数就可以构建出Intent的意图,,但是我们该怎么使用Intent呢?Activity提供了一个startActivity()方法,这个方法是专门启动活动的,他接收一个Intent参数,这里我们把intent传入进去就可以启动活动了
这里MainActivity.this作为上下文,FirstActivity.class作为目标活动,然后通过startActivity(intent)启动活动
下面这个是FirstActivity里面的代码
package com.example.testintent;

import android.os.Bundle;
import android.support.v7.app.AppCompatActivity;


public class FirstActivity extends AppCompatActivity {
 @Override
 protected void onCreate( Bundle savedInstanceState) {
 super.onCreate(savedInstanceState);
 setContentView(R.layout.first_layout);
 }
}
当然了我们还有一个重要的地方需要去修改下那就是AndroidManifest.xml
<?xml version="1.0" encoding="utf-8"?>
<manifest xmlns:android="http://schemas.android.com/apk/res/android"
 package="com.example.testintent">

 <application
 android:allowBackup="true"
 android:icon="@mipmap/ic_launcher"
 android:label="@string/app_name"
 android:supportsRtl="true"
 android:theme="@style/AppTheme">
 <activity android:name=".MainActivity">
  <intent-filter>
  <action android:name="android.intent.action.MAIN" />
  <category android:name="android.intent.category.LAUNCHER" />
  </intent-filter>
 </activity>
 <activity android:name=".FirstActivity" />
 </application>

</manifest>
这里面需要注意的是
<intent-filter>
 <action android:name="android.intent.action.MAIN" />
 <category android:name="android.intent.category.LAUNCHER" />
</intent-filter>
这段代码主要是首先启动哪个活动,因为我们首先启动的是MainActivity这个活动所以在那里添加这段代码,第二个活动不需要去添加这段代码
接下来我们启动模拟器如图
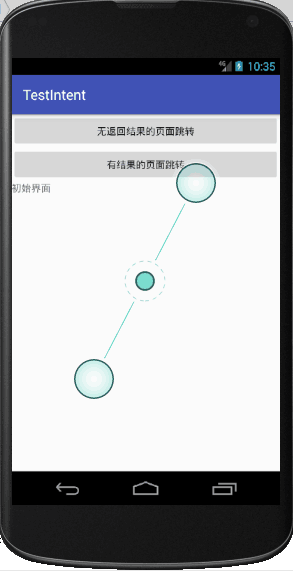
点击第一个按钮然后就可以跳转到第二个界面
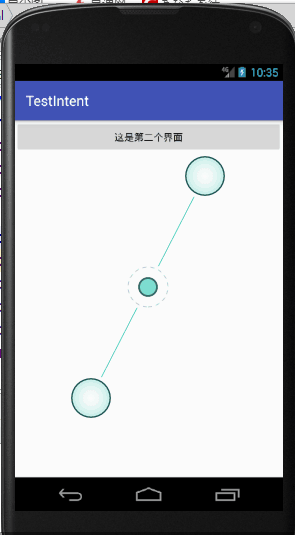
可以看到我们已经成功启动了第二个活动,这就是我们Intent显示实现页面跳转.
以上就是本文的全部内容,希望对大家的学习有所帮助,也希望大家多多支持脚本之家。


