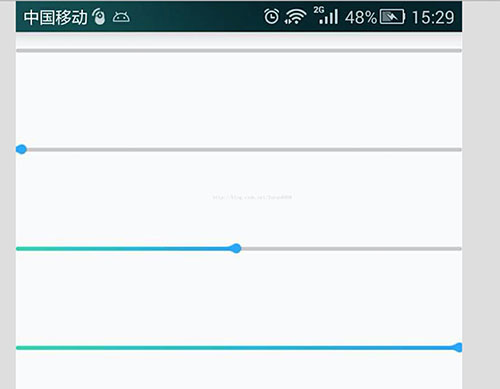
一、直接看效果
二、直接上代码
1.自定义控件部分
package com.susan.project.myapplication;
import android.app.Activity;
import android.content.Context;
import android.graphics.Bitmap;
import android.graphics.BitmapFactory;
import android.graphics.Canvas;
import android.graphics.Color;
import android.graphics.LinearGradient;
import android.graphics.Paint;
import android.graphics.RectF;
import android.graphics.Shader;
import android.util.AttributeSet;
import android.util.DisplayMetrics;
import android.util.Log;
import android.view.View;
/**
* @author dahai
* @ClassName: ${type_name}
* @Description: ${todo}
* @date ${date} ${time}
* @email 202491024@qq.com
* @since $
android
渐变
进度条
*/
public class ProgressSeek extends View {
/**
* 进度条的宽度
*/
private int view_width;
/**
* 画布的宽度
*/
private int view_base_width;
/**
* 控件的宽度
*/
private int view_edge_width;
/**
* 进度
*/
private int progress;
private Canvas cacheCanvas;
/**
* 背景颜色的画笔
*/
private Paint backgroundPaint;
/**
* 进度条的画笔
*/
private Paint progressPaint;
/**
* 进度末端的图
*/
private Bitmap bitmap;
private int bitmapWidth;
private int bitmapHeight;
private Context context;
//渐变色开始
private static final int DEFAULT_START_COLOR = Color.parseColor("#34DAB5");
//渐变色结束
private static final int DEFAULT_END_COLOR = Color.parseColor("#27A5FE");
/**
* 缓存图片
*/
private Bitmap cacheBitmap;
public ProgressSeek(Context context) {
super(context);
initView(context);
}
public ProgressSeek(Context context, AttributeSet attrs) {
super(context, attrs);
initView(context);
}
public ProgressSeek(Context context, AttributeSet attrs, int defStyleAttr) {
super(context, attrs, defStyleAttr);
initView(context);
}
private void initView(Context context) {
this.context = context;
bitmap = BitmapFactory.decodeResource(context.getResources(), R.mipmap.thumb);
bitmapWidth = bitmap.getWidth();
bitmapHeight = bitmap.getHeight();
backgroundPaint = new Paint();
backgroundPaint.setStrokeWidth(bitmapWidth);
backgroundPaint.setColor(Color.parseColor("#cccccc"));
backgroundPaint.setDither(true);
backgroundPaint.setAntiAlias(true);
progressPaint = new Paint();
progressPaint.setStrokeWidth(bitmapWidth);
progressPaint.setDither(true);
progressPaint.setAntiAlias(true);
DisplayMetrics d = new DisplayMetrics();
((Activity) context).getWindowManager().getDefaultDisplay().getMetrics(d);
view_base_width = d.widthPixels;
}
public void init(int progress) {
this.progress = progress;
if (view_width == 0) {//第一上来
/* DisplayMetrics d = new DisplayMetrics();
((Activity) context).getWindowManager().getDefaultDisplay().getMetrics(d);
view_width = d.widthPixels*progress/100;*/
view_width = view_base_width * progress / 100;
} else {
view_width = view_edge_width * progress / 100;
}
if (cacheBitmap != null) {
if (!cacheBitmap.isRecycled()) {
cacheBitmap.recycle();
cacheBitmap = null;
}
cacheCanvas = null;
}
cacheBitmap = Bitmap.createBitmap(view_base_width, bitmapHeight * 2, Bitmap.Config.ARGB_8888);
if (cacheCanvas == null) {
cacheCanvas = new Canvas();
cacheCanvas.setBitmap(cacheBitmap);
}
/**
* 画背景
*/
RectF r = new RectF();
r.left = 0;
r.top = bitmapHeight;
r.right = view_base_width;
r.bottom = bitmapWidth + 10;
cacheCanvas.drawRoundRect(r, 5f, 5f, backgroundPaint);
if (progress > 0) {
LinearGradient lg = new LinearGradient(0, 0, view_width, bitmapWidth, DEFAULT_START_COLOR, DEFAULT_END_COLOR, Shader.TileMode.CLAMP);
progressPaint.setShader(lg);
RectF r1 = new RectF();
r.left = 0;
r.top = bitmapHeight;
r.right = view_width;
r.bottom = bitmapWidth + 10;
cacheCanvas.drawRoundRect(r, 5f, 5f, progressPaint);
cacheCanvas.drawBitmap(bitmap, view_width - bitmapWidth+8, bitmapHeight / 2 + 6, new Paint());
}
invalidate();
}
@Override
protected void onDraw(Canvas canvas) {
super.onDraw(canvas);
Paint bmpPaint = new Paint();
//将cacheBitmap绘制到该View组件
if (cacheBitmap != null) {
canvas.drawBitmap(cacheBitmap, 0, 0, bmpPaint);
}
view_edge_width = this.getWidth();
Log.e("打出来看看控件的宽度:", view_edge_width + "");
init(progress);
}
}
3. 布局文件部分
<?xml version="1.0" encoding="utf-8"?>
<LinearLayout xmlns:android="http://schemas.android.com/apk/res/android"
android:layout_width="match_parent"
android:layout_height="match_parent"
android:orientation="vertical">
<com.susan.project.myapplication.ProgressSeek
android:id="@+id/progress"
android:layout_width="match_parent"
android:layout_height="80dp">
</com.susan.project.myapplication.ProgressSeek>
<com.susan.project.myapplication.ProgressSeek
android:id="@+id/progress1"
android:layout_width="match_parent"
android:layout_height="80dp">
</com.susan.project.myapplication.ProgressSeek>
<com.susan.project.myapplication.ProgressSeek
android:id="@+id/progress2"
android:layout_width="match_parent"
android:layout_height="80dp">
</com.susan.project.myapplication.ProgressSeek>
<com.susan.project.myapplication.ProgressSeek
android:id="@+id/progress3"
android:layout_width="match_parent"
android:layout_height="80dp">
</com.susan.project.myapplication.ProgressSeek>
</LinearLayout>
4.Activity部分
package com.susan.project.myapplication;
import android.app.Activity;
import android.os.Bundle;
public class MainActivity extends Activity {
private ProgressSeek progress;
private ProgressSeek progress1;
private ProgressSeek progress2;
private ProgressSeek progress3;
@Override
protected void onCreate(Bundle savedInstanceState) {
super.onCreate(savedInstanceState);
setContentView(R.layout.activity_main);
progress = (ProgressSeek) findViewById(R.id.progress);
progress.init(0);
progress1 = (ProgressSeek) findViewById(R.id.progress1);
progress1.init(2);
progress2 = (ProgressSeek) findViewById(R.id.progress2);
progress2.init(50);
progress3 = (ProgressSeek) findViewById(R.id.progress3);
progress3.init(100);
}
}
以上所述是小编给大家介绍的Android自定义带水滴的进度条样式(带渐变色效果),希望对大家有所帮助,如果大家有任何疑问请给我留言,小编会及时回复大家的。在此也非常感谢大家对脚本之家网站的支持!


