

最近由于项目需要,宝宝好久没搞Android啦,又是因为项目需要,现在继续弄Android,哎,说多了都是泪呀,别的不用多说,先搞一个登录界面练练手,登录界面可以说是Android项目中最常用也是最基本的,如果这个都搞不定,那可以直接去跳21世纪楼啦。
废话不多说,先上效果图了,如果大家感觉还不错,请参考实现代码吧。
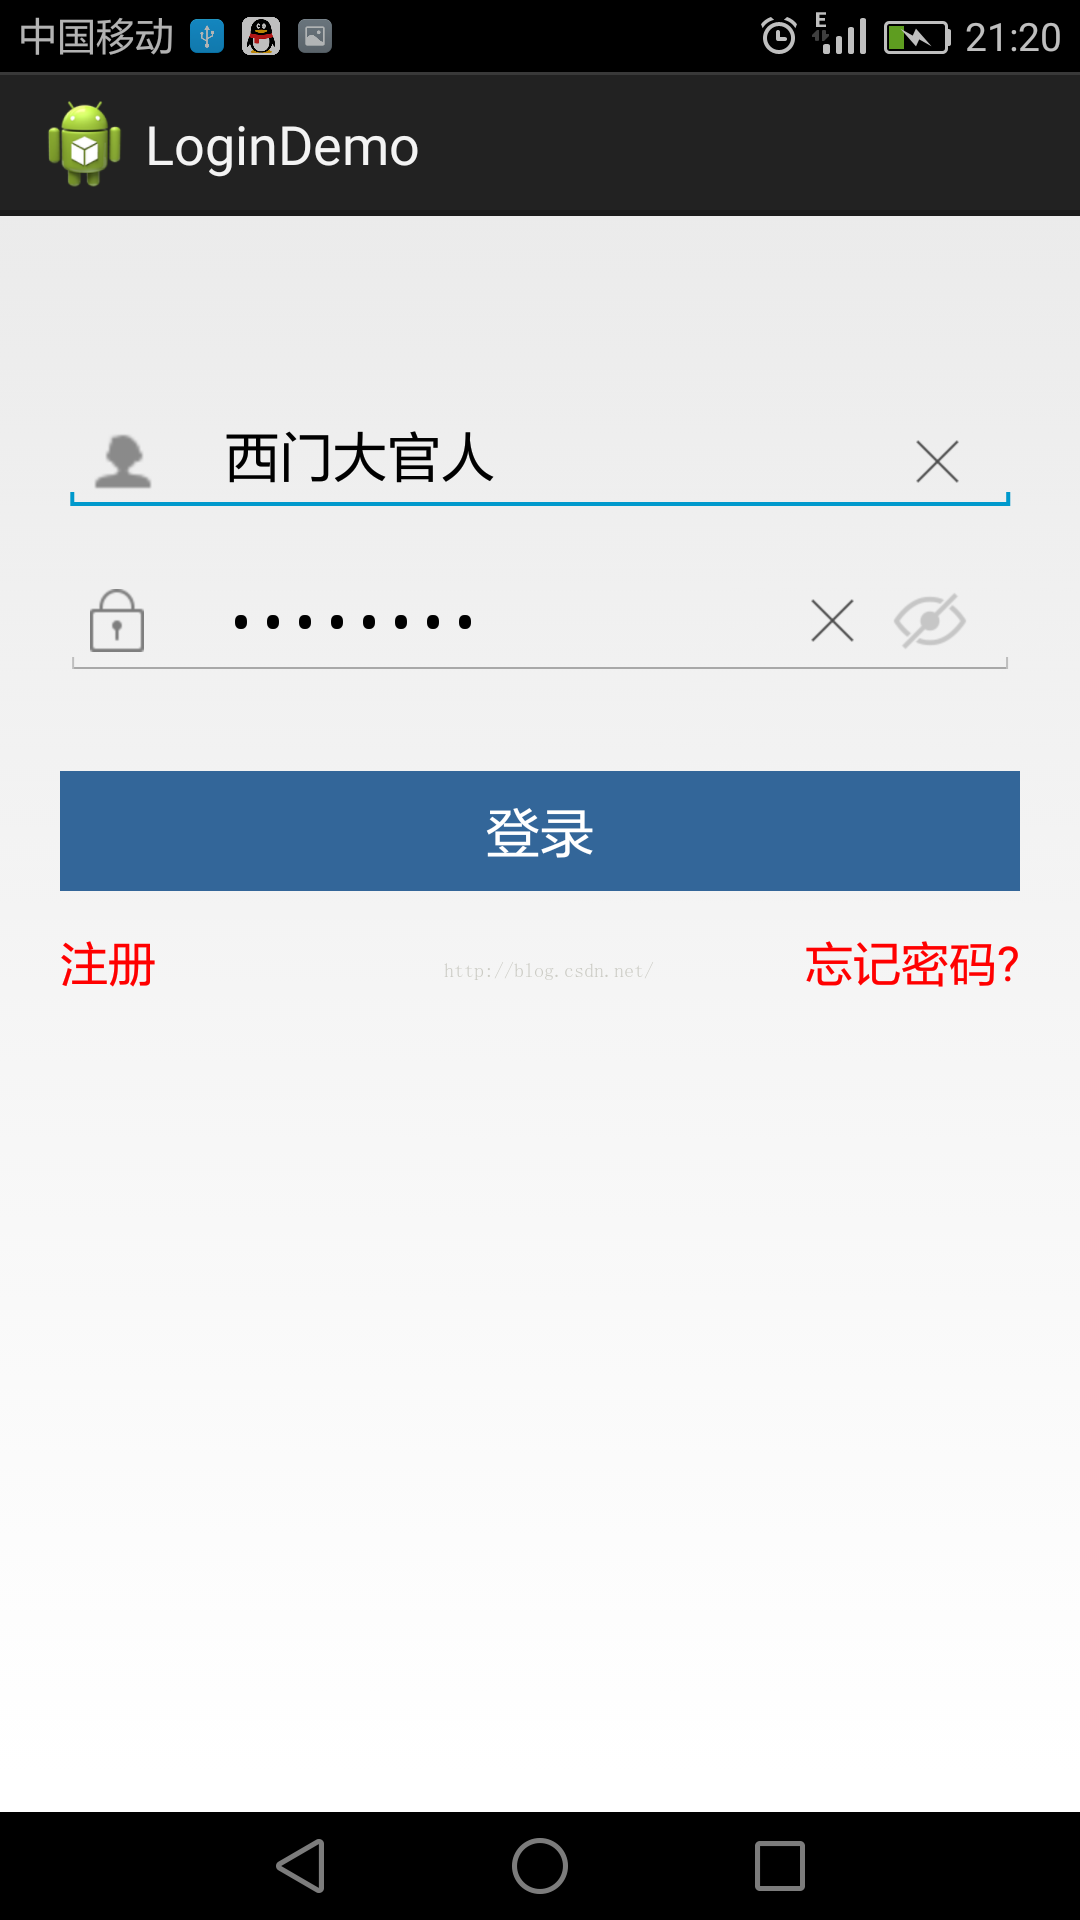
相信这种渣渣布局对很多人来说太简单啦,直接上布局:
<RelativeLayout xmlns:android="http://schemas.android.com/apk/res/android"
xmlns:custom="http://schemas.android.com/apk/res-auto"
android:layout_width="fill_parent"
android:layout_height="fill_parent"
android:fitsSystemWindows="true" >
<RelativeLayout
android:id="@+id/login_layout"
android:layout_width="fill_parent"
android:layout_height="wrap_content"
android:layout_marginLeft="20dp"
android:layout_marginRight="20dp"
android:gravity="center" >
<FrameLayout
android:id="@+id/username_layout"
android:layout_width="fill_parent"
android:layout_height="wrap_content"
android:layout_marginTop="55dp"
android:gravity="center" >
<!-- android:inputType="number" -->
<EditText
android:id="@+id/username"
android:layout_width="fill_parent"
android:layout_height="40dp"
android:layout_marginTop="5dp"
android:maxLength="20"
android:paddingLeft="55dp"
android:paddingRight="60dp" >
</EditText>
<ImageView
android:layout_width="22dp"
android:layout_height="21dp"
android:layout_gravity="left|center_vertical"
android:layout_marginStart="10dp"
android:background="@drawable/username"
android:visibility="visible" />
<TextView
android:id="@+id/contry_sn"
android:layout_width="40dp"
android:layout_height="50dp"
android:layout_gravity="left|center_vertical"
android:layout_marginTop="4dp"
android:gravity="center"
android:text="+62"
android:textColor="@android:color/black"
android:textSize="18sp"
android:visibility="invisible" />
<Button
android:id="@+id/bt_username_clear"
android:layout_width="35dp"
android:layout_height="35dp"
android:layout_gravity="right|center_vertical"
android:layout_marginRight="10dp"
android:background="@drawable/email_delete_pressed"
android:visibility="invisible" />
</FrameLayout>
<FrameLayout
android:id="@+id/usercode_layout"
android:layout_width="fill_parent"
android:layout_height="wrap_content"
android:layout_below="@id/username_layout"
android:layout_marginTop="6dp"
android:gravity="center" >
<EditText
android:id="@+id/password"
android:layout_width="fill_parent"
android:layout_height="40dp"
android:inputType="textPassword"
android:maxLength="20"
android:paddingLeft="55dp"
android:paddingRight="60dp" >
</EditText>
<ImageView
android:layout_width="18dp"
android:layout_height="21dp"
android:layout_gravity="left|center_vertical"
android:layout_marginStart="10dp"
android:background="@drawable/password" />
<Button
android:id="@+id/bt_pwd_eye"
android:layout_width="40dp"
android:layout_height="40dp"
android:layout_gravity="right|center_vertical"
android:layout_marginRight="10dp"
android:background="@drawable/password_close" />
<Button
android:id="@+id/bt_pwd_clear"
android:layout_width="35dp"
android:layout_height="35dp"
android:layout_gravity="right|center_vertical"
android:layout_marginRight="45dp"
android:background="@drawable/email_delete_pressed"
android:visibility="invisible" />
</FrameLayout>
<Button
android:id="@+id/login"
android:layout_width="fill_parent"
android:layout_height="40dp"
android:layout_below="@id/usercode_layout"
android:layout_marginTop="30dp"
android:background="@drawable/login_selector"
android:gravity="center"
android:text="登录"
android:textColor="@android:color/white" />
<Button
android:id="@+id/forgive_pwd"
android:layout_width="wrap_content"
android:layout_height="wrap_content"
android:layout_alignRight="@id/login"
android:layout_below="@id/login"
android:background="#00000000"
android:text="忘记密码?"
android:textColor="@drawable/text_color_selector"
android:textSize="16sp" />
<Button
android:id="@+id/register"
android:layout_width="wrap_content"
android:layout_height="wrap_content"
android:layout_alignLeft="@id/login"
android:layout_below="@id/login"
android:background="#00000000"
android:gravity="left|center_vertical"
android:text="注册"
android:textColor="@drawable/text_color_selector"
android:textSize="16sp"
android:visibility="visible" />
</RelativeLayout>
</RelativeLayout>
MainActivity如下:
package com.example.logindemo;
import android.support.v7.app.ActionBarActivity;
import android.text.Editable;
import android.text.TextWatcher;
import android.text.method.HideReturnsTransformationMethod;
import android.text.method.PasswordTransformationMethod;
import android.view.View;
import android.view.View.OnClickListener;
import android.widget.Button;
import android.widget.EditText;
import android.widget.Toast;
import android.os.Bundle;
/**
* 登录界面Demo
*
* @author ZHY
*
*/
public class MainActivity extends ActionBarActivity implements OnClickListener {
private EditText username, password;
private Button bt_username_clear;
private Button bt_pwd_clear;
private Button forgive_pwd;
private Button bt_pwd_eye;
private Button login;
private Button register;
private boolean isOpen = false;
@Override
protected void onCreate(Bundle savedInstanceState) {
super.onCreate(savedInstanceState);
setContentView(R.layout.activity_main);
initView();
}
private void initView() {
username = (EditText) findViewById(R.id.username);
// 监听文本框内容变化
username.addTextChangedListener(new TextWatcher() {
@Override
public void onTextChanged(CharSequence s, int start, int before,
int count) {
// 获得文本框中的用户
String user = username.getText().toString().trim();
if ("".equals(user)) {
// 用户名为空,设置按钮不可见
bt_username_clear.setVisibility(View.INVISIBLE);
} else {
// 用户名不为空,设置按钮可见
bt_username_clear.setVisibility(View.VISIBLE);
}
}
@Override
public void beforeTextChanged(CharSequence s, int start, int count,
int after) {
}
@Override
public void afterTextChanged(Editable s) {
}
});
password = (EditText) findViewById(R.id.password);
// 监听文本框内容变化
password.addTextChangedListener(new TextWatcher() {
@Override
public void onTextChanged(CharSequence s, int start, int before,
int count) {
// 获得文本框中的用户
String pwd = password.getText().toString().trim();
if ("".equals(pwd)) {
// 用户名为空,设置按钮不可见
bt_pwd_clear.setVisibility(View.INVISIBLE);
} else {
// 用户名不为空,设置按钮可见
bt_pwd_clear.setVisibility(View.VISIBLE);
}
}
@Override
public void beforeTextChanged(CharSequence s, int start, int count,
int after) {
}
@Override
public void afterTextChanged(Editable s) {
}
});
bt_username_clear = (Button) findViewById(R.id.bt_username_clear);
bt_username_clear.setOnClickListener(this);
bt_pwd_clear = (Button) findViewById(R.id.bt_pwd_clear);
bt_pwd_clear.setOnClickListener(this);

bt_pwd_eye = (Button) findViewById(R.id.bt_pwd_eye);
bt_pwd_eye.setOnClickListener(this);
login = (Button) findViewById(R.id.login);
login.setOnClickListener(this);
egister = (Button) findViewById(R.id.register);
register.setOnClickListener(this);
forgive_pwd = (Button) findViewById(R.id.forgive_pwd);
forgive_pwd.setOnClickListener(this);
}
@Override
public void onClick(View v) {
switch (v.getId()) {
case R.id.bt_username_clear:
// 清除登录名
username.setText("");
break;
case R.id.bt_pwd_clear:
// 清除密码
password.setText("");
break;
case R.id.bt_pwd_eye:
// 密码可见与不可见的切换
if (isOpen) {
isOpen = false;
} else {
isOpen = true;
}
// 默认isOpen是false,密码不可见
changePwdOpenOrClose(isOpen);
break;
case R.id.login:
// TODO 登录按钮
break;
case R.id.register:
// 注册按钮
Toast.makeText(MainActivity.this, "注册", 0).show();
break;
case R.id.forgive_pwd:
// 忘记密码按钮
Toast.makeText(MainActivity.this, "忘记密码", 0).show();
break;
default:
break;
}
}
/**
* 密码可见与不可见的切换
*
* @param flag
*/
private void changePwdOpenOrClose(boolean flag) {
// 第一次过来是false,密码不可见
if (flag) {
// 密码可见
bt_pwd_eye.setBackgroundResource(R.drawable.password_open);
// 设置EditText的密码可见
password.setTransformationMethod(HideReturnsTransformationMethod
.getInstance());
} else {
// 密码不接见
bt_pwd_eye.setBackgroundResource(R.drawable.password_close);
// 设置EditText的密码隐藏
password.setTransformationMethod(PasswordTransformationMethod
.getInstance());
}
}
}
Ok,就是这么简单,效果完成。
以上所述是小编给大家介绍的Android登录界面的实现代码分享,希望对大家有所帮助,如果大家有任何疑问请给我留言,小编会及时回复大家的。在此也非常感谢大家对脚本之家网站的支持!


