

Android的界面是有布局和组件协同完成的,布局好比是建筑里的框架,而组件则相当于建筑里的砖瓦。组件按照布局的要求依次排列,就组成了用户所看见的界面。Android的五大布局分别是LinearLayout(线性布局)、FrameLayout(单帧布局)、RelativeLayout(相对布局)、AbsoluteLayout(绝对布局)和TableLayout(表格布局)。
布局一:LinearLayout
LinearLayout按照垂直或者水平的顺序依次排列子元素,每一个子元素都位于前一个元素之后。如果是垂直排列,那么将是一个N行单列的结构,每一行只会有一个元素,而不论这个元素的宽度为多少;如果是水平排列,那么将是一个单行N列的结构。如果搭建两行两列的结构,通常的方式是先垂直排列两个元素,每一个元素里再包含一个LinearLayout进行水平排列。
LinearLayout中的子元素属性android:layout_weight生效,它用于描述该子元素在剩余空间中占有的大小比例。加入一行只有一个文本框,那么它的默认值就为0,如果一行中有两个等长的文本框,那么他们的android:layout_weight值可以是同为1。如果一行中有两个不等长的文本框,那么他们的android:layout_weight值分别为1和2,那么第一个文本框将占据剩余空间的三分之二,第二个文本框将占据剩余空间中的三分之一。android:layout_weight遵循数值越小,重要度越高的原则。显示效果如下:
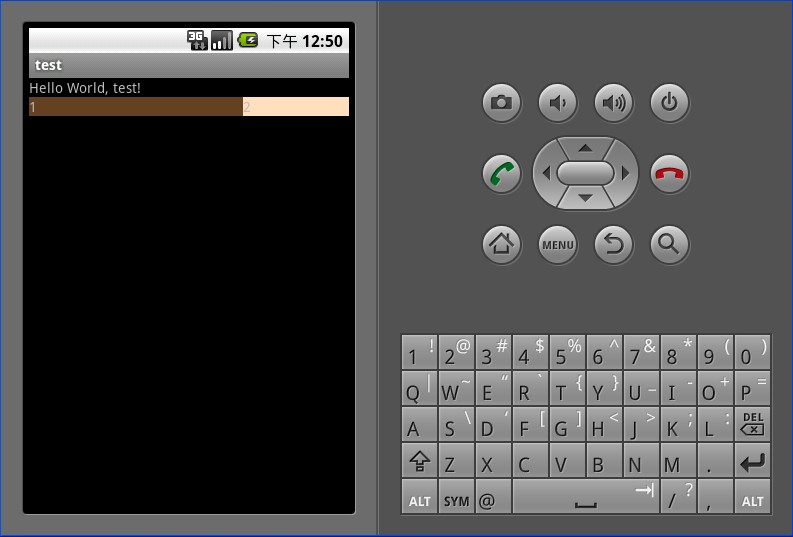
LinearLayout
 <?xml version="1.0" encoding="utf-8"?>
 <LinearLayout xmlns:android="http://schemas.android.com/apk/res/android" android:orientation="vertical" android:layout_width="fill_parent" android:layout_height="fill_parent">
 <TextView android:layout_width="fill_parent" android:layout_height="wrap_content" android:background="#ff000000" android:text="@string/hello"/>
 <LinearLayout android:orientation="horizontal" android:layout_width="fill_parent" android:layout_height="fill_parent">
  <TextView android:layout_width="fill_parent" android:layout_height="wrap_content" android:background="#ff654321" android:layout_weight="1" android:text="1"/>
  <TextView android:layout_width="fill_parent" android:layout_height="wrap_content" android:background="#fffedcba" android:layout_weight="2" android:text="2"/>
 </LinearLayout>
 </LinearLayout>
布局二:FrameLayout
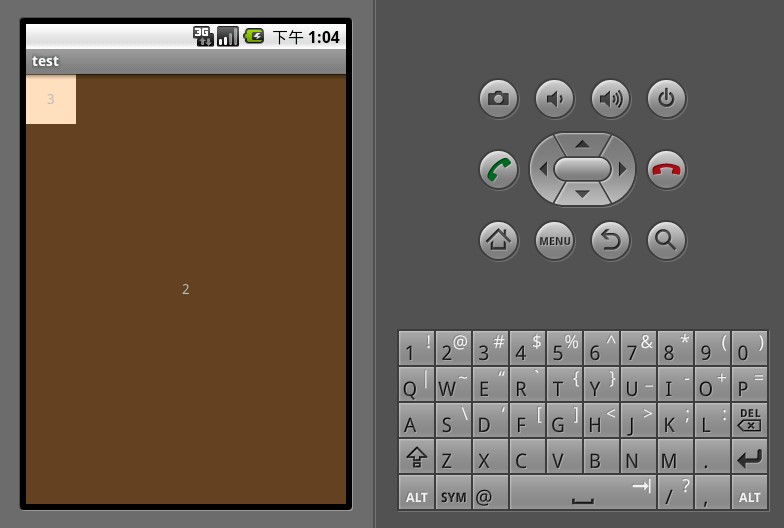
FrameLayout是五大布局中最简单的一个布局,在这个布局中,整个界面被当成一块空白备用区域,所有的子元素都不能被指定放置的位置,它们统统放于这块区域的左上角,并且后面的子元素直接覆盖在前面的子元素之上,将前面的子元素部分和全部遮挡。显示效果如下,第一个TextView被第二个TextView完全遮挡,第三个TextView遮挡了第二个TextView的部分位置。
FrameLayout
 <?xml version="1.0" encoding="utf-8"?>
 <FrameLayout xmlns:android="http://schemas.android.com/apk/res/android" android:orientation="vertical" android:layout_width="fill_parent" android:layout_height="fill_parent">
 <TextView android:layout_width="fill_parent" android:layout_height="fill_parent" android:background="#ff000000" android:gravity="center" android:text="1"/>
 <TextView android:layout_width="fill_parent" android:layout_height="fill_parent" android:background="#ff654321" android:gravity="center" android:text="2"/>
 <TextView android:layout_width="50dp" android:layout_height="50dp" android:background="#fffedcba" android:gravity="center" android:text="3"/>
 </FrameLayout>
布局三:AbsoluteLayout
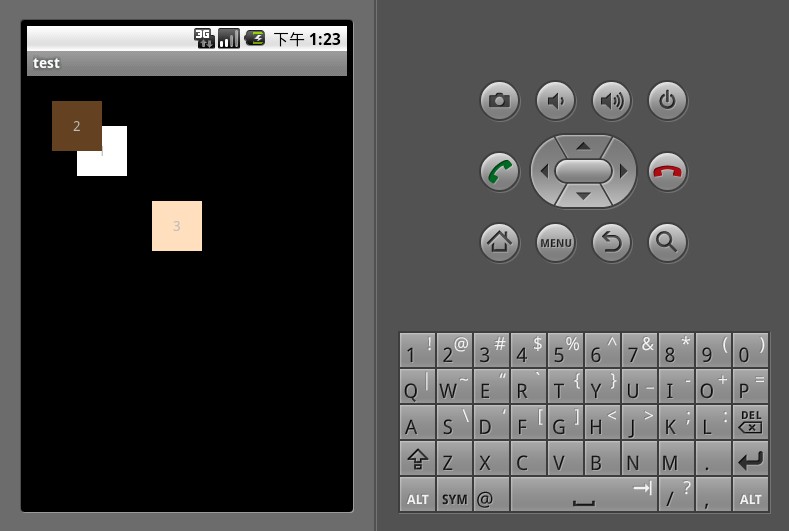
AbsoluteLayout是绝对位置布局。在此布局中的子元素的android:layout_x和android:layout_y属性将生效,用于描述该子元素的坐标位置。屏幕左上角为坐标原点(0,0),第一个0代表横坐标,向右移动此值增大,第二个0代表纵坐标,向下移动,此值增大。在此布局中的子元素可以相互重叠。在实际开发中,通常不采用此布局格式,因为它的界面代码过于刚性,以至于有可能不能很好的适配各种终端。显示效果如下:
AbsoluteLayout
 <?xml version="1.0" encoding="utf-8"?>
 <AbsoluteLayout xmlns:android="http://schemas.android.com/apk/res/android" android:orientation="vertical" android:layout_width="fill_parent" android:layout_height="fill_parent">
 <TextView android:layout_width="50dp" android:layout_height="50dp" android:background="#ffffffff" android:gravity="center" android:layout_x="50dp" android:layout_y="50dp" android:text="1"/>
 <TextView android:layout_width="50dp" android:layout_height="50dp" android:background="#ff654321" android:gravity="center" android:layout_x="25dp" android:layout_y="25dp" android:text="2"/>
 <TextView android:layout_width="50dp" android:layout_height="50dp" android:background="#fffedcba" android:gravity="center" android:layout_x="125dp" android:layout_y="125dp" android:text="3"/>
 </AbsoluteLayout>
布局四:RelativeLayout
RelativeLayout按照各子元素之间的位置关系完成布局。在此布局中的子元素里与位置相关的属性将生效。例如android:layout_below, android:layout_above等。子元素就通过这些属性和各自的ID配合指定位置关系。注意在指定位置关系时,引用的ID必须在引用之前,先被定义,否则将出现异常。
RelativeLayout里常用的位置属性如下:
android:layout_toLeftOf —— 该组件位于引用组件的左方
android:layout_toRightOf —— 该组件位于引用组件的右方
android:layout_above —— 该组件位于引用组件的上方
android:layout_below —— 该组件位于引用组件的下方
android:layout_alignParentLeft —— 该组件是否对齐父组件的左端
android:layout_alignParentRight —— 该组件是否齐其父组件的右端
android:layout_alignParentTop —— 该组件是否对齐父组件的顶部
android:layout_alignParentBottom —— 该组件是否对齐父组件的底部
android:layout_centerInParent —— 该组件是否相对于父组件居中
android:layout_centerHorizontal —— 该组件是否横向居中
android:layout_centerVertical —— 该组件是否垂直居中
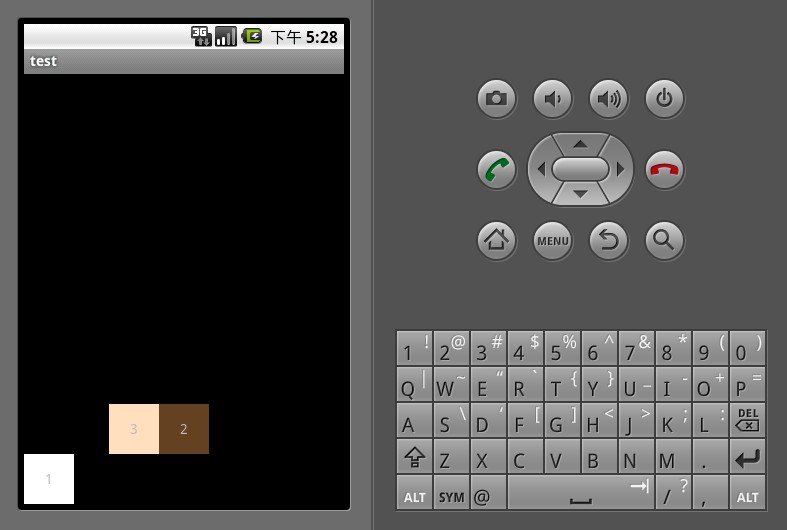
RelativeLayout是Android五大布局结构中最灵活的一种布局结构,比较适合一些复杂界面的布局。下面示例就展示这么一个情况,第一个文本框与父组件的底部对齐,第二个文本框位于第一个文本框的上方,并且第三个文本框位于第二个文本框的左方。
RelativeLayout
 <?xml version="1.0" encoding="utf-8"?>
 <RelativeLayout xmlns:android="http://schemas.android.com/apk/res/android" android:orientation="vertical" android:layout_width="fill_parent" android:layout_height="fill_parent">
 <TextView android:id="@+id/text_01" android:layout_width="50dp" android:layout_height="50dp" android:background="#ffffffff" android:gravity="center" android:layout_alignParentBottom="true" android:text="1"/>
 <TextView android:id="@+id/text_02" android:layout_width="50dp" android:layout_height="50dp" android:background="#ff654321" android:gravity="center" android:layout_above="@id/text_01" android:layout_centerHorizontal="true" android:text="2"/>
 <TextView android:id="@+id/text_03" android:layout_width="50dp" android:layout_height="50dp" android:background="#fffedcba" android:gravity="center" android:layout_toLeftOf="@id/text_02" android:layout_above="@id/text_01" android:text="3"/>
 </RelativeLayout>
布局五:TableLayout
TableLayout顾名思义,此布局为表格布局,适用于N行N列的布局格式。一个TableLayout由许多TableRow组成,一个TableRow就代表TableLayout中的一行。
TableRow是LinearLayout的子类,它的android:orientation属性值恒为horizontal,并且它的android:layout_width和android:layout_height属性值恒为MATCH_PARENT和WRAP_CONTENT。所以它的子元素都是横向排列,并且宽高一致的。这样的设计使得每个TableRow里的子元素都相当于表格中的单元格一样。在TableRow中,单元格可以为空,但是不能跨列。
下面示例演示了一个TableLayout的布局结构,其中第二行只有两个单元格,而其余行都是三个单元格。
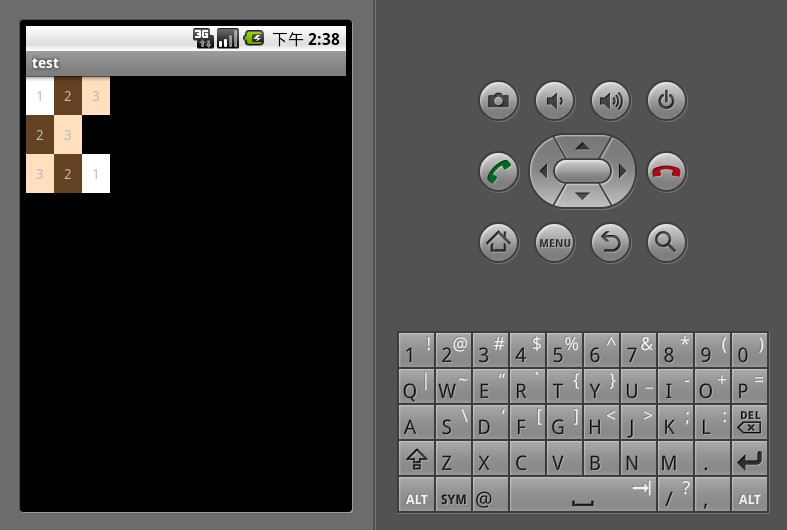
TableLayout
 <?xml version="1.0" encoding="utf-8"?>
 <TableLayout xmlns:android="http://schemas.android.com/apk/res/android" android:orientation="vertical" android:layout_width="fill_parent" android:layout_height="fill_parent">
 <TableRow android:layout_width="fill_parent" android:layout_height="wrap_content">
  <TextView android:background="#ffffffff" android:gravity="center" android:padding="10dp" android:text="1"/>
  <TextView android:background="#ff654321" android:gravity="center" android:padding="10dp" android:text="2"/>
  <TextView android:background="#fffedcba" android:gravity="center" android:padding="10dp" android:text="3"/>
 </TableRow>
 <TableRow android:layout_width="fill_parent" android:layout_height="wrap_content">
  <TextView android:background="#ff654321" android:gravity="center" android:padding="10dp" android:text="2"/>
  <TextView android:background="#fffedcba" android:gravity="center" android:padding="10dp" android:text="3"/>
 </TableRow>
 <TableRow android:layout_width="fill_parent" android:layout_height="wrap_content">
  <TextView android:background="#fffedcba" android:gravity="center" android:padding="10dp" android:text="3"/>
  <TextView android:background="#ff654321" android:gravity="center" android:padding="10dp" android:text="2"/>
  <TextView android:background="#ffffffff" android:gravity="center" android:padding="10dp" android:text="1"/>
 </TableRow>
 </TableLayout>
以上就是本文的全部内容,希望对大家学习Android五大布局有所帮助,也希望大家多多支持脚本之家。


