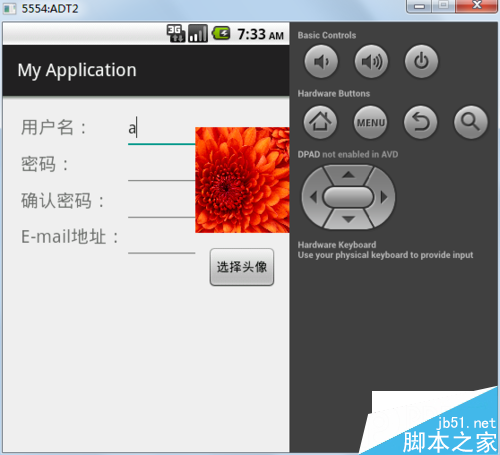
1.首先是注册页面的布局:
<?xml version="1.0" encoding="utf-8"?>
<LinearLayout xmlns:android="http://schemas.android.com/apk/res/android"
android:layout_width="fill_parent"
android:layout_height="fill_parent"
android:paddingTop="20px"
android:orientation="horizontal" >
<LinearLayout
android:id="@+id/linearLayout1"
android:orientation="vertical"
android:layout_weight="2"
android:paddingLeft="20px"
android:layout_width="wrap_content"
android:layout_height="wrap_content" >
<TableLayout
android:id="@+id/tableLayout1"
android:layout_width="match_parent"
android:layout_height="wrap_content" >
<TableRow
android:id="@+id/tableRow1"
android:layout_width="wrap_content"
android:layout_height="wrap_content" >
<TextView
android:id="@+id/textView1"
android:textSize="20px"
android:layout_width="wrap_content"
android:layout_height="wrap_content"
android:text="用户名:" />
<EditText
android:id="@+id/user"
android:minWidth="400px"
android:layout_width="wrap_content"
android:layout_height="wrap_content" />
</TableRow>
<TableRow
android:id="@+id/tableRow2"
android:layout_width="wrap_content"
android:layout_height="wrap_content" >
<TextView
android:id="@+id/textView2"
android:textSize="20px"
android:layout_width="wrap_content"
android:layout_height="wrap_content"
android:text="密码:" />
<EditText
android:id="@+id/pwd"
android:inputType="textPassword"
android:layout_width="wrap_content"
android:layout_height="wrap_content" />
</TableRow>
<TableRow
android:id="@+id/tableRow3"
android:layout_width="wrap_content"
android:layout_height="wrap_content" >
<TextView
android:id="@+id/textView3"
android:textSize="20px"
android:layout_width="wrap_content"
android:layout_height="wrap_content"
android:text="确认密码:" />
<EditText
android:id="@+id/repwd"
android:inputType="textPassword"
android:layout_width="wrap_content"
android:layout_height="wrap_content" />
</TableRow>
<TableRow
android:id="@+id/tableRow4"
android:layout_width="wrap_content"
android:layout_height="wrap_content" >
<TextView
android:id="@+id/textView4"
android:textSize="20px"
android:layout_width="wrap_content"
android:layout_height="wrap_content"
android:text="E-mail地址:" />
<EditText
android:id="@+id/email"
android:layout_width="wrap_content"
android:layout_height="wrap_content" />
</TableRow>
</TableLayout>
</LinearLayout>
<LinearLayout
android:id="@+id/linearLayout2"
android:orientation="vertical"
android:gravity="center_horizontal"
android:layout_width="wrap_content"
android:layout_weight="1"
android:layout_height="wrap_content" >
<ImageView
android:id="@+id/imageView1"
android:layout_width="158px"
android:layout_height="150px"
android:src="@drawable/ic_launcher" />
<Button
android:id="@+id/button1"
android:layout_width="wrap_content"
android:layout_height="wrap_content"
android:text="选择头像" />
</LinearLayout>
</LinearLayout>
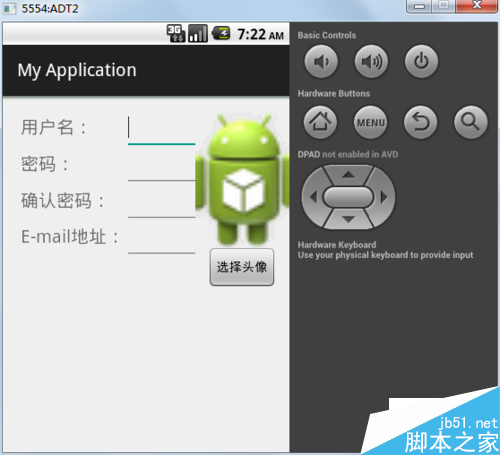
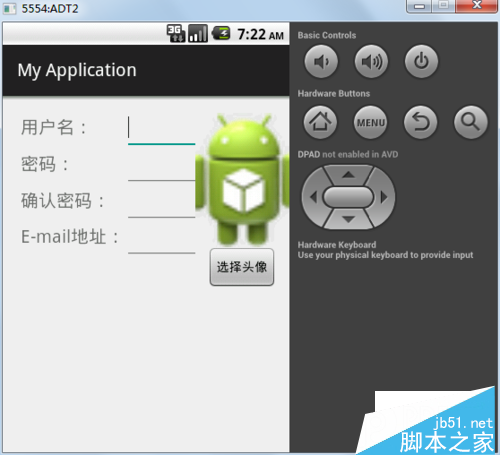
效果如下图所示:
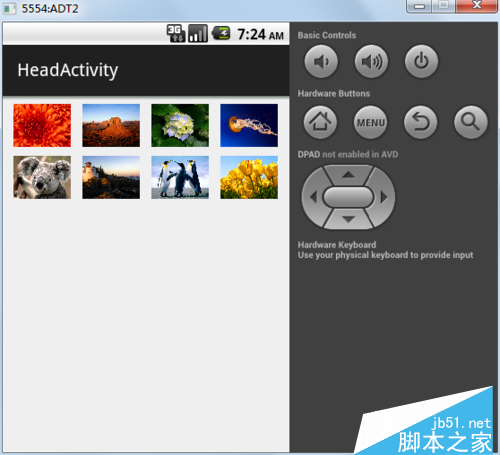
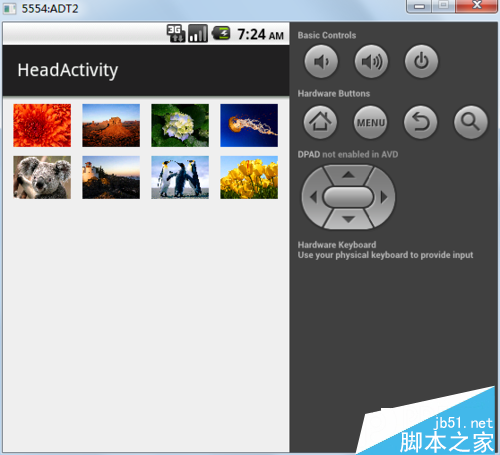
2.然后是图库的页面布局,由用户去选择图片,这里我就用windows系统里面的几张照片:
<?xml version="1.0" encoding="utf-8"?>
<LinearLayout xmlns:android="http://schemas.android.com/apk/res/android"
android:layout_width="match_parent" android:layout_height="match_parent">
<GridView
android:layout_width="wrap_content"
android:layout_height="match_parent"
android:id="@+id/gridView"
android:numColumns="4" />
</LinearLayout>
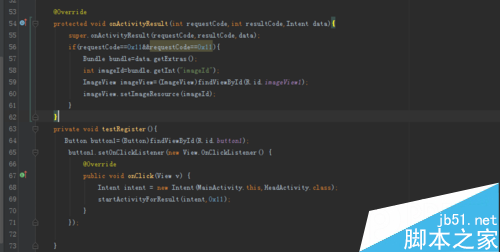
3.然后我们在注册页面的Activity写入以下代码:
点击按钮跳转到图库Activity页面中:
Button button1=(Button)findViewById(R.id.button1);
button1.setOnClickListener(new View.OnClickListener() {
@Override
public void onClick(View v) {
Intent intent = new Intent(MainActivity.this,HeadActivity.class);
startActivityForResult(intent,0x11);
}
});
重写
@Override onActivityResult方法:
protected void onActivityResult(int requestCode,int resultCode,Intent data){
super.onActivityResult(requestCode,resultCode,data);
if(requestCode==0x11&&requestCode==0x11){
Bundle bundle=data.getExtras();
int imageId=bundle.getInt("imageId");
ImageView imageView=(ImageView)findViewById(R.id.imageView1);
imageView.setImageResource(imageId);
}
}
4.在图库Activity里面写入以下代码响应用户点击图片并通过Intent传递给前一个Activity:
GridView gridView=(GridView)findViewById(R.id.gridView);
BaseAdapter adapter=new BaseAdapter() {
@Override
public int getCount() {
return imageId.length;
}
@Override
public Object getItem(int position) {
return position;
}
@Override
public long getItemId(int position) {
return position;
}
@Override
public View getView(int position, View convertView, ViewGroup parent) {
ImageView imageView;
if(convertView==null){
imageView=new ImageView(HeadActivity.this);
imageView.setAdjustViewBounds(true);
imageView.setMaxHeight(58);
imageView.setMaxWidth(50);
imageView.setPadding(5,5,5,5);
}else{
imageView=(ImageView)convertView;
}
imageView.setImageResource(imageId[position]);
return imageView;
}
};
gridView.setAdapter(adapter);
gridView.setOnItemClickListener(new AdapterView.OnItemClickListener() {
@Override
public void onItemClick(AdapterView<?> parent, View view, int position, long id) {
Intent intent=getIntent();
Bundle bundle=new Bundle();
bundle.putInt("imageId",imageId[position]);
intent.putExtras(bundle);
setResult(0x11,intent);
finish();
}
});
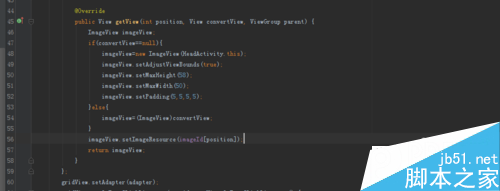
这里主要是重写getView方法:
5.然后我们点击运行界面如下:
6.我们点击按钮之后跳转Activity选择图片头像:
7.然后我们点击一个图片又跳转回去,头像更改: