废话不多说了,直接给大家贴代码了。
布局文件xml:
<LinearLayout xmlns:android="http://schemas.android.com/apk/res/android"
xmlns:tools="http://schemas.android.com/tools"
android:layout_width="match_parent"
android:layout_height="match_parent"
android:orientation="vertical"
android:paddingBottom="@dimen/activity_vertical_margin"
android:paddingLeft="@dimen/activity_horizontal_margin"
android:paddingRight="@dimen/activity_horizontal_margin"
android:paddingTop="@dimen/activity_vertical_margin"
tools:context=".DialogActivity" >
<Button
android:id="@+id/plainDialog"
android:layout_width="match_parent"
android:layout_height="wrap_content"
android:text="普通Dialog" />
<Button
android:id="@+id/plainDialogEvent"
android:layout_width="match_parent"
android:layout_height="wrap_content"
android:text="Dialog按钮事件集中处理" />
<Button
android:id="@+id/inputDialog"
android:layout_width="match_parent"
android:layout_height="wrap_content"
android:text="请输入框" />
<Button
android:id="@+id/listDialog"
android:layout_width="match_parent"
android:layout_height="wrap_content"
android:text="列表对话框" />
<Button
android:id="@+id/radioDialog"
android:layout_width="match_parent"
android:layout_height="wrap_content"
android:text="单选对话框" />
<Button
android:id="@+id/checkboxDialog"
android:layout_width="match_parent"
android:layout_height="wrap_content"
android:text="多选对话框" />
<Button
android:id="@+id/diyDialog"
android:layout_width="match_parent"
android:layout_height="wrap_content"
android:text="自定义布局对话框" />
</LinearLayout>
Activity文件:
普通的dialog:
private void plainDialogDemo() {
Button plainBtn = (Button) findViewById(R.id.plainDialog);
plainBtn.setOnClickListener(new OnClickListener() {
public void onClick(View v) {
new AlertDialog.Builder(DialogActivity.this)
.setTitle("删除")
.setMessage("确定删除指定数据")
.setPositiveButton("确定",
new DialogInterface.OnClickListener() {
@Override
public void onClick(DialogInterface dialog,
int which) {
Toast.makeText(getApplicationContext(),
"确定了", Toast.LENGTH_SHORT)
.show();
}
})
.setNegativeButton("取消",
new DialogInterface.OnClickListener() {
@Override
public void onClick(DialogInterface dialog,
int which) {
}
}).setCancelable(false).show();
}
});
}
效果如下:

输入文本框的dialog:
private void inputDialog() {
Button inputBtn = (Button) findViewById(R.id.inputDialog);
inputBtn.setOnClickListener(new OnClickListener() {
@Override
public void onClick(View v) {
// TODO Auto-generated method stub
final EditText et = new EditText(DialogActivity.this);
new AlertDialog.Builder(DialogActivity.this)
.setTitle("请输入数字")
.setView(et)
.setPositiveButton("确定",
new DialogInterface.OnClickListener() {
@Override
public void onClick(DialogInterface dialog,
int which) {
// TODO Auto-generated method stub
Toast.makeText(getApplicationContext(),
et.getText(),
Toast.LENGTH_SHORT).show();
}
}).setNegativeButton("取消", null)
.setCancelable(false).show();
}
});
}
效果如下:

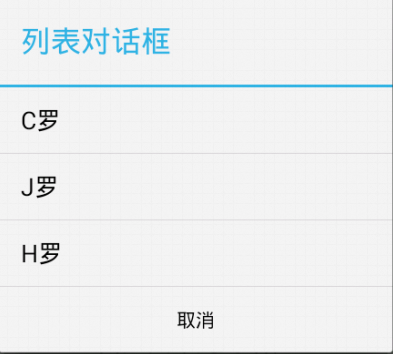
列表dialog:
private void listDialogDemo() {
Button listBtn = (Button) findViewById(R.id.listDialog);
listBtn.setOnClickListener(new OnClickListener() {
@Override
public void onClick(View v) {
final String[] names = { "C罗", "J罗", "H罗" };
new AlertDialog.Builder(DialogActivity.this).setTitle("列表对话框")
.setItems(names, new DialogInterface.OnClickListener() {
@Override
public void onClick(DialogInterface dialog,
int which) {
Toast.makeText(DialogActivity.this,
names[which], Toast.LENGTH_SHORT)
.show();
}
}).setNegativeButton("取消", null).show();
}
});
}
效果如下:

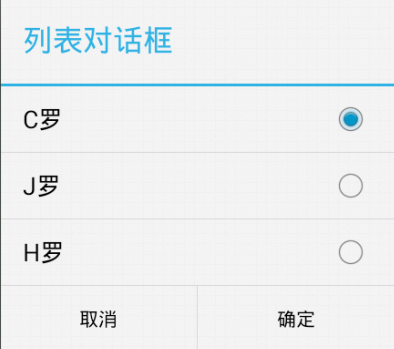
单选dialog:
private void radioDialogDemo() {
Button radioButton = (Button) findViewById(R.id.radioDialog);
radioButton.setOnClickListener(new OnClickListener() {
@Override
public void onClick(View v) {
final String[] names = { "C罗", "J罗", "H罗" };
new AlertDialog.Builder(DialogActivity.this)
.setTitle("列表对话框")
.setSingleChoiceItems(names, ,
new DialogInterface.OnClickListener() {
@Override
public void onClick(DialogInterface dialog,
int which) {
selecteName = names[which];
}
})
.setPositiveButton("确定",
new DialogInterface.OnClickListener() {
@Override
public void onClick(DialogInterface dialog,
int which) {
Toast.makeText(DialogActivity.this,
selecteName, Toast.LENGTH_SHORT)
.show();
}
}).setNegativeButton("取消", null).show();
}
});
}
效果如下:

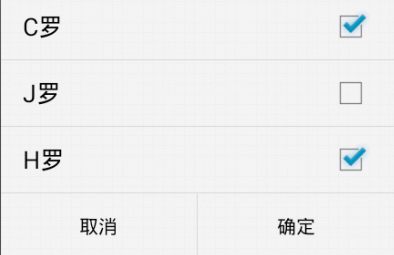
多选dialog:
private void checkDialogDemo() {
Button checkBtn = (Button) findViewById(R.id.checkboxDialog);
checkBtn.setOnClickListener(new OnClickListener() {
@Override
public void onClick(View v) {
final String[] names = { "C罗", "J罗", "H罗" };
final boolean[] selected = new boolean[] { true, false, true };
new AlertDialog.Builder(DialogActivity.this)
.setMultiChoiceItems(
names,
selected,
new DialogInterface.OnMultiChoiceClickListener() {
@Override
public void onClick(DialogInterface dialog,
int which, boolean isChecked) {
}
})
.setPositiveButton("确定",
new DialogInterface.OnClickListener() {
@Override
public void onClick(DialogInterface dialog,
int which) {
StringBuilder sb = new StringBuilder(
"你选择了:");
for (int i = ; i < names.length; i++) {
if (selected[i]) {
sb.append(names[i]);
}
}
Toast.makeText(DialogActivity.this,
sb.toString(), ).show();
}
}).setNegativeButton("取消", null).show();
}
});
}
效果如下:

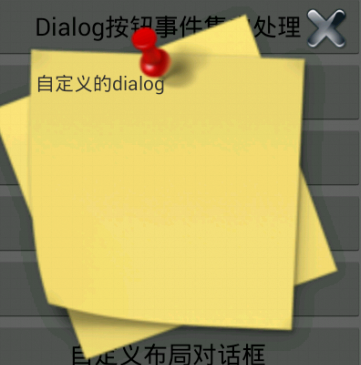
自定义dialog:
private void customDialogDemo() {
final AlertDialog dlg = new AlertDialog.Builder(this).create();
dlg.show();
Window window = dlg.getWindow();
window.setContentView(R.layout.diylayout);
ImageButton ok = (ImageButton) window.findViewById(R.id.btnok);
ok.setOnClickListener(new View.OnClickListener() {
@Override
public void onClick(View v) {
Toast.makeText(getApplicationContext(), "关闭了",
Toast.LENGTH_SHORT).show();
dlg.dismiss();
}
});
}
自定义布局:
<?xml version="." encoding="utf-"?>
<RelativeLayout xmlns:android="http://schemas.android.com/apk/res/android"
android:layout_width="match_parent"
android:layout_height="match_parent" >
<ImageView
android:id="@+id/dialogimg"
android:layout_width="wrap_content"
android:layout_height="wrap_content"
android:layout_centerInParent="true"
android:src="@drawable/dialog_bg" />
<TextView
android:layout_width="wrap_content"
android:layout_height="wrap_content"
android:layout_alignLeft="@id/dialogimg"
android:layout_alignTop="@id/dialogimg"
android:layout_marginLeft="dp"
android:layout_marginTop="dp"
android:text="自定义的dialog" />
<ImageButton
android:id="@+id/btnok"
android:layout_width="dp"
android:layout_height="dp"
android:layout_alignRight="@id/dialogimg"
android:layout_alignTop="@id/dialogimg"
android:layout_marginRight="dp"
android:layout_marginTop="dp"
android:background="@drawable/close_dialog" />
</RelativeLayout>
效果如:

有关Android Dialog对话框详解小编就给大家介绍这么多,希望对大家有所帮助!