关于 android 常用布局,利用 XML 文件实现已经有很多的实例了。但如何利用代码实现呢?当然利用代码实现没有太大的必要,也是不提倡的,但我觉得利用代码实现这些布局,可以更好的了解 SDK API ,所以在此也整理一些,和大家分享一下。
首先看一下,布局所对应的类的 API 继承图:

android常用布局的代码实现所有的布局都会对应相关的类,这些类都是继承自 android.view.ViewGroup 类的。而 LinearLayout,RelativeLayout 都是在 android.widget 包里的。另外,TableLayout 是继承自 LinearLayout.
下面直接贴代码了。
// 利用代码设置 线性布局
 private void setLinearLayout(){
  LinearLayout llayout = new LinearLayout(this);
  llayout.setOrientation(LinearLayout.VERTICAL); // 设置线性布局的排列方式
  TextView textView = new TextView(this);
  textView.setText("代码实现的线性布局");
  textView.setTextColor(Color.RED);
  textView.setGravity(Gravity.CENTER); // 设置文本内容的对齐方式
  LinearLayout.LayoutParams ll_lpara = new LinearLayout.LayoutParams(MP,WC);
//  ll_lpara.gravity = Gravity.CENTER_HORIZONTAL; // 设置控件在布局中的对齐方式
  llayout.addView(textView,ll_lpara);
  Button btn = new Button(this);
  btn.setText("按钮");
  llayout.addView(btn,ll_lpara); // 按指定属性添加控件
  setContentView(llayout);
 }
实现效果图:

=========================================================================
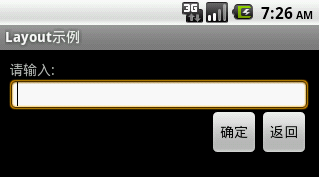
// 利用代码设置 相对布局
 private void setRelativeLayout(){
  RelativeLayout rlayout = new RelativeLayout(this);
  rlayout.setPadding(10, 10, 10, 10); // 单位: pixels
  int textViewID = 100;
  TextView textView = new TextView(this);
  textView.setId(textViewID);
  textView.setText("请输入:");
  RelativeLayout.LayoutParams rl_lpara1 = new RelativeLayout.LayoutParams(MP, WC);
  rlayout.addView(textView, rl_lpara1);
  int editTextID = 200;
  EditText editText = new EditText(this);
  editText.setId(editTextID);
  editText.setBackgroundResource(android.R.drawable.editbox_background); // 设置背景 , 同android:backgroumd
  RelativeLayout.LayoutParams rl_lpara2 = new RelativeLayout.LayoutParams(MP, WC);
  rl_lpara2.addRule(RelativeLayout.BELOW,textViewID); // 设置相对属性,需先指定相对控件的ID
  rlayout.addView(editText, rl_lpara2);
  int backBtnID = 300;
  Button backBtn = new Button(this);
  backBtn.setId(backBtnID);
  backBtn.setText("返回");
  RelativeLayout.LayoutParams rl_lpara3 = new RelativeLayout.LayoutParams(WC, WC);
  rl_lpara3.addRule(RelativeLayout.BELOW, editTextID);
  rl_lpara3.addRule(RelativeLayout.ALIGN_PARENT_RIGHT); // 设置与父控件的相对属性
  rlayout.addView(backBtn, rl_lpara3);
  Button okBtn = new Button(this);
  okBtn.setText("确定");
  RelativeLayout.LayoutParams rl_lpara4 = new RelativeLayout.LayoutParams(WC, WC);
  rl_lpara4.addRule(RelativeLayout.LEFT_OF, backBtnID);
  rl_lpara4.addRule(RelativeLayout.ALIGN_TOP,backBtnID);
  rlayout.addView(okBtn, rl_lpara4);
  setContentView(rlayout);
 }
实现效果图:
=========================================================================
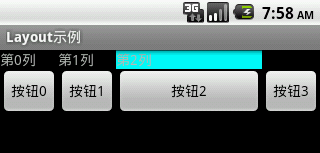
// 利用代码设置 表格布局
 private void setTableLayout(){
  TableLayout tlayout = new TableLayout(this);
  tlayout.setColumnStretchable(2, true); // 拉长索引从0开始的第2列
  TableLayout.LayoutParams tl_lpara = new TableLayout.LayoutParams(MP,WC);
  // 1. TableRow 不需要设置 layout_width, layout_height
  // 2. TableRow 中的控件不能设置 layout_span 属性
  TableRow tr1 = new TableRow(this);
  TextView textView0 = new TextView(this);
  textView0.setText("第0列");
  tr1.addView(textView0);
  TextView textView1 = new TextView(this);
  textView1.setText("第1列");
  tr1.addView(textView1);
  TextView textView2 = new TextView(this);
  textView2.setText("第2列");
  textView2.setBackgroundColor(Color.CYAN);
  tr1.addView(textView2);
  tlayout.addView(tr1, tl_lpara);
  TableRow tr2 = new TableRow(this);
  Button btn0 = new Button(this);
  btn0.setText("按钮0");
  tr2.addView(btn0);
  Button btn1 = new Button(this);
  btn1.setText("按钮1");
  tr2.addView(btn1);
  Button btn2 = new Button(this);
  btn2.setText("按钮2");
  tr2.addView(btn2);
  Button btn3 = new Button(this);
  btn3.setText("按钮3");
  tr2.addView(btn3);
  tlayout.addView(tr2, tl_lpara);
  setContentView(tlayout);
 }
实现效果图: