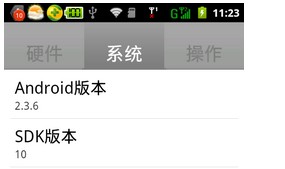
首先,定义TabHost的布局文件:
<?xml version="1.0" encoding="utf-8"?>
<TabHost xmlns:android="http://schemas.android.com/apk/res/android"
android:id="@android:id/tabhost" android:layout_width="fill_parent"
android:layout_height="fill_parent">
<LinearLayout android:orientation="vertical"
android:layout_width="fill_parent" android:layout_height="fill_parent">
<TabWidget android:id="@android:id/tabs"
android:layout_alignParentBottom="true"
android:layout_width="fill_parent"
android:layout_height="wrap_content"/>
<FrameLayout
android:id="@android:id/tabcontent"
android:layout_width="fill_parent"
android:layout_height="fill_parent" />
</LinearLayout>
</TabHost>
其中,TabWidget即是选项卡上面的标签,FrameLayout是选项卡的内容。
在Java类文件中定义如下:
public class MainActivity extends TabActivity {
private TabHost my_tabhost;
private TabWidget my_tabwidget;
private int i,k;
private TextView tv;
private String[] tabMenu = { "系统", "硬件", "操作"};
private Intent intent0, intent1, intent2;
private Intent[] intents = { intent0, intent1, intent2};
private TabHost.TabSpec tabSpec0, tabSpec1, tabSpec2, tabSpec3;
private TabHost.TabSpec[] tabSpecs = { tabSpec0, tabSpec1, tabSpec2, tabSpec3};
public static Context mContext;
@Override
protected void onCreate(Bundle savedInstanceState) {
super.onCreate(savedInstanceState);
// 不要窗体标题
requestWindowFeature(Window.FEATURE_NO_TITLE);
setContentView(R.layout.activity_main);
setContentView(R.layout.activity_main);
my_tabhost = getTabHost();
intent0 = new Intent(this, system.class);
intent1 = new Intent(this, hardware.class);
intent2 = new Intent(this, operation.class);
tabSpec0 = my_tabhost.newTabSpec("system").setIndicator(tabMenu[0],null).
setContent(intent0);
tabSpec1 = my_tabhost.newTabSpec("hardware").setIndicator(tabMenu[1],null).
setContent(intent1);
tabSpec2 = my_tabhost.newTabSpec("operation").setIndicator(tabMenu[2],null).
setContent(intent2);
my_tabhost.addTab(tabSpec1);
my_tabhost.addTab(tabSpec0);
my_tabhost.addTab(tabSpec2);
<br> // 设置默认选中的选项卡为第2个
my_tabhost.setCurrentTab(1);
}
}
每一个选项卡对应一个Intent,每一个Intent又对应一个类,选中这个选项卡时,就显示对应的类。
运行结果如下: