
一、API接口设置
比如我这段代码中的一些设置,设置文字、居中、禁止复制、LineEdit输入为password等等
import sys
from PyQt5.QtCore import Qt
from PyQt5.QtWidgets import QFrame
from PyQt5.QtWidgets import QLabel
from PyQt5.QtWidgets import QWidget
from PyQt5.QtWidgets import QLineEdit
from PyQt5.QtWidgets import QTextEdit
from PyQt5.QtWidgets import QSizePolicy
from PyQt5.QtWidgets import QMainWindow
from PyQt5.QtWidgets import QPushButton
from PyQt5.QtWidgets import QGridLayout
from PyQt5.QtWidgets import QApplication
from View import interface
class MainWindow(QMainWindow):
def __init__(self):
super(MainWindow,self).__init__(None)
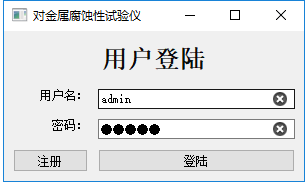
self.setWindowTitle("对金属腐蚀性试验仪")
self.initUI()
def initUI(self):
layout = QGridLayout()
layout.setSpacing(10)
self.loginLabel = QLabel("用户名:")
self.loginLabel.setAlignment(Qt.AlignRight)
self.loginLabel.setStyleSheet("color:rgb(20,20,20,255);font-size:16px;font-weight:bold:text")
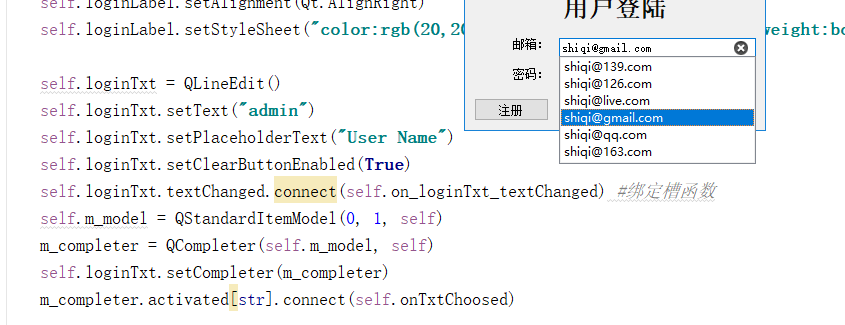
self.loginTxt = QLineEdit()
self.loginTxt.setText("admin")
self.loginTxt.setPlaceholderText("User Name")
self.loginTxt.setClearButtonEnabled(True)
self.pwdLabel = QLabel("密码:")
self.pwdLabel.setAlignment(Qt.AlignRight)
self.pwdTxt = QLineEdit()
self.pwdTxt.setContextMenuPolicy(Qt.NoContextMenu) #禁止复制粘贴
self.pwdTxt.setPlaceholderText("Password")
self.pwdTxt.setText("admin")
self.pwdTxt.setEchoMode(QLineEdit.Password)
self.pwdTxt.setClearButtonEnabled(True)
self.registeredBtn = QPushButton("注册")
self.loginBtn = QPushButton("登陆")
self.headLabel = QLabel("用户登陆")
self.headLabel.resize(300,30)
self.headLabel.setAlignment(Qt.AlignCenter)
self.headLabel.setStyleSheet("color:rgb(10,10,10,255);font-size:25px;font-weight:bold;font-family:Roman times;")
self.headLabel.setSizePolicy(QSizePolicy.Expanding,QSizePolicy.Expanding)
layout.addWidget(self.headLabel,0,0,1,2)
policy = self.headLabel.sizePolicy()
print(policy.verticalPolicy())
policy.setVerticalPolicy(1)
print(policy.verticalPolicy())
# policy.setVerticalPolicy(1)
layout.addWidget(self.loginLabel,1,0)
layout.addWidget(self.loginTxt,1,1)
layout.addWidget(self.pwdLabel,2,0)
layout.addWidget(self.pwdTxt,2,1)
layout.addWidget(self.registeredBtn,3,0)
layout.addWidget(self.loginBtn,3,1)
frame = QFrame(self)
frame.setLayout(layout)
self.setCentralWidget(frame)
self.resize(300,150)
if __name__ == '__main__':
app = QApplication(sys.argv)
mainWindow = MainWindow()
mainWindow.show()
mainWindow.activateWindow()
mainWindow.raise_()
app.exec_()
del mainWindow
del app
1.1.0 QLineEdit一些属性
inputMask设置掩码
text 设置文本
maxLength文本框输入的最大字符数
frame 设置边框
echoMode 设置文本框显示格式
Normal正常显示所输入的字符,此为默认选项
NoEcho不显示任何输入的字符,常用于密码类型的输入,且长度保密
Password显示与平台相关的密码掩饰字符,而不是实际输入的字符
PasswordEchoOnEdit在编辑时显示字符,负责显示密码类型的输入
cursorPosition光标位置
alignment文本对齐方式
AlignLeft左对齐
AlignRight右对齐
AlignCenter水平居中对齐
AlignJustify水平方向调整间距两端对齐
AlignTop垂直上对齐
AlignBottom垂直方下对齐
AlignVCenter垂直方向居中对齐
dragEnabled设置文本框是否接受拖动
readOnly设置文本为只读
placeholderText设置文本框提示文字
cursorMoveStyle光标移动风格
LogicalMoveStyle逻辑风格
VisualMoveStyle视觉风格
clearButtonEnabled快速删除按钮
1.1 常用的一些设置

| 参数 | 作用 |
|---|---|
| AlignAbsolute=16 | |
| AlignBaseline=256 | |
| AlignBottom=64 | 底端对齐 |
| AlignCenter=132 | 完全居中 |
| AlignHCenter=4 | 水平居中 |
| AlignHorizontal_Mask=31 | |
| AlignJustify=8 | 可用空间对齐 |
| AlignLeading=1 | 领头对齐(理解为左对齐吧) |
| AlignLeft=1 | 左对齐 |
| AlignRight=2 | 右对齐 |
| AlignTop=32 | 上对齐 |
| AlignTrailing=2 | 尾对齐(右对齐 |
| AlignVCenter=128 | 垂直居中 |
setClearButtonEnabled(self, bool): 是否有清除文本按钮(如我第一段程序文本框后的 小黑X)
setCompleter(self, QCompleter):设置自动补全QLineEdit自动补全
setCursorMoveStyle(self, Qt_CursorMoveStyle):
setCursorPosition(self, p_int):
setDragEnabled(self, bool):
setEchoMode(self, QLineEdit_EchoMode):
setFrame(self, bool):
setInputMask(self, p_str):
setMaxLength(self, p_int):
setModified(self, bool):
setPlaceholderText(self, p_str):
setReadOnly(self, bool):
setSelection(self, p_int, p_int_1):
setText(self, p_str):
setTextMargins(self, *__args):
setValidator(self, QValidator):


