
废话不多说,直接上代码吧!
# -*- coding: utf-8 -*-
import cv2
import numpy as np
# -----------------------鼠标操作相关------------------------------------------
lsPointsChoose = []
tpPointsChoose = []
pointsCount = 0
count = 0
pointsMax = 10
def on_mouse(event, x, y, flags, param):
global img, point1, point2, count, pointsMax
global lsPointsChoose, tpPointsChoose # 存入选择的点
global pointsCount # 对鼠标按下的点计数
global img2, ROI_bymouse_flag
img2 = img.copy() # 此行代码保证每次都重新再原图画 避免画多了
# -----------------------------------------------------------
# count=count+1
# print("callback_count",count)
# --------------------------------------------------------------
if event == cv2.EVENT_LBUTTONDOWN: # 左键点击
pointsCount = pointsCount + 1
# 感觉这里没有用?2018年8月25日20:06:42
# 为了保存绘制的区域,画的点稍晚清零
# if (pointsCount == pointsMax + 1):
# pointsCount = 0
# tpPointsChoose = []
print('pointsCount:', pointsCount)
point1 = (x, y)
print (x, y)
# 画出点击的点
cv2.circle(img2, point1, 10, (0, 255, 0), 2)
# 将选取的点保存到list列表里
lsPointsChoose.append([x, y]) # 用于转化为darry 提取多边形ROI
tpPointsChoose.append((x, y)) # 用于画点
# ----------------------------------------------------------------------
# 将鼠标选的点用直线连起来
print(len(tpPointsChoose))
for i in range(len(tpPointsChoose) - 1):
print('i', i)
cv2.line(img2, tpPointsChoose[i], tpPointsChoose[i + 1], (0, 0, 255), 2)
# ----------------------------------------------------------------------
# ----------点击到pointMax时可以提取去绘图----------------
if (pointsCount == pointsMax):
# -----------绘制感兴趣区域-----------
ROI_byMouse()
ROI_bymouse_flag = 1
lsPointsChoose = []
cv2.imshow('src', img2)
# -------------------------右键按下清除轨迹-----------------------------
if event == cv2.EVENT_RBUTTONDOWN: # 右键点击
print("right-mouse")
pointsCount = 0
tpPointsChoose = []
lsPointsChoose = []
print(len(tpPointsChoose))
for i in range(len(tpPointsChoose) - 1):
print('i', i)
cv2.line(img2, tpPointsChoose[i], tpPointsChoose[i + 1], (0, 0, 255), 2)
cv2.imshow('src', img2)
def ROI_byMouse():
global src, ROI, ROI_flag, mask2
mask = np.zeros(img.shape, np.uint8)
pts = np.array([lsPointsChoose], np.int32) # pts是多边形的顶点列表(顶点集)
pts = pts.reshape((-1, 1, 2))
# 这里 reshape 的第一个参数为-1, 表明这一维的长度是根据后面的维度的计算出来的。
# OpenCV中需要先将多边形的顶点坐标变成顶点数×1×2维的矩阵,再来绘制
# --------------画多边形---------------------
mask = cv2.polylines(mask, [pts], True, (255, 255, 255))
##-------------填充多边形---------------------
mask2 = cv2.fillPoly(mask, [pts], (255, 255, 255))
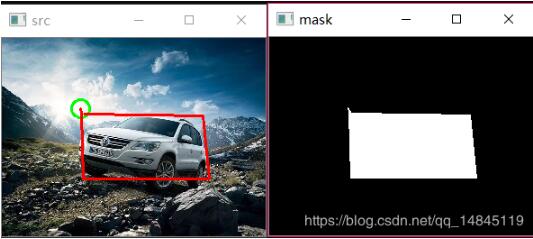
cv2.imshow('mask', mask2)
cv2.imwrite('mask.jpg', mask2)
ROI = cv2.bitwise_and(mask2, img)
#cv2.imwrite('ROI.bmp', ROI)
#cv2.imshow('ROI', ROI)
# -----------------------定点ROI绘制,程序中未使用-------------------
def fixed_ROI():
mask = np.zeros(img.shape, np.uint8)
pts = np.array([[x1, y1], [x2, y2], [x3, y3], [x4, y4]], np.int32) # 顶点集
pts = pts.reshape((-1, 1, 2))
mask = cv2.polylines(mask, [pts], True, (255, 255, 255))
mask2 = cv2.fillPoly(mask, [pts], (255, 255, 255))
cv2.imshow('mask', mask2)
# cv2.imwrite('mask.bmp', mask2)
# cv2.drawContours(mask,points,-1,(255,255,255),-1)
ROI = cv2.bitwise_and(mask2, img)
cv2.imshow('ROI', ROI)
# cv2.imwrite('ROI.bmp', ROI)
img = cv2.imread('yuantu.jpg')
# ---------------------------------------------------------
# --图像预处理,设置其大小
# height, width = img.shape[:2]
# size = (int(width * 0.3), int(height * 0.3))
# img = cv2.resize(img, size, interpolation=cv2.INTER_AREA)
# ------------------------------------------------------------
ROI = img.copy()
cv2.namedWindow('src')
cv2.setMouseCallback('src', on_mouse)
cv2.imshow('src', img)
cv2.waitKey(0)
以上这篇python3+opencv生成不规则黑白mask实例就是小编分享给大家的全部内容了,希望能给大家一个参考,也希望大家多多支持脚本之家。


