这是一个MAYA7.0制作人体皮肤材质的英文教程;学习MAYA英文是基础,因此我们对这个教程不再翻译。大家凑活着看一下。This could be the single biggest hurdle in realistic cg since Gouraud shading...
...as for me, I've been wrestling with this since -95. Like many others, I've been extremely frustrated by it, mainly cause until about -00 very few knew much about it, and no one could answer my questions. So -99 I found my own home-made method, a pragmatic approach that sidesteps simulation. (When we have the software and the power to do nice simulating, of course we should, but until then this kind of 'kludgy' approach might serve ok.)
My terminology is astronomy-based, because it's clearer and more concise:
Dayside = where light hits
Nightside = where light doesn't reach
Terminator = the transitional zone between night and day
Disclaimer: I mention Maya a few times, because that's what I use, but very similar effects can be achieved in any other high-end 3d software.
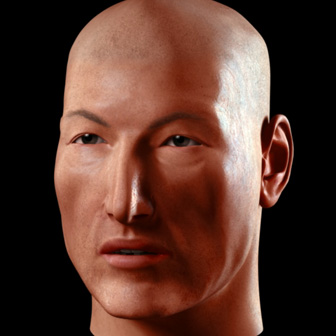
Pardon the crappy geometry, but I had to rapidly make big changes to the original face due to unforeseen copyright issues - sorry.
Faking Translucency
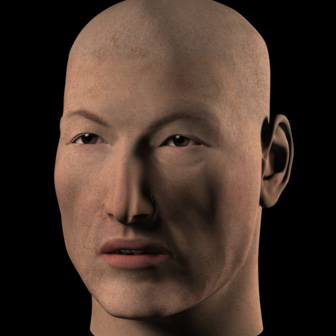
Starting from the beginning - as we all know, if you use a plain Lambert and put a skin-colored texture in the color channel, you end up with something like this: the "Copper Zombie". We see it in many beginner's work, and still today in game graphics, since they often use quite simple shading.
The skin is a horrible dead greenish-gray in the shadows, and a metallic orange in the highlights - a bit like a corpse touched up with copper-tinted makeup.
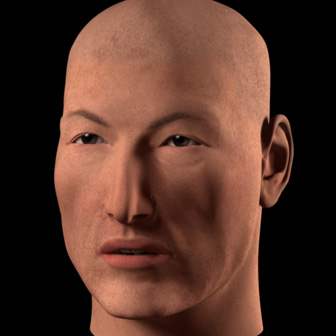
So we need to make the nightside warmer, and the dayside cooler. Also, from observing real skin, we can see that the terminator needs to be even warmer than the nightside. (Warmer in this case means more orange/red, and cooler means more blue.)
My first efforts used the ambient or incandescency channels to create some Global Warming - making the whole head redder. I sometimes even tried making the color channel and spec channels bluish. But this is of limited usefulness - when you get the terminator as warm as it must be, the nightside is too red, and the dayside too bright.
So leave the ambient like this, maximum saturation but a fairly low value. It's ok, better than the corpse, but still not very realistic.
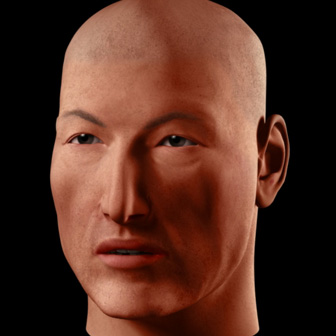
Here's where it gets fun. Take a cartoon-shader - doesn't matter which one, as long as it can give you simple control over which color ends up where, and you can get rid of the sharp edges between the colors. (We're not going to use any outline function, just the flat-shading function... except not flat.)
The shader I use here takes its color info from a ramp (in Maya, just switch the interpolation to 'linear' or'smooth' instead of 'none'). The original cartoon shader I use came from Tom Kluysken's 'Maya Queen' site, and has been attributed to Duncan Brinsmead and Michelle Borghi - it's still here (in Tutorials).
Here's the network in Maya for the translucency-fake (cartoon-shader):
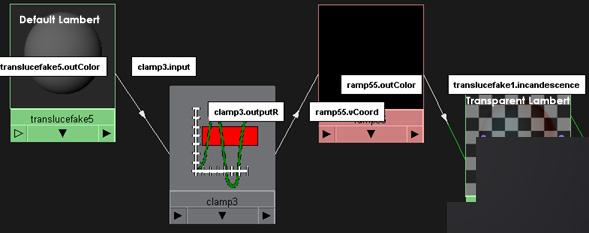
The ramp hooks into the incandescent channel of a transparent Lambert. Now layer that on top of your first skin-colored Lambert.
(Layering shaders in Maya is very simple - one shader is just 'stacked' on top of another.)
Now tweak the colors of the ramp, to be bluish on the dayside, reddish on the terminator, and reddish or black on the nightside.
In Maya you can go below zero on the Value. Making the Hue blue and the Value any sort of minus, will 'suck' blue out of that part, and in effect create a very dark and strong orange - this is what I did here, in the terminator. The only problem is, when you need to go back to edit it later the color-editor will not display the correct HSV anymore, so you'll either have to remember, guess or write it down somewhere...
Note - you can just as well put that cartoon-shader based 'translucency fake' in the incandescency channel of the base Lambert shader - it doesn't have to be layered... I just do it to have a bit of 'modularity' - I can use the same layer in many other layered shaders, and when I tweak one of them they all get tweaked.
Here's how to add another level of subtlety to the shader: do what I mentioned above, put the translucency fake not in a layer but in the base Lambert itself. Then copy that Lambert and layer that on top - Maya-note: move the translucency fake out of the incandescence to the ambient channel - this ensures none of the effect is seen in the transparent areas (but you'll have to increase the intensity of it). (Sorry, I'm not sure if there's a way to achieve this in any other software.)
Then tweak this second cartoon-shader-ramp so it seems right for a 'bonier' part of the head, like the skull/forehead (like decrease the width and redness of the terminator).
Then simply make this second Lambert transparent over the 'fleshier' bits, using a low-res and blurry grayscale texture map.
Highlights
The highlights are a whole other hornet's nest of problems. For this reason I like to isolate them on another layer, in fact here I use 2 layers: one for the glancing highlights (like the one on the right), and one for head-on or'flat' highlights (on the left side). They gradually cross-fade into each other as the light revolves around the model.
Both shaders here are transparent PhongE, but they could also be Blinn, it doesn't matter that much. The important thing is to map whatever parameters the shader has for the highlight so that it changes with regards to the angle of the light that hits the surface. In Maya you can use ramps to control this change. The basis for this shader was Emmanuel Campin's Backlight Shader (pixho.com)
Lets look at the most important of the two, the glancing highlight. It must become brighter and bluer and wider as the light becomes more and more glancing, finally flaring out into a long thin line in opposing light. Since I have another layer to handle the flatter angles, I make this glancing layer fade out to complete darkness before it hits 'noon'.
(In fact both layers are always slightly bluish - any specularity on skin must be somewhat blue to counteract the default tendency towards yellow. This can be applied to other organic materials as well, like for instance greenery - in this case the highlight would be red/magenta.)
Any bumpmap should be placed first on these specular layers, and should always be of higher value than one you may put on the base-layer. This increases the illusion of translucency.
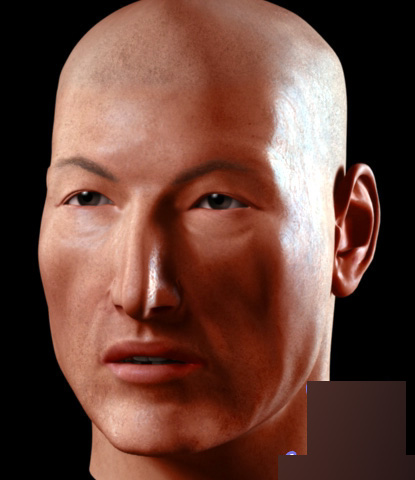
And that's it - a higher res (just tweaked with Auto-Levels in Photoshop).
The lighting: 8 spotlights - 2 fairly tight clusters of 4 each - and a very weak ambient light below and to the back.
The ear could certainly do with a lot more incandescent red in some selected spots, especially in this particular lighting (faking translucency) - hard work but if the image or scene is important it might be worth going the extra mile to add it.
Of course you could just use MentalRay, FinalRender, VRay, PRMan or Brazil, none of which I have...
以上就是MAYA7.0制作人体皮肤材质的英文教程,操作很简单的,大家学会了吗?希望这篇教程能对大家有所帮助!


