
vue实现移动端可拖拽浮球,供大家参考,具体内容如下
1 首先创建一个div
<div class="floatball" id="floatball"
 @mousedown="down" @touchstart.stop="down"
 @mousemove="move" @touchmove.stop="move"
 @mouseup="end" @touchend.stop="end" @click="showRewardDesc"
 :style="{top:position.y+'px', left:position.x+'px'}">
 奖励规则
</div>
2 给 div 附上样式
<style>
 .floatball{
 color:white;
 height:50px;
 width: 50px;
 padding: 5px;
 z-index: 990;
 position: fixed;
 top: 60px;
 right: 320px;
 border-radius: 50%;
 background-color: rgba(29, 157, 237,0.8);
 }

</style>
3 给 div 附上事件
准备四个变量
1)、屏幕长
var screenHeight = window.screen.height
2)、屏幕宽
var screenWidth = window.screen.width
3)、初始触控点 距离 div 左上角的横向距离 dx
4)、初始触控点 距离 div 左上角的竖向距离 dy
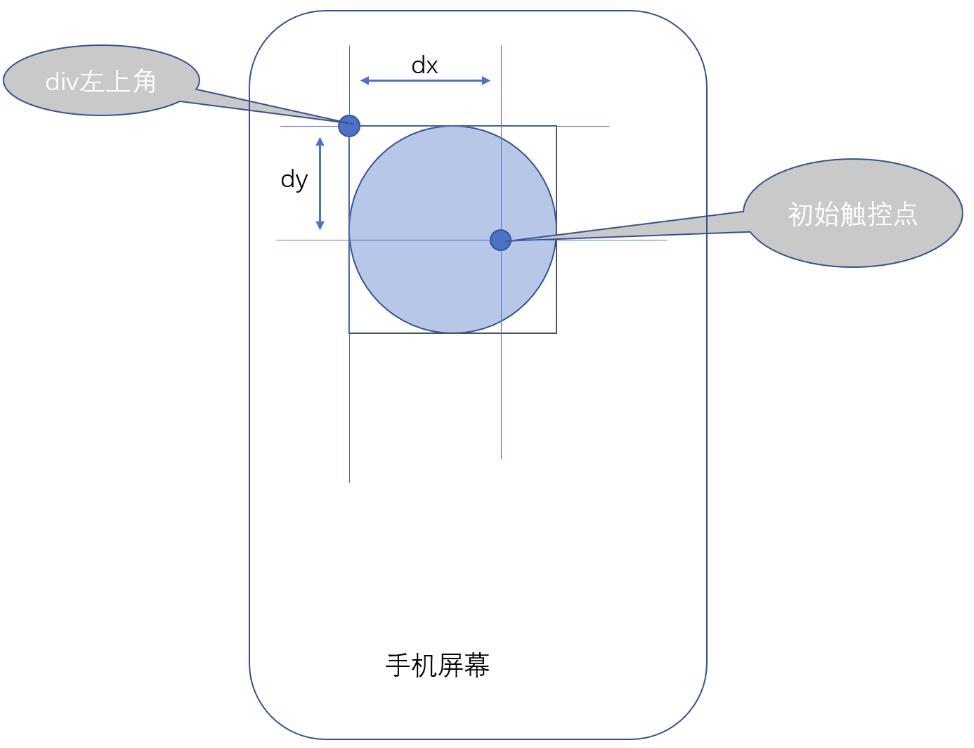
在开始拖拽时,计算出鼠标点(初始触控点)和 div左上角顶点的距离
down(event){
 this.flags = true;
 var touch ;
 if(event.touches){
 touch = event.touches[0];
 }else {
 touch = event;
 }
 console.log('鼠标点所在位置', touch.clientX,touch.clientY)
 console.log('div左上角位置', event.target.offsetTop,event.target.offsetLeft)
 dx = touch.clientX - event.target.offsetLeft
 dy = touch.clientY - event.target.offsetTop
},
拖拽进行时,将触控点的位置赋值给 div
// 定位滑块的位置
this.position.x = touch.clientX - dx;
this.position.y = touch.clientY - dy;
// 限制滑块超出页面
// console.log('屏幕大小', screenWidth, screenHeight)
if (this.position.x < 0) {
 this.position.x = 0
} else if (this.position.x > screenWidth - touch.target.clientWidth) {
 this.position.x = screenWidth - touch.target.clientWidth
}
if (this.position.y < 0) {
 this.position.y = 0
} else if (this.position.y > screenHeight - touch.target.clientHeight) {
 this.position.y = screenHeight - touch.target.clientHeight
}
拖拽结束
//鼠标释放时候的函数
end(){
 console.log('end')
 this.flags = false;
},
全部代码
<template>
 <div class="floatball" id="floatball"
 @mousedown="down" @touchstart.stop="down"
 @mousemove="move" @touchmove.stop="move"
 @mouseup="end" @touchend.stop="end"
 :style="{top:position.y+'px', left:position.x+'px'}">
 奖励规则
 </div>
</template>

<script>
// 鼠标位置和div的左上角位置 差值
var dx,dy
var screenWidth = window.screen.width
var screenHeight = window.screen.height

export default {
 data() {
 return {
 flags: false,
 position: {
 x: 320,
 y: 60
 },
 }
 },


 methods: {
 // 实现移动端拖拽
 down(event){
 this.flags = true;
 var touch ;
 if(event.touches){
 touch = event.touches[0];
 }else {
 touch = event;
 }
 console.log('鼠标点所在位置', touch.clientX,touch.clientY)
 console.log('div左上角位置', event.target.offsetTop,event.target.offsetLeft)
 dx = touch.clientX - event.target.offsetLeft
 dy = touch.clientY - event.target.offsetTop
 },
 move() {
 if (this.flags) {
 var touch ;
 if (event.touches) {
 touch = event.touches[0];
 } else {
 touch = event;
 }
 // 定位滑块的位置
 this.position.x = touch.clientX - dx;
 this.position.y = touch.clientY - dy;
 // 限制滑块超出页面
 // console.log('屏幕大小', screenWidth, screenHeight )
 if (this.position.x < 0) {
 this.position.x = 0
 } else if (this.position.x > screenWidth - touch.target.clientWidth) {
 this.position.x = screenWidth - touch.target.clientWidth
 }
 if (this.position.y < 0) {
 this.position.y = 0
 } else if (this.position.y > screenHeight - touch.target.clientHeight) {
 this.position.y = screenHeight - touch.target.clientHeight
 }
 //阻止页面的滑动默认事件
 document.addEventListener("touchmove",function(){
 event.preventDefault();
 },false);
 }
 },
 //鼠标释放时候的函数
 end(){
 console.log('end')
 this.flags = false;
 },

 }

}
</script>

<style>
 .floatball{
 color:white;
 height:50px;
 width: 50px;
 padding: 5px;
 z-index: 990;
 position: fixed;
 top: 60px;
 right: 320px;
 border-radius: 50%;
 background-color: rgba(29, 157, 237,0.8);
 }

</style>
以上就是本文的全部内容,希望对大家的学习有所帮助,也希望大家多多支持脚本之家。


