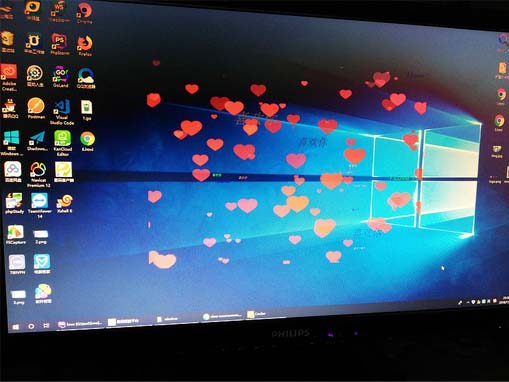
本文介绍了使用electron制作满屏心特效的示例代码,分享给大家,具体如下:

图片被压缩了 看起来很难看

主进程代码
import {BrowserWindow, app, ipcMain} from 'electron'

createWindow();

ipcMain.on('quitApp', () => {
  app.quit();
});

function createWindow() {

  const loginURL = process.env.NODE_ENV === 'development' ? `http://localhost:9080` : `file://${__dirname}/index.html`;
  const win = new BrowserWindow({

    alwaysOnTop: true,
    modal: true,
    width: 1200,
    height: 6500,
    frame: false,
    show: false,
    darkTheme: true,
    resizable: false,
    minimizable: false,
    maximizable: false,
    transparent: true,
    type: 'toolbar',
    webPreferences: {
      devTools: false,
    }
  });
  win.loadURL(loginURL);
  win.once('ready-to-show', () => {
    win.show();
  });
}
渲染进程代码
界面代码
<template>
  <div style="position: absolute;width: 95%;height: 95%;border-radius: 10px;-webkit-app-region: drag">
    <canvas ref="drawHeart" id="drawHeart"></canvas>
  </div>
</template>
js代码
 mounted() {
      var hearts = [];
      var canvas = this.$refs.drawHeart;
      var wW = 1920;
      var wH = 1040;
      // 创建画布
      var ctx = canvas.getContext('2d');
      // 创建图片对象
      var heartImage = new Image();
      heartImage.src = img;
      var num = 100;

      init();

      window.addEventListener('resize', function(){
        wW = window.innerWidth;
        wH = window.innerHeight;
      });
      // 初始化画布大小
      function init(){
        canvas.width = wW;
        canvas.height = wH;
        for(var i = 0; i < num; i++){
          hearts.push(new Heart(i%5));
        }
        requestAnimationFrame(render);
      }

      function getColor(){
        var val = Math.random() * 10;
        if(val > 0 && val <= 1){
          return '#00f';
        } else if(val > 1 && val <= 2){
          return '#f00';
        } else if(val > 2 && val <= 3){
          return '#0f0';
        } else if(val > 3 && val <= 4){
          return '#368';
        } else if(val > 4 && val <= 5){
          return '#666';
        } else if(val > 5 && val <= 6){
          return '#333';
        } else if(val > 6 && val <= 7){
          return '#f50';
        } else if(val > 7 && val <= 8){
          return '#e96d5b';
        } else if(val > 8 && val <= 9){
          return '#5be9e9';
        } else {
          return '#d41d50';
        }
      }

      function getText(){
        var val = Math.random() * 10;
        if(val > 1 && val <= 3){
          return '爱你一辈子';
        } else if(val > 3 && val <= 5){
          return '感谢你';
        } else if(val > 5 && val <= 8){
          return '喜欢你';
        } else{
          return 'I Love You';
        }
      }

      function Heart(type){
        this.type = type;
        // 初始化生成范围
        this.x = Math.random() * wW;
        this.y = Math.random() * wH;

        this.opacity = Math.random() * .5 + .5;

        // 偏移量
        this.vel = {
          x: (Math.random() - .5) * 5,
          y: (Math.random() - .5) * 5
        }

        this.initialW = wW * .5;
        this.initialH = wH * .5;
        // 缩放比例
        this.targetScale = Math.random() * .15 + .02; // 最小0.02
        this.scale = Math.random() * this.targetScale;

        // 文字位置
        this.fx = Math.random() * wW;
        this.fy = Math.random() * wH;
        this.fs = Math.random() * 10;
        this.text = getText();

        this.fvel = {
          x: (Math.random() - .5) * 5,
          y: (Math.random() - .5) * 5,
          f: (Math.random() - .5) * 2
        }
      }

      Heart.prototype.draw = function(){
        ctx.save();
        ctx.globalAlpha = this.opacity;
        ctx.drawImage(heartImage, this.x, this.y, this.width, this.height);
        ctx.scale(this.scale + 1, this.scale + 1);
        if(!this.type){
          // 设置文字属性
          ctx.fillStyle = getColor();
          ctx.font = 'italic ' + this.fs + 'px sans-serif';
          // 填充字符串
          ctx.fillText(this.text, this.fx, this.fy);
        }
        ctx.restore();
      }
      Heart.prototype.update = function(){
        this.x += this.vel.x;
        this.y += this.vel.y;

        if(this.x - this.width > wW || this.x + this.width < 0){
          // 重新初始化位置
          this.scale = 0;
          this.x = Math.random() * wW;
          this.y = Math.random() * wH;
        }
        if(this.y - this.height > wH || this.y + this.height < 0){
          // 重新初始化位置
          this.scale = 0;
          this.x = Math.random() * wW;
          this.y = Math.random() * wH;
        }

        // 放大
        this.scale += (this.targetScale - this.scale) * .1;
        this.height = this.scale * this.initialH;
        this.width = this.height * 1.4;

        // -----文字-----
        this.fx += this.fvel.x;
        this.fy += this.fvel.y;
        this.fs += this.fvel.f;

        if(this.fs > 50){
          this.fs = 2;
        }

        if(this.fx - this.fs > wW || this.fx + this.fs < 0){
          // 重新初始化位置
          this.fx = Math.random() * wW;
          this.fy = Math.random() * wH;
        }
        if(this.fy - this.fs > wH || this.fy + this.fs < 0){
          // 重新初始化位置
          this.fx = Math.random() * wW;
          this.fy = Math.random() * wH;
        }
      }

      function render(){
        ctx.clearRect(0, 0, wW, wH);
        for(var i = 0; i < hearts.length; i++){
          hearts[i].draw();
          hearts[i].update();
        }
        requestAnimationFrame(render);
      }

    }
扩展功能
全屏展示
const size = screen.getPrimaryDisplay().workAreaSize;  //获取显示器的宽高
win.setSet(size.width size.height);
win.setPosition(0,0);
这样就会让窗口全屏 但是有一个问题 就是这样做界面不会正确响应 我们可以使用进程通信去解决
win.webContents.sen('windowSize',size);
之后再主进程中监听就行了
窗口点击穿透
以上代码会有一个问题 就是一旦运行 就不能关闭了
win.setIgnoreMouseEvents(true) 就可以让界面只做展示使用 鼠标可以点击你窗口的任意区域
以上就是本文的全部内容,希望对大家的学习有所帮助,也希望大家多多支持脚本之家。