
本文实例为大家分享了微信小程序手势图案锁屏的具体代码,供大家参考,具体内容如下
参考
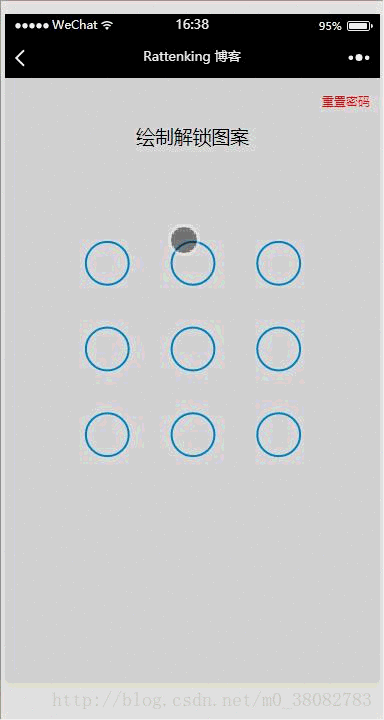
效果图
WXML
<view class="container">
  <view class="reset" bindtap="resetPwd">重置密码</view>
  <view class="title">{{title}}</view>
  <canvas canvas-id="canvas" class="canvas" bindtouchend="onTouchEnd"
   bindtouchstart="onTouchStart" bindtouchmove="onTouchMove"></canvas>
</view>
JS
var Locker = class {
 constructor(page,opt){
  var obj = opt || {};

  this.page = page;
  this.width = obj.width || 300;
  this.height = obj.height || 300;
  this.canvasId = obj.id || 'canvas';
  this.cleColor = obj.cleColor || '#CFE6FF';
  this.cleCenterColor = obj.cleCenterColor || '#CFE6FF';

  var chooseType = obj.chooseType || 3;
  // 判断是否缓存有chooseType,有就用缓存,没有就用传入的值
  this.chooseType = Number(wx.getStorageSync('chooseType')) || chooseType;

  this.init();
 }
 init(){
  this.pswObj = wx.getStorageSync('passwordxx') ? {
   step: 2,
   spassword: JSON.parse(wx.getStorageSync('passwordxx'))
  } : {};

  this.makeState();
  // 创建 canvas 绘图上下文(指定 canvasId)
  this.ctx = wx.createCanvasContext(this.canvasId,this);
  this.touchFlag = false;
  this.lastPoint = [];

  // 绘制圆
  this.createCircle();
  // canvas绑定事件
  this.bindEvent();
 }
 makeState() {
  if (this.pswObj.step == 2) {
   this.page.setData({ title:'请解锁'});
  } else if (this.pswObj.step == 1) {
   // pass
  } else {
   // pass
  }
 }
 // 画圆方法
 drawCle(x,y){
  // 设置边框颜色。
  this.ctx.setStrokeStyle(this.cleColor); // 注意用set
  // 设置线条的宽度。
  this.ctx.setLineWidth(2); // 注意用set
  // 开始创建一个路径,需要调用fill或者stroke才会使用路径进行填充或描边。
  this.ctx.beginPath();
  // 画一条弧线。
  this.ctx.arc(x, y, this.r, 0, Math.PI * 2, true);
  // 关闭一个路径
  this.ctx.closePath();
  // 画出当前路径的边框。默认颜色色为黑色。
  this.ctx.stroke();
  // 将之前在绘图上下文中的描述(路径、变形、样式)画到 canvas 中。
  this.ctx.draw(true);
 }

 // 计算两点之间的距离的方法
 getDis(a, b) {
  return Math.sqrt(Math.pow(a.x - b.x, 2) + Math.pow(a.y - b.y, 2));
 }

 // 创建解锁点的坐标,根据canvas的大小(默认300px)来平均分配半径
 createCircle() {
  var n = this.chooseType;
  var count = 0;
  // 计算圆半径
  this.r = this.width / (2 + 4 * n);
  this.arr = [];
  this.restPoint = [];
  var r = this.r;
  // 获取圆心坐标,以及当前圆所代表的数
  for (var i = 0; i < n; i++) {
   for (var j = 0; j < n; j++) {
    count++;
    var obj = {
     x: j * 4 * r + 3 * r,
     y: i * 4 * r + 3 * r,
     index: count
    };
    this.arr.push(obj);
    this.restPoint.push(obj);
   }
  }
  // 清空画布
  this.ctx.clearRect(0, 0, this.width, this.height);

  // 绘制所有的圆
  this.arr.forEach(current => {this.drawCle(current.x, current.y);});
 }


 // 设置密码绘制
 getPosition(e) { // 获取touch点相对于canvas的坐标
  var po = {
   x: e.touches[0].x,
   y: e.touches[0].y
  };
  return po;
 }
 precisePosition(po){
  var arr = this.restPoint.filter(current => Math.abs(po.x - current.x) < this.r && Math.abs(po.y - current.y) < this.r);
  return arr[0];
 }
 drawPoint(obj) { // 初始化圆心

  for (var i = 0; i < this.lastPoint.length; i++) {
   this.ctx.setFillStyle(this.cleCenterColor); // 注意用set方法
   this.ctx.beginPath();
   this.ctx.arc(this.lastPoint[i].x, this.lastPoint[i].y, this.r / 2, 0, Math.PI * 2, true);
   this.ctx.closePath();
   this.ctx.fill();
   this.ctx.draw(true);
  }
 }
 drawLine(po) {// 解锁轨迹
  this.ctx.beginPath();
  this.ctx.lineWidth = 3;
  this.ctx.moveTo(this.lastPoint[0].x,this.lastPoint[0].y);

  for (var i = 1; i < this.lastPoint.length; i++) {
   this.ctx.lineTo(this.lastPoint[i].x, this.lastPoint[i].y);
  }
  this.ctx.lineTo(po.x, po.y);
  this.ctx.stroke();
  this.ctx.closePath();
  this.ctx.draw(true);
 }
 pickPoints(fromPt, toPt) {
  var lineLength = this.getDis(fromPt, toPt);
  var dir = toPt.index > fromPt.index ? 1 : -1;

  var len = this.restPoint.length;
  var i = dir === 1 ? 0 : (len - 1);
  var limit = dir === 1 ? len : -1;

  while (i !== limit) {
   var pt = this.restPoint[i];

   if (this.getDis(pt, fromPt) + this.getDis(pt, toPt) === lineLength) {
    this.drawPoint(pt.x, pt.y);
    this.lastPoint.push(pt);
    this.restPoint.splice(i, 1);
    if (limit > 0) {
     i--;
     limit--;
    }
   }

   i += dir;
  }
 }
 update(po) {// 核心变换方法在touchmove时候调用
  this.ctx.clearRect(0, 0, this.width, this.height);

  for (var i = 0; i < this.arr.length; i++) { // 每帧先把面板画出来
   this.drawCle(this.arr[i].x, this.arr[i].y);
  }

  this.drawPoint(this.lastPoint);// 每帧花轨迹
  this.drawLine(po, this.lastPoint);// 每帧画圆心

  for (var i = 0; i < this.restPoint.length; i++) {
   var pt = this.restPoint[i];

   if (Math.abs(po.x - pt.x) < this.r && Math.abs(po.y - pt.y) < this.r) {
    this.drawPoint(pt.x, pt.y);
    this.pickPoints(this.lastPoint[this.lastPoint.length - 1], pt);
    break;
   }
  }
 }
 checkPass(psw1, psw2) {// 检测密码
  var p1 = '',
   p2 = '';
  for (var i = 0; i < psw1.length; i++) {
   p1 += psw1[i].index + psw1[i].index;
  }
  for (var i = 0; i < psw2.length; i++) {
   p2 += psw2[i].index + psw2[i].index;
  }
  return p1 === p2;
 }
 storePass(psw) {// touchend结束之后对密码和状态的处理
  if (this.pswObj.step == 1) {
   if (this.checkPass(this.pswObj.fpassword, psw)) {
    this.pswObj.step = 2;
    this.pswObj.spassword = psw;

    this.page.setData({title:'密码保存成功'});

    this.drawStatusPoint('#2CFF26');
    wx.setStorageSync('passwordxx', JSON.stringify(this.pswObj.spassword));
    wx.setStorageSync('chooseType', this.chooseType);
   } else {
    this.page.setData({ title: '两次不一致,重新输入' });
    this.drawStatusPoint('red');
    delete this.pswObj.step;
   }
  } else if (this.pswObj.step == 2) {
   if (this.checkPass(this.pswObj.spassword, psw)) {
    this.page.setData({ title: '解锁成功' });
    this.drawStatusPoint('#2CFF26');
   } else {
    this.drawStatusPoint('red');
    this.page.setData({ title: '解锁失败' });
   }
  } else {
   this.pswObj.step = 1;
   this.pswObj.fpassword = psw;
   this.page.setData({ title: '再次输入' });
  }
 }
 drawStatusPoint(type) { // 初始化状态线条
  for (var i = 0; i < this.lastPoint.length; i++) {
   this.ctx.strokeStyle = type;
   this.ctx.beginPath();
   this.ctx.arc(this.lastPoint[i].x, this.lastPoint[i].y, this.r, 0, Math.PI * 2, true);
   this.ctx.closePath();
   this.ctx.stroke();
   this.ctx.draw(true);
  }
 }

 updatePassword() {
  wx.removeStorageSync('passwordxx');
  wx.removeStorageSync('chooseType');
  this.pswObj = {};
  this.page.setData({ title: '绘制解锁图案' });
  this.reset();
 }
 reset() {
  this.makeState();
  this.createCircle();
 }
 bindEvent(){
  var self = this;
  this.page.onTouchStart = function(e){
   var po = self.getPosition(e);
   self.lastPoint = [];
   for (var i = 0; i < self.arr.length; i++) {
    if (Math.abs(po.x - self.arr[i].x) < self.r && Math.abs(po.y - self.arr[i].y) < self.r) {

     self.touchFlag = true;
     self.drawPoint(self.arr[i].x, self.arr[i].y);
     self.lastPoint.push(self.arr[i]);
     self.restPoint.splice(i, 1);
     break;
    }
   }
  }

  this.page.onTouchMove = function(e){
   if (self.touchFlag) {
    self.update(self.getPosition(e));
   }
  }

  this.page.onTouchEnd = function(e){
   if (self.touchFlag) {
    self.touchFlag = false;
    self.storePass(self.lastPoint);
    setTimeout(function () {
     self.reset();
    }, 300);
   }
  }
 }
}
module.exports = Locker;
DEMO下载
以上就是本文的全部内容,希望对大家的学习有所帮助,也希望大家多多支持脚本之家。


