
前言
前端用什么框架都可以,这里选择小巧的vuejs。
要实现的功能很简单:
1、登录功能,成功将服务器返回的token存在本地
2、使用带token的header访问服务器的一个资源
本次实验环境:
"dependencies": {
  "vue": "^2.2.1"
 },
 "devDependencies": {
  "babel-core": "^6.0.0",
  "babel-loader": "^6.0.0",
  "babel-preset-latest": "^6.0.0",
  "cross-env": "^3.0.0",
  "css-loader": "^0.25.0",
  "file-loader": "^0.9.0",
  "vue-loader": "^11.1.4",
  "vue-template-compiler": "^2.2.1",
  "webpack": "^2.2.0",
  "webpack-dev-server": "^2.2.0"
 }
开发IDE:Atom
首先建一个项目
使用webpack构建
/Atom# vue init webpack-simple vue-jwt-demo
...
/Atom# cd vue-jwt-demo/
/Atom/vue-jwt-demo# cnpm install
/Atom/vue-jwt-demo# npm run dev
安装插件
/Atom/vue-jwt-demo# cnpm install vue-router

/Atom/vue-jwt-demo# cnpm install vue-resource
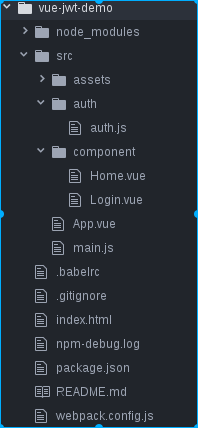
整体目录
auth.js
完成token的存取
const SERVER_URL = 'http://localhost:8081'
const LOGIN_URL = SERVER_URL+'/login2'

export default{
  data:{
    authenticated:false
  },
  login(context,info){
    context.$http.post(LOGIN_URL,info).then(function(data){
      console.log(data.bodyText)
      localStorage.setItem('token',data.bodyText);
      this.authenticated = true
      //跳到home页
      this.$router.push('home')
    },function(err){
      console.log(err+","+err.body.message)
      context.error = err.body.message
    })
  },
  getAuthHeader(){
    return {
      'Authorization':'Bearer '+localStorage.getItem('token')
    }
  },
  checkAuth(){
    var token = localStorage.getItem('token')
    if(token){
      this.authenticated = true
    }else{
      this.authenticated = false
    }
  }
}
main.js
程序入口:完成路由和初始化
import Vue from 'vue'
import App from './App.vue'
import Login from './component/Login.vue'
import Home from './component/Home.vue'
import VueRouter from 'vue-router'
import VueResource from 'vue-resource'
import auth from './auth/auth'

Vue.use(VueRouter)
Vue.use(VueResource)

//在启动APP时进行校验是否有token
auth.checkAuth()

const routes= [
  {
    path:'/',redirect:'/login'
  },
  {
    path:'/login',component:Login
  },
  {
    path:'/home',component:Home
  }
]

const router = new VueRouter({
  routes
})
new Vue({
 router,
 render: h => h(App)
}).$mount('#app')
App.vue
页面载体
<template>
 <div id="app">
  <h1>{{msg}}</h1>
  <router-view></router-view>
 </div>
</template>

<script>
export default {
 name: 'app',
 data () {
  return {
   msg: 'Vue前后端分离demo'
  }
 }
}
</script>
Login.vue
登录页面
<template>
 <div>
  <h2>登录</h2>
  <p>{{ error }}</p>
  <div>
   <input
    type="text"
    placeholder="Enter your username"
    v-model="info.username"
   >
  </div>
  <div>
   <input
    type="password"
    placeholder="Enter your password"
    v-model="info.password"
   >
  </div>
  <button @click="submit()">登录</button>
 </div>
</template>

<script>
import auth from '../auth/auth'

export default {

 data() {
  return {
   info: {
    username: '',
    password: ''
   },
   error: ''
  }
 },
 methods: {
  submit() {
   var info = {
    username: this.info.username,
    password: this.info.password
   }
   auth.login(this, info)
  }
 }
}
</script>
效果:丑是丑了点

Home.vue
主页面,访问一个获取邮箱的请求
<template>
 <div id="home">
  <h1>{{msg}}</h1>
  <button @click="getEmail()">Get Email</button>
  <h2>Email:{{email}}</h2>
 </div>
</template>

<script>
import auth from '../auth/auth'

export default {
 name: 'home',
 data () {
  return {
   msg: '欢迎您登录成功',
   email:''
  }
  },
  beforeCreate(){
    //如果没有token的话需要重新登录
     if(!auth.authenticated){
      this.$router.push('login')
    }
  },
  methods:{
    getEmail(){
      this.$http.get('http://localhost:8081/user/getEmail',{
        headers:auth.getAuthHeader()
      }).then(function(re){
        this.email = re.bodyText
      },function(){
        console.log("get email error")
      })
    }
  }
}
</script>

<style>
#app {
 font-family: 'Avenir', Helvetica, Arial, sans-serif;
 -webkit-font-smoothing: antialiased;
 -moz-osx-font-smoothing: grayscale;
 text-align: center;
 color: #2c3e50;
 margin-top: 60px;
}

h1, h2 {
 font-weight: normal;
}

a {
 color: #42b983;
}
</style>
对应在服务端:
@GetMapping("/getEmail")
  public String getEmail() {
    return "xxxx@qq.com";
  }

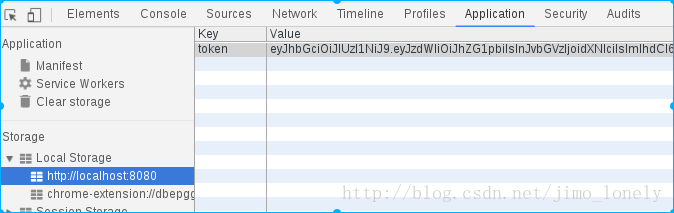
可看到浏览器的本地存储:
代码:https://github.com/jimolonely/vue-jwt-demo
以上就是本文的全部内容,希望对大家的学习有所帮助,也希望大家多多支持脚本之家。


