

本文实例为大家分享了iOS实现九宫格连线手势解锁的具体代码,供大家参考,具体内容如下
Demo下载地址:手势解锁
效果图:
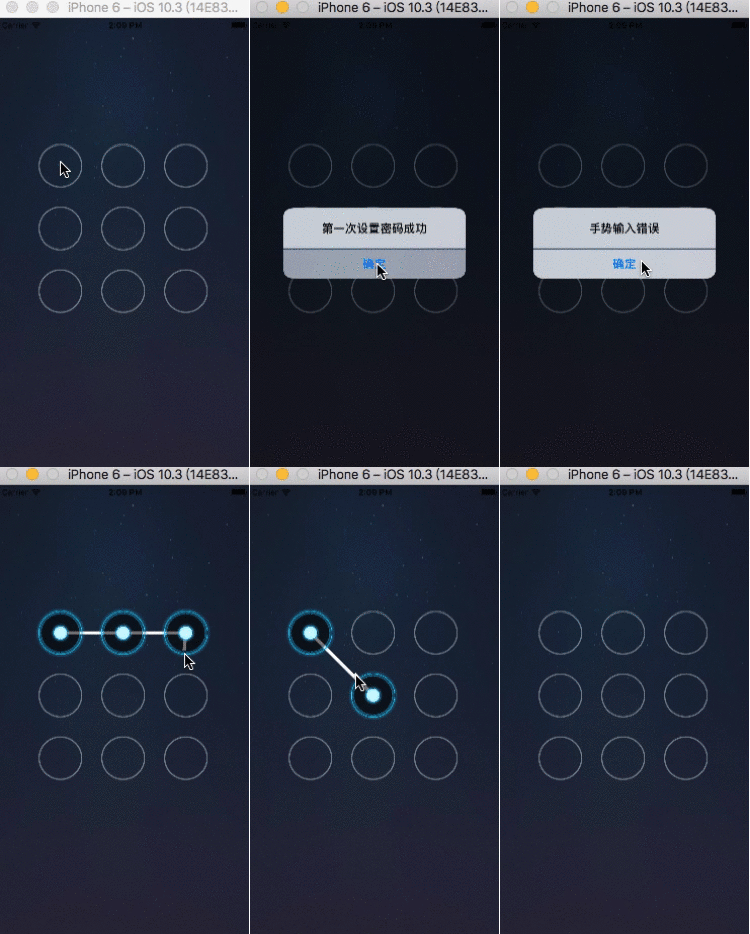
核心代码:
//
// ClockView.m
// 手势解锁
//
// Created by llkj on 2017/8/24.
// Copyright © 2017年 LayneCheung. All rights reserved.
//

#import "ClockView.h"

@interface ClockView ()

//存放当前选中的按钮
@property (nonatomic, strong) NSMutableArray *selectBtnArry;

//当前手指所在点
@property (nonatomic, assign) CGPoint curP;

@end

@implementation ClockView

- (void)awakeFromNib{

 [super awakeFromNib];

 //初始化
 [self setUp];
}

- (NSMutableArray *)selectBtnArry{

 if (_selectBtnArry == nil) {
 _selectBtnArry = [NSMutableArray array];
 }
 return _selectBtnArry;
}

- (void)setUp{

 for (int i = 0; i < 9; i ++) {

 //创建按钮
 UIButton *btn = [UIButton buttonWithType:UIButtonTypeCustom];

 btn.tag = i;

 btn.userInteractionEnabled = NO;

 [btn setImage:[UIImage imageNamed:@"gesture_node_normal"] forState:UIControlStateNormal];

 [btn setImage:[UIImage imageNamed:@"gesture_node_selected"] forState:UIControlStateSelected];

 [self addSubview:btn];
 }
}

//获取当前点
- (CGPoint)getCurrentPoint:(NSSet *)point{

 UITouch *touch = [point anyObject];
 return [touch locationInView:self];

}

//返回按钮
- (UIButton *)btnRectContainsPoint:(CGPoint)point{

 //遍历brn判断当前点在不在btn上
 for (UIButton *btn in self.subviews) {
 if (CGRectContainsPoint(btn.frame, point)) {
  return btn;
 }
 }
 return nil;
}
- (void)touchesBegan:(NSSet<UITouch *> *)touches withEvent:(UIEvent *)event{

 //1.获取当前点
 CGPoint curP = [self getCurrentPoint:touches];

 //2.判断当前点在不在btn上
 UIButton *btn = [self btnRectContainsPoint:curP];
 if (btn && btn.selected == NO) {
 btn.selected = YES;

 //保存选中的按钮
 [self.selectBtnArry addObject:btn];
 }

}

- (void)touchesMoved:(NSSet<UITouch *> *)touches withEvent:(UIEvent *)event{

 //1.获取当前点
 CGPoint curP = [self getCurrentPoint:touches];
 self.curP = curP;

 //2.判断当前点在不在btn上
 UIButton *btn = [self btnRectContainsPoint:curP];
 if (btn && btn.selected == NO) {
 btn.selected = YES;

 //保存选中的按钮
 [self.selectBtnArry addObject:btn];
 }
 //重绘
 [self setNeedsDisplay];
}

- (void)touchesEnded:(NSSet<UITouch *> *)touches withEvent:(UIEvent *)event{

 NSMutableString *str = [NSMutableString string];
 //1.取消所有选中的按钮
 for (UIButton *btn in self.selectBtnArry) {
 btn.selected = NO;
 [str appendFormat:@"%ld", btn.tag];
 }
 //2.清空路径
 [self.selectBtnArry removeAllObjects];
 [self setNeedsDisplay];

 //查看是否是第一次设置密码
 NSString *keyPwd = [[NSUserDefaults standardUserDefaults] objectForKey:@"keyPwd"];
 if (!keyPwd) {
 [[NSUserDefaults standardUserDefaults] setObject:str forKey:@"keyPwd"];
 [[NSUserDefaults standardUserDefaults] synchronize];

 UIAlertView *alertV = [[UIAlertView alloc] initWithTitle:@"第一次设置密码成功" message:nil delegate:nil cancelButtonTitle:@"确定" otherButtonTitles:nil, nil];
 [alertV show];
 NSLog(@"第一次输入密码");
 }else{

 if ([keyPwd isEqualToString:str]) {
  NSLog(@"密码正确");
  UIAlertView *alertV = [[UIAlertView alloc] initWithTitle:@"手势输入正确" message:nil delegate:nil cancelButtonTitle:@"确定" otherButtonTitles:nil, nil];
  [alertV show];


 }else{
  NSLog(@"密码错误");
  UIAlertView *alertV = [[UIAlertView alloc] initWithTitle:@"手势输入错误" message:nil delegate:nil cancelButtonTitle:@"确定" otherButtonTitles:nil, nil];
  [alertV show];
 }
 }
 //3.查看当前选中按钮的顺序
 NSLog(@"选中按钮顺序为:%@",str);
}

- (void)drawRect:(CGRect)rect{

 if (self.selectBtnArry.count) {
 //1.创建路径
 UIBezierPath *path = [UIBezierPath bezierPath];

 //2.取出所有保存的按钮
 for (int i = 0; i < self.selectBtnArry.count; i ++) {
  UIButton *btn = self.selectBtnArry[i];

  //当前按钮是不是第一个按钮
  if (i == 0) {
  //设置成路径的起点
  [path moveToPoint:btn.center];
  } else {
  //添加一根线到按钮中心
  [path addLineToPoint:btn.center];
  }
 }

 //添加一根线到当前手指所在点
 [path addLineToPoint:self.curP];

 //设置线宽/颜色
 [path setLineWidth:5];
 [[UIColor whiteColor] set];
 [path setLineJoinStyle:kCGLineJoinRound];

 //3.绘制路径
 [path stroke];
 }


}
- (void)layoutSubviews{

 [super layoutSubviews];

 CGFloat x = 0;
 CGFloat y = 0;

 CGFloat btnWH = 75;

 int column = 3;
 int margin = (self.bounds.size.width - (column * btnWH)) / (column + 1);

 int currentColumn = 0;
 int currentRow = 0;

 for (int i = 0; i < self.subviews.count; i ++) {

 // 求当前所在的列
 currentColumn = i % column;

 // 求当前所在的行
 currentRow = i / column;

 x = margin + (btnWH + margin) * currentColumn;

 y = margin + (btnWH + margin) * currentRow;

 UIButton *btn = self.subviews[i];

 btn.frame = CGRectMake(x, y, btnWH, btnWH);
 }
}
@end
以上就是本文的全部内容,希望对大家的学习有所帮助,也希望大家多多支持脚本之家。


