
在我们日常开发的过程中难免会碰到一些选项的需求,下面是我针对我们该次需求做的一个小的Demo,闲话不多说了,上图片,上代码。
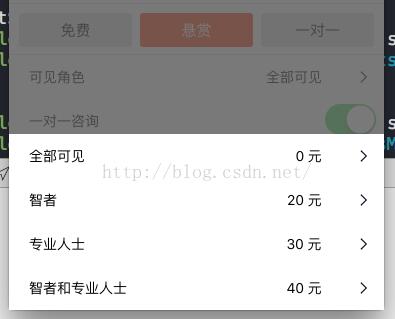
这样在我们选择上面一个Cell进行点击的时候,我会通过一个代理把数据传递到下面的页面,下面是代码
//
// LCAlertListView.h
// MeiMeiDu
//
// Created by 韩伟佳 on 16/4/6.
// Copyright © 2016年 LangCuang. All rights reserved.
//

#import <UIKit/UIKit.h>
@class LCAlertListView;

@protocol LCAlertListViewDelegate <NSObject>

-(void)alertListView:(LCAlertListView*)view didSelectedRow:(NSInteger)row;

@end

@interface LCAlertListView : UIView<UITableViewDataSource, UITableViewDelegate>

-(instancetype)initWithFrame:(CGRect)frame datas:(NSArray*)datas;
-(instancetype)initWithFrame:(CGRect)frame datas:(NSArray*)datas count:(NSArray*)counts;
@property(nonatomic, strong) id<LCAlertListViewDelegate> delegate;
@end
下面是具体实现
//
// LCAlertListView.m
// MeiMeiDu
//
// Created by 韩伟佳 on 16/4/6.
// Copyright © 2016年 LangCuang. All rights reserved.
//

#import "LCAlertListView.h"
#import "NoFreeCell.h"

static CGFloat TableViewHeight ;

@implementation LCAlertListView{
 UITableView* mTableView;
 NSArray* tableData;
 NSArray* visiableData;
 NSArray* visiableCount;
 UIButton* backgroundBtn;
}

-(instancetype)initWithFrame:(CGRect)frame datas:(NSArray*)datas{
 if (self = [super initWithFrame:frame]) {
 self.backgroundColor = [UIColor clearColor];
 backgroundBtn = [[UIButton alloc] initWithFrame:frame];
 backgroundBtn.backgroundColor = RGBA(88, 88, 88, 0.8);
 [backgroundBtn addTarget:self action:@selector(dismiss) forControlEvents:UIControlEventTouchUpInside];
 [self addSubview:backgroundBtn];
 tableData = datas;
 TableViewHeight = (datas.count + 1) * 44 + 20;
 mTableView = [[UITableView alloc] initWithFrame:CGRectMake(0, kScreenHeight, kScreenWidth, TableViewHeight) style:UITableViewStylePlain];
 [mTableView registerClass:[UITableViewCell class] forCellReuseIdentifier:@"cell"];
 mTableView.delegate = self;
 mTableView.dataSource = self;
 [self addSubview:mTableView];
 [UIView animateWithDuration:.25 animations:^{
 [mTableView setFrame:CGRectMake(0, kScreenHeight - TableViewHeight, kScreenWidth, TableViewHeight)];
 } completion:^(BOOL finished) {

 }];
 }
 return self;
}
-(instancetype)initWithFrame:(CGRect)frame datas:(NSArray*)datas count:(NSArray*)counts{
 if (self = [super initWithFrame:frame]) {
 self.backgroundColor = [UIColor clearColor];
 backgroundBtn = [[UIButton alloc] initWithFrame:frame];
 backgroundBtn.backgroundColor = RGBA(88, 88, 88, 0.8);
 [backgroundBtn addTarget:self action:@selector(dismiss) forControlEvents:UIControlEventTouchUpInside];
 [self addSubview:backgroundBtn];
 visiableData = datas;
 visiableCount = counts;
 TableViewHeight = (datas.count + 1) * 44 + 20;
 mTableView = [[UITableView alloc] initWithFrame:CGRectMake(0, kScreenHeight, kScreenWidth, TableViewHeight) style:UITableViewStylePlain];
 [mTableView registerClass:[UITableViewCell class] forCellReuseIdentifier:@"cell"];
 mTableView.delegate = self;
 mTableView.dataSource = self;
 [self addSubview:mTableView];
 [UIView animateWithDuration:.25 animations:^{
 [mTableView setFrame:CGRectMake(0, kScreenHeight - TableViewHeight, kScreenWidth, TableViewHeight)];
 } completion:^(BOOL finished) {

 }];
 }
 return self;
}


- (NSInteger)tableView:(UITableView *)tableView numberOfRowsInSection:(NSInteger)section{
 if(tableData.count > 0){
 return [tableData count];
 }else if (visiableCount.count > 0){
 return [visiableCount count];
 }
 return nil;
}

- (UITableViewCell *)tableView:(UITableView *)tableView cellForRowAtIndexPath:(NSIndexPath *)indexPath{
 UITableViewCell* cell;
 NoFreeCell *doubleCell;
 if([tableData count] <= 3 && [tableData count] > 0){
 cell = [tableView dequeueReusableCellWithIdentifier:@"cell" forIndexPath:indexPath];
 cell.textLabel.text = tableData[indexPath.row];
 return cell;

 }else {
 static NSString *identifier = @"cell0";
 doubleCell =[tableView dequeueReusableCellWithIdentifier:identifier];
 if (doubleCell == nil){
 doubleCell= [[NoFreeCell alloc]initWithStyle:UITableViewCellStyleDefault reuseIdentifier:identifier];
 doubleCell.visibleRoleLabel.text = visiableData[indexPath.row];
 doubleCell.showVisibleRoleLabel.text = visiableCount[indexPath.row];
 }
 return doubleCell;
 }

}

-(void)tableView:(UITableView *)tableView didSelectRowAtIndexPath:(NSIndexPath *)indexPath{
 NSInteger row = indexPath.row;
 [self dismiss:row];
}

-(void)dismiss:(NSInteger) row{
 if (_delegate && [_delegate respondsToSelector:@selector(alertListView:didSelectedRow:)]) {
 [_delegate alertListView:self didSelectedRow:row];
 }

 [UIView animateWithDuration:.15 animations:^{
 [mTableView setFrame:CGRectMake(0, kScreenHeight, kScreenWidth, TableViewHeight)];
 } completion:^(BOOL finished) {
 [self removeFromSuperview];
 }];

}

-(void)dismiss{
 [UIView animateWithDuration:.15 animations:^{
 [mTableView setFrame:CGRectMake(0, kScreenHeight, kScreenWidth, TableViewHeight)];
 } completion:^(BOOL finished) {
 [self removeFromSuperview];
 }];
}
@end
上面的NoFree 文件只是一个自定义的Cell,我们可以根据自己的需求自己设计,就不上传了,最后我们说说用法:
LCAlertListView* alertListView = [[LCAlertListView alloc]initWithFrame:CGRectMake(0, 0, kScreenWidth, kScreenHeight) datas:visibleRoleArray count:visibleRoleCountArray];
 alertListView.delegate = self;
 [[[self.view superview] superview] addSubview:alertListView];
下面是代理传值的使用
#pragma mark - LCAlertListViewDelegate
-(void)alertListView:(LCAlertListView *)view didSelectedRow:(NSInteger)row{
 if(didSelectedIndex == 0){
 testVisibleRole = visibleRoleArray[row];
 }else{
 testData = datas[row];
 }

 NSIndexPath *indexPath = [NSIndexPath indexPathForRow:didSelectedIndex inSection:0];
 [_myTableView reloadRowsAtIndexPaths:@[indexPath] withRowAnimation:UITableViewRowAnimationFade];
}
这样,我们的AlertTableVIew 就做好了。
以上就是本文的全部内容,希望对大家的学习有所帮助,也希望大家多多支持脚本之家。


