

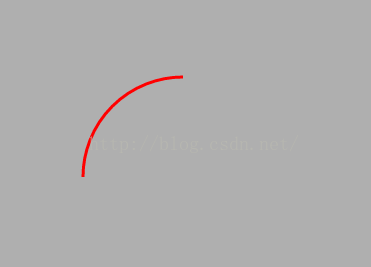
在canvas中,可以使用clip()函数裁剪区域,设定裁剪区域后,只有在区域内的图像才能显示,其余部分会被屏蔽掉
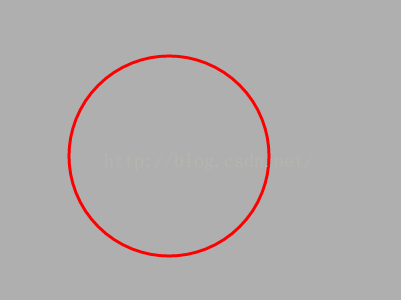
未使用裁剪绘制一个圆
<!DOCTYPE html>
<html lang="en">
<head>
    <meta charset="UTF-8">
    <title></title>
    <style>
        *{margin:0; padding:0;}
        html, body{width:100%; height:100%; overflow:hidden; background-color:#AFAFAF;}
    </style>
</head>
<body>
    <canvas id="canvas"></canvas>
    <script>
        var canvas = document.getElementById('canvas'),
            context = canvas.getContext('2d');
        canvas.width = document.body.clientWidth;
        canvas.height = document.body.clientHeight;
        context.lineWidth = 3;
        context.strokeStyle = 'red';
        context.beginPath();
        context.arc(200, 200, 100, (Math.PI / 180) * 0, (Math.PI / 180) * 360, false);
        context.stroke();
        context.closePath();
    </script>
</body>
</html>
效果
使用clip()裁剪区域
<!DOCTYPE html>
<html lang="en">
<head>
    <meta charset="UTF-8">
    <title></title>
    <style>
        *{margin:0; padding:0;}
        html, body{width:100%; height:100%; overflow:hidden; background-color:#AFAFAF;}
    </style>
</head>
<body>
    <canvas id="canvas"></canvas>
    <script>
        var canvas = document.getElementById('canvas'),
            context = canvas.getContext('2d');
        canvas.width = document.body.clientWidth;
        canvas.height = document.body.clientHeight;
        context.lineWidth = 3;
        context.strokeStyle = 'red';
        context.rect(0, 0, 200, 200);
        context.clip();
        context.beginPath();
        context.arc(200, 200, 100, (Math.PI / 180) * 0, (Math.PI / 180) * 360, false);
        context.stroke();
        context.closePath();
    </script>
</body>
</html>
效果
也可以使用arc绘制圆形的剪裁区域
<!DOCTYPE html>
<html lang="en">
<head>
    <meta charset="UTF-8">
    <title></title>
    <style>
        *{margin:0; padding:0;}
        html, body{width:100%; height:100%; overflow:hidden; background-color:#AFAFAF;}
    </style>
</head>
<body>
    <canvas id="canvas"></canvas>
    <script>
        var canvas = document.getElementById('canvas'),
            context = canvas.getContext('2d');
        canvas.width = document.body.clientWidth;
        canvas.height = document.body.clientHeight;
        context.lineWidth = 3;
        context.strokeStyle = 'red';
        context.arc(100, 100, 150, (Math.PI / 180) * 0, (Math.PI / 180) * 360, false);
        context.clip();
        context.beginPath();
        context.arc(200, 200, 100, (Math.PI / 180) * 0, (Math.PI / 180) * 360, false);
        context.stroke();
        context.closePath();
    </script>
</body>
</html>
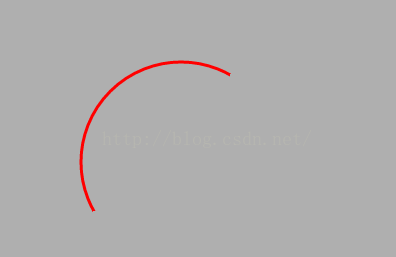
效果
使用save和restore实现只裁剪单个路径
<!DOCTYPE html>
<html lang="en">
<head>
    <meta charset="UTF-8">
    <title></title>
    <style>
        *{margin:0; padding:0;}
        html, body{width:100%; height:100%; overflow:hidden; background-color:#AFAFAF;}
    </style>
</head>
<body>
    <canvas id="canvas"></canvas>
    <script>
        var canvas = document.getElementById('canvas'),
            context = canvas.getContext('2d');
        canvas.width = document.body.clientWidth;
        canvas.height = document.body.clientHeight;
        context.lineWidth = 3;
        context.strokeStyle = 'red';
        context.save();
        context.rect(0, 0, 200, 200);
        context.clip();
        context.beginPath();
        context.arc(200, 200, 100, (Math.PI / 180) * 0, (Math.PI / 180) * 360, false);
        context.stroke();
        context.closePath();
        context.restore();
        context.beginPath();
        context.arc(250, 250, 100, (Math.PI / 180) * 0, (Math.PI / 180) * 360, false);
        context.stroke();
        context.closePath();
    </script>
</body>
</html>
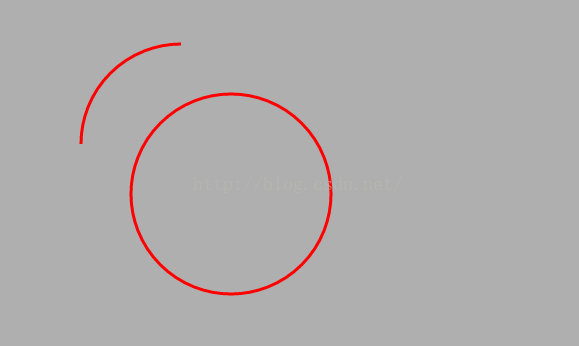
效果
以上就是本文的全部内容,希望对大家的学习有所帮助,也希望大家多多支持脚本之家。


