今天我们要学习的是使用Geolocation实现定位功能。我们可以通过navigator.geolocation获取Geolocation对象,他提供了下列方法:
getCurrentPosition(callback,errorCallback,options):获取当前位置;
watchPosition(callback,error,options):开始监控当前位置;
clearWatch(id):停止监控当前位置。
note:下面例子使用的浏览器是chrome,使用其他浏览器我不能保证运行结果和例子显示的结果一致。
1.获取当前位置 我们将使用getCurrentPosition方法获取当前位置,位置信息不会以结果的形式直接返回,我们需要使用callback函数进行处理。在获取坐标的过程中会有些延迟,还会问你要访问权限。我们来看下面的例子:
<!DOCTYPE HTML>
<html>
<head>
<title>Example</title>
<style>
table{border-collapse: collapse;}
th, td{padding: 4px;}
th{text-align: right;}
</style>
</head>
<body>
<table border="1">
<tr>
<th>Longitude:</th>
<td id="longitude">-</td>
<th>Latitude:</th>
<td id="latitude">-</td>
</tr>
<tr>
<th>Altitude:</th>
<td id="altitude">-</td>
<th>Accuracy:</th>
<td id="accuracy">-</td>
</tr>
<tr>
<th>Altitude Accuracy:</th>
<td id="altitudeAccuracy">-</td>
<th>Heading:</th>
<td id="heading">-</td>
</tr>
<tr>
<th>Speed:</th>
<td id="speed">-</td>
<th>Time Stamp:</th>
<td id="timestamp">-</td>
</tr>
</table>
<script>
navigator.geolocation.getCurrentPosition(displayPosition);
function displayPosition(pos) {
var properties = ['longitude', 'latitude', 'altitude', 'accuracy', 'altitudeAccuracy', 'heading', 'speed'];
for (var i = 0, len = properties.length; i < len; i++) {
var value = pos.coords[properties[i]];
document.getElementById(properties[i]).innerHTML = value;
}
document.getElementById('timestamp').innerHTML = pos.timestamp;
}
</script>
</body>
</html>
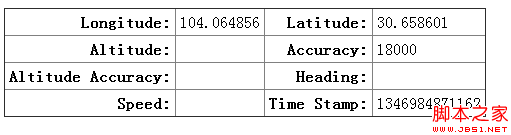
返回的position对象包含两个属性,coords:返回坐标信息;timestamp:获取坐标信息的时间。其中coords又包括下面属性:latitude:纬度;longitude:经度;altitude:高度;accuracy:精确度(米);altitudeAccuracy:高度精确度(米);heading:行进方向;speed:行进速度(米/秒)。
并不是所有的信息都会返回,这取决于你承载浏览器的设备。像有GPS、加速器、罗盘的移动设备会返回大部分信息,家用电脑就不行了。家用电脑获取的位置信息,取决于所处的网络环境或者是wifi。下面我们看上例的运行结果。
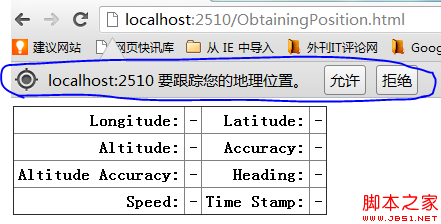
点击允许,获取坐标信息。
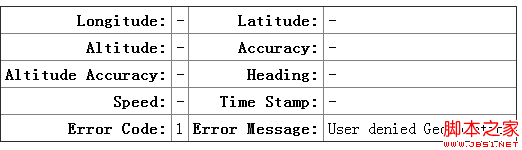
2.处理异常 现在我们介绍getCurrentPosition的异常处理,他是通过使用errorCallback回调函数实现的。函数返回的参数error包含两个属性,code:错误类型的代码;message:错误信息。code包含三个值:1:用户没有授权使用geolocation;2:无法获取坐标信息;3:获取信息超时。
下面我们看个例子:
<!DOCTYPE HTML>
<html>
<head>
<title>Example</title>
<style>
table{border-collapse: collapse;}
th, td{padding: 4px;}
th{text-align: right;}
</style>
</head>
<body>
<table border="1">
<tr>
<th>Longitude:</th>
<td id="longitude">-</td>
<th>Latitude:</th>
<td id="latitude">-</td>
</tr>
<tr>
<th>Altitude:</th>
<td id="altitude">-</td>
<th>Accuracy:</th>
<td id="accuracy">-</td>
</tr>
<tr>
<th>Altitude Accuracy:</th>
<td id="altitudeAccuracy">-</td>
<th>Heading:</th>
<td id="heading">-</td>
</tr>
<tr>
<th>Speed:</th>
<td id="speed">-</td>
<th>Time Stamp:</th>
<td id="timestamp">-</td>
</tr>
<tr>
<th>Error Code:</th>
<td id="errcode">-</td>
<th>Error Message:</th>
<td id="errmessage">-</td>
</tr>
</table>
<script>
navigator.geolocation.getCurrentPosition(displayPosition, handleError);
function displayPosition(pos) {
var properties = ["longitude", "latitude", "altitude", "accuracy", "altitudeAccuracy", "heading", "speed"];
for (var i = 0; i < properties.length; i++) {
var value = pos.coords[properties[i]];
document.getElementById(properties[i]).innerHTML = value;
}
document.getElementById("timestamp").innerHTML = pos.timestamp;
}
function handleError(err) {
document.getElementById("errcode").innerHTML = err.code;
document.getElementById("errmessage").innerHTML = err.message;
}
</script>
</body>
</html>
拒绝授权,运行结果:
3.使用geolocation可选参数项 getCurrentPosition(callback,errorCallback,options)中的options有如下参数可以使用,enableHighAccuracy:使用最好的效果;timeout:超时时间(毫秒);maximumAge:指定缓存时间(毫秒)。我们来下下面的例子:
<!DOCTYPE HTML>
<html>
<head>
<title>Example</title>
<style>
table{border-collapse: collapse;}
th, td{padding: 4px;}
th{text-align: right;}
</style>
</head>
<body>
<table border="1">
<tr>
<th>Longitude:</th>
<td id="longitude">-</td>
<th>Latitude:</th>
<td id="latitude">-</td>
</tr>
<tr>
<th>Altitude:</th>
<td id="altitude">-</td>
<th>Accuracy:</th>
<td id="accuracy">-</td>
</tr>
<tr>
<th>Altitude Accuracy:</th>
<td id="altitudeAccuracy">-</td>
<th>Heading:</th>
<td id="heading">-</td>
</tr>
<tr>
<th>Speed:</th>
<td id="speed">-</td>
<th>Time Stamp:</th>
<td id="timestamp">-</td>
</tr>
<tr>
<th>Error Code:</th>
<td id="errcode">-</td>
<th>Error Message:</th>
<td id="errmessage">-</td>
</tr>
</table>
<script>
var options = {
enableHighAccuracy: false,
timeout: 2000,
maximumAge: 30000
};
navigator.geolocation.getCurrentPosition(displayPosition, handleError, options);
function displayPosition(pos) {
var properties = ["longitude", "latitude", "altitude", "accuracy", "altitudeAccuracy", "heading", "speed"];
for (var i = 0; i < properties.length; i++) {
var value = pos.coords[properties[i]];
document.getElementById(properties[i]).innerHTML = value;
}
document.getElementById("timestamp").innerHTML = pos.timestamp;
}
function handleError(err) {
document.getElementById("errcode").innerHTML = err.code;
document.getElementById("errmessage").innerHTML = err.message;
}
</script>
</body>
</html>
4.监视位置变化 下面我们介绍使用watchPosition方法实现位置变化的监视,他的使用方法和getCurrentPosition一样。我们来看例子:
<!DOCTYPE HTML>
<html>
<head>
<title>Example</title>
<style>
table{border-collapse: collapse;}
th, td{padding: 4px;}
th{text-align: right;}
</style>
</head>
<body>
<table border="1">
<tr>
<th>Longitude:</th>
<td id="longitude">-</td>
<th>Latitude:</th>
<td id="latitude">-</td>
</tr>
<tr>
<th>Altitude:</th>
<td id="altitude">-</td>
<th>Accuracy:</th>
<td id="accuracy">-</td>
</tr>
<tr>
<th>Altitude Accuracy:</th>
<td id="altitudeAccuracy">-</td>
<th>Heading:</th>
<td id="heading">-</td>
</tr>
<tr>
<th>Speed:</th>
<td id="speed">-</td>
<th>Time Stamp:</th>
<td id="timestamp">-</td>
</tr>
<tr>
<th>Error Code:</th>
<td id="errcode">-</td>
<th>Error Message:</th>
<td id="errmessage">-</td>
</tr>
</table>
<button id="pressme">Cancel Watch</button>
<script>
var options = {
enableHighAccuracy: false,
timeout: 2000,
maximumAge: 30000
};
var watchID = navigator.geolocation.watchPosition(displayPosition, handleError, options);
document.getElementById("pressme").onclick = function (e) {
navigator.geolocation.clearWatch(watchID);
};
function displayPosition(pos) {
var properties = ["longitude", "latitude", "altitude", "accuracy", "altitudeAccuracy", "heading", "speed"];
for (var i = 0; i < properties.length; i++) {
var value = pos.coords[properties[i]];
document.getElementById(properties[i]).innerHTML = value;
}
document.getElementById("timestamp").innerHTML = pos.timestamp;
}
function handleError(err) {
document.getElementById("errcode").innerHTML = err.code;
document.getElementById("errmessage").innerHTML = err.message;
}
</script>
</body>
</html>
当点击Cancel Watch按钮时,停止监视。
demo下载地址:
Html5Guide.Geolocation.zip 


