
最近公司在做一个签名的功能,主要用到了canvas画线的功能结合移动端touch事件
js部分是这样的:
window.onload = function() {
    new lineCanvas({
        el: document.getElementById("canvas"),//绘制canvas的父级div
        clearEl: document.getElementById("clearCanvas"),//清除按钮
        saveEl: document.getElementById("saveCanvas"),//保存按钮
        //      linewidth:1,//线条粗细,选填
        //      color:"black",//线条颜色,选填
        //      background:"#ffffff"//线条背景,选填
    });
};
function lineCanvas(obj) {
    this.linewidth = 1;
    this.color = "#000000";
    this.background = "#ffffff";
    for (var i in obj) {
        this[i] = obj[i];
    };
    this.canvas = document.createElement("canvas");
    this.el.appendChild(this.canvas);
    this.cxt = this.canvas.getContext("2d");
    this.canvas.width = this.el.clientWidth;
    this.canvas.height = this.el.clientHeight;
    this.cxt.fillStyle = this.background;
    this.cxt.fillRect(0, 0, this.canvas.width, this.canvas.width);
    this.cxt.strokeStyle = this.color;
    this.cxt.lineWidth = this.linewidth;
    this.cxt.lineCap = "round";
    //开始绘制
    this.canvas.addEventListener("touchstart", function(e) {
        this.cxt.beginPath();
        this.cxt.moveTo(e.changedTouches[0].pageX, e.changedTouches[0].pageY);
    }.bind(this), false);
    //绘制中
    this.canvas.addEventListener("touchmove", function(e) {
        this.cxt.lineTo(e.changedTouches[0].pageX, e.changedTouches[0].pageY);
        this.cxt.stroke();
    }.bind(this), false);
    //结束绘制
    this.canvas.addEventListener("touchend", function() {
        this.cxt.closePath();
    }.bind(this), false);
    //清除画布
    this.clearEl.addEventListener("click", function() {
        this.cxt.clearRect(0, 0, this.canvas.width, this.canvas.height);
    }.bind(this), false);
    //保存图片,直接转base64
    this.saveEl.addEventListener("click", function() {
        var imgBase64 = this.canvas.toDataURL();
        console.log(imgBase64);
    }.bind(this), false);
};
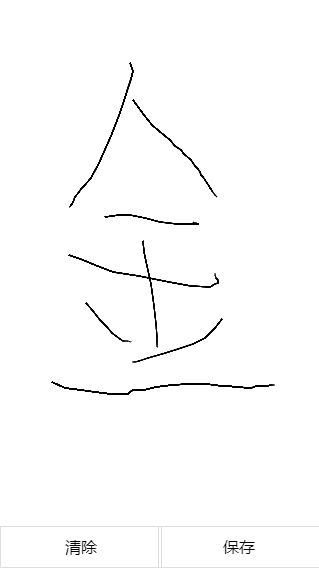
这是效果图:
附上html和css
<div id="canvas">
    <p id="clearCanvas">清除</p>
    <p id="saveCanvas">保存</p>
</div>

html,body{
    width: 100%;
    height: 100%;
}
#canvas{
    width: 100%;
    height: 100%;
    position: relative;
}
#canvas canvas{
    display: block;
}
#clearCanvas{
    width: 50%;
    height: 40px;
    line-height: 40px;
    text-align: center;
    position: absolute;
    bottom: 0;
    left: 0;
    border: 1px solid #DEDEDE;
    z-index: 1;
}
#saveCanvas{
    width: 50%;
    height: 40px;
    line-height: 40px;
    text-align: center;
    position: absolute;
    bottom: 0;
    right: 0;
    border: 1px solid #DEDEDE;
    z-index: 1;
}
以上就是本文的全部内容,希望对大家的学习有所帮助,也希望大家多多支持脚本之家。


