
有一天,我们写了关于如何在localStorage中保存图像和文件的文章,它是关于我们今天可用的实用主义。 然而,localStorage有一些性能影响 - 我们将在稍后的博客中讨论这个问题 - 并且未来期望的方法是使用IndexedDB。 在这里,我将向您介绍如何在IndexedDB中存储图像和文件,然后通过ObjectURL呈现它们。
本文是翻译过来的,原文在这里 Storing images and files in IndexedDB
关于作者: Robert Nyman [Editor emeritus]
Technical Evangelist & Editor of Mozilla Hacks. Gives talks & blogs about HTML5, JavaScript & the Open Web. Robert is a strong believer in HTML5 and the Open Web and has been working since 1999 with Front End development for the web - in Sweden and in New York City. He regularly also blogs atrobertnyman.com and loves to travel and meet people.
使用IndexDB存储图像和文件的常规步骤
首先,我们来谈谈我们将创建一个IndexedDB数据库,将文件保存到其中然后将其读出并显示在页面中的步骤:
1、创建或打开数据库
2、创建一个objectStore
3、将图像文件检索为blob
4、初始化一个数据库事物
5、保存图像blob到数据库中去
6、读出保存的文件并从中创建ObjectURL并将其设置为页面中图像元素的src
1、创建或打开数据库。
// IndexedDB
window.indexedDB = window.indexedDB || window.webkitIndexedDB || window.mozIndexedDB || window.OIndexedDB || window.msIndexedDB,
    IDBTransaction = window.IDBTransaction || window.webkitIDBTransaction || window.OIDBTransaction || window.msIDBTransaction,
    dbVersion = 1;

/*
    Note: The recommended way to do this is assigning it to window.indexedDB,
    to avoid potential issues in the global scope when web browsers start
    removing prefixes in their implementations.
    You can assign it to a varible, like var indexedDB… but then you have
    to make sure that the code is contained within a function.
*/

// Create/open database
var request = indexedDB.open("elephantFiles", dbVersion);

request.onsuccess = function (event) {
    console.log("Success creating/accessing IndexedDB database");
    db = request.result;

    db.onerror = function (event) {
        console.log("Error creating/accessing IndexedDB database");
    };

    // Interim solution for Google Chrome to create an objectStore. Will be deprecated
    if (db.setVersion) {
        if (db.version != dbVersion) {
            var setVersion = db.setVersion(dbVersion);
            setVersion.onsuccess = function () {
                createObjectStore(db);
                getImageFile();
            };
        }
        else {
            getImageFile();
        }
    }
    else {
        getImageFile();
    }
}

// For future use. Currently only in latest Firefox versions
request.onupgradeneeded = function (event) {
    createObjectStore(event.target.result);
};
使用它的预期方法是在创建数据库时触发onupgradeneeded事件或获取更高版本号。 目前仅在Firefox中支持此功能,但很快将在其他Web浏览器中支持。 如果Web浏览器不支持此事件,则可以使用已弃用的setVersion方法并连接到其onsuccess事件。
2、创建一个objectStore(如果它尚不存在)
// Create an objectStore
console.log("Creating objectStore")
dataBase.createObjectStore("elephants");
在这里,您创建一个ObjectStore,您将存储数据 - 或者在我们的例子中,文件 - 并且一旦创建,您不需要重新创建它,只需更新其内容即可。
3、将图像文件检索为blob
// Create XHR
var xhr = new XMLHttpRequest(),
    blob;

xhr.open("GET", "elephant.png", true);
// Set the responseType to blob
xhr.responseType = "blob";

xhr.addEventListener("load", function () {
    if (xhr.status === 200) {
        console.log("Image retrieved");

        // File as response
        blob = xhr.response;

        // Put the received blob into IndexedDB
        putElephantInDb(blob);
    }
}, false);
// Send XHR
xhr.send();
此代码直接将文件的内容作为blob获取。目前只支持Firefox。 收到整个文件后,将blob发送到函数以将其存储在数据库中。
4、初始化一个数据库事物
// Open a transaction to the database
var transaction = db.transaction(["elephants"], IDBTransaction.READ_WRITE);
要开始向数据库写入内容,您需要使用objectStore名称和要执行的操作类型(在本例中为read和write)启动事务。
5、保存图像blob到数据库中去
// Put the blob into the dabase
transaction.objectStore("elephants").put(blob, "image");
一旦事务到位,您将获得对所需objectStore的引用,然后将您的blob放入其中并为其提供密钥。
6、读出保存的文件并从中创建ObjectURL并将其设置为页面中图像元素的src
// Retrieve the file that was just stored
transaction.objectStore("elephants").get("image").onsuccess = function (event) {
    var imgFile = event.target.result;
    console.log("Got elephant!" + imgFile);

    // Get window.URL object
    var URL = window.URL || window.webkitURL;

    // Create and revoke ObjectURL
    var imgURL = URL.createObjectURL(imgFile);

    // Set img src to ObjectURL
    var imgElephant = document.getElementById("elephant");
    imgElephant.setAttribute("src", imgURL);

    // Revoking ObjectURL
    URL.revokeObjectURL(imgURL);
};
使用相同的事务来获取刚刚存储的图像文件,然后创建一个objectURL并将其设置为页面中图像的src。 例如,这也可以是一个附加到脚本元素的JavaScript文件,然后它将解析JavaScript。
最后完整代码
(function () {
    // IndexedDB
    var indexedDB = window.indexedDB || window.webkitIndexedDB || window.mozIndexedDB || window.OIndexedDB || window.msIndexedDB,
        IDBTransaction = window.IDBTransaction || window.webkitIDBTransaction || window.OIDBTransaction || window.msIDBTransaction,
        dbVersion = 1.0;

    // Create/open database
    var request = indexedDB.open("elephantFiles", dbVersion),
        db,
        createObjectStore = function (dataBase) {
            // Create an objectStore
            console.log("Creating objectStore")
            dataBase.createObjectStore("elephants");
        },

        getImageFile = function () {
            // Create XHR
            var xhr = new XMLHttpRequest(),
                blob;

            xhr.open("GET", "elephant.png", true);
            // Set the responseType to blob
            xhr.responseType = "blob";

            xhr.addEventListener("load", function () {
                if (xhr.status === 200) {
                    console.log("Image retrieved");

                    // Blob as response
                    blob = xhr.response;
                    console.log("Blob:" + blob);

                    // Put the received blob into IndexedDB
                    putElephantInDb(blob);
                }
            }, false);
            // Send XHR
            xhr.send();
        },

        putElephantInDb = function (blob) {
            console.log("Putting elephants in IndexedDB");

            // Open a transaction to the database
            var transaction = db.transaction(["elephants"], IDBTransaction.READ_WRITE);

            // Put the blob into the dabase
            var put = transaction.objectStore("elephants").put(blob, "image");

            // Retrieve the file that was just stored
            transaction.objectStore("elephants").get("image").onsuccess = function (event) {
                var imgFile = event.target.result;
                console.log("Got elephant!" + imgFile);

                // Get window.URL object
                var URL = window.URL || window.webkitURL;

                // Create and revoke ObjectURL
                var imgURL = URL.createObjectURL(imgFile);

                // Set img src to ObjectURL
                var imgElephant = document.getElementById("elephant");
                imgElephant.setAttribute("src", imgURL);

                // Revoking ObjectURL
                URL.revokeObjectURL(imgURL);
            };
        };

    request.onerror = function (event) {
        console.log("Error creating/accessing IndexedDB database");
    };

    request.onsuccess = function (event) {
        console.log("Success creating/accessing IndexedDB database");
        db = request.result;

        db.onerror = function (event) {
            console.log("Error creating/accessing IndexedDB database");
        };

        // Interim solution for Google Chrome to create an objectStore. Will be deprecated
        if (db.setVersion) {
            if (db.version != dbVersion) {
                var setVersion = db.setVersion(dbVersion);
                setVersion.onsuccess = function () {
                    createObjectStore(db);
                    getImageFile();
                };
            }
            else {
                getImageFile();
            }
        }
        else {
            getImageFile();
        }
    }

    // For future use. Currently only in latest Firefox versions
    request.onupgradeneeded = function (event) {
        createObjectStore(event.target.result);
    };
})();
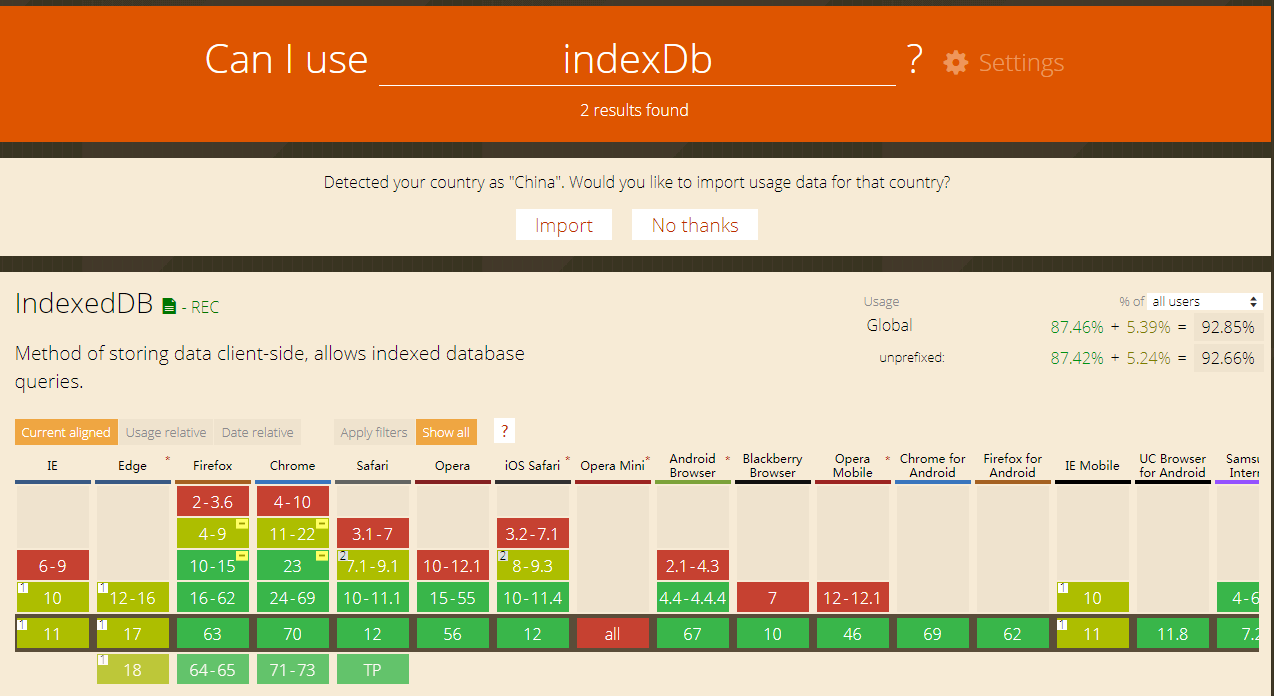
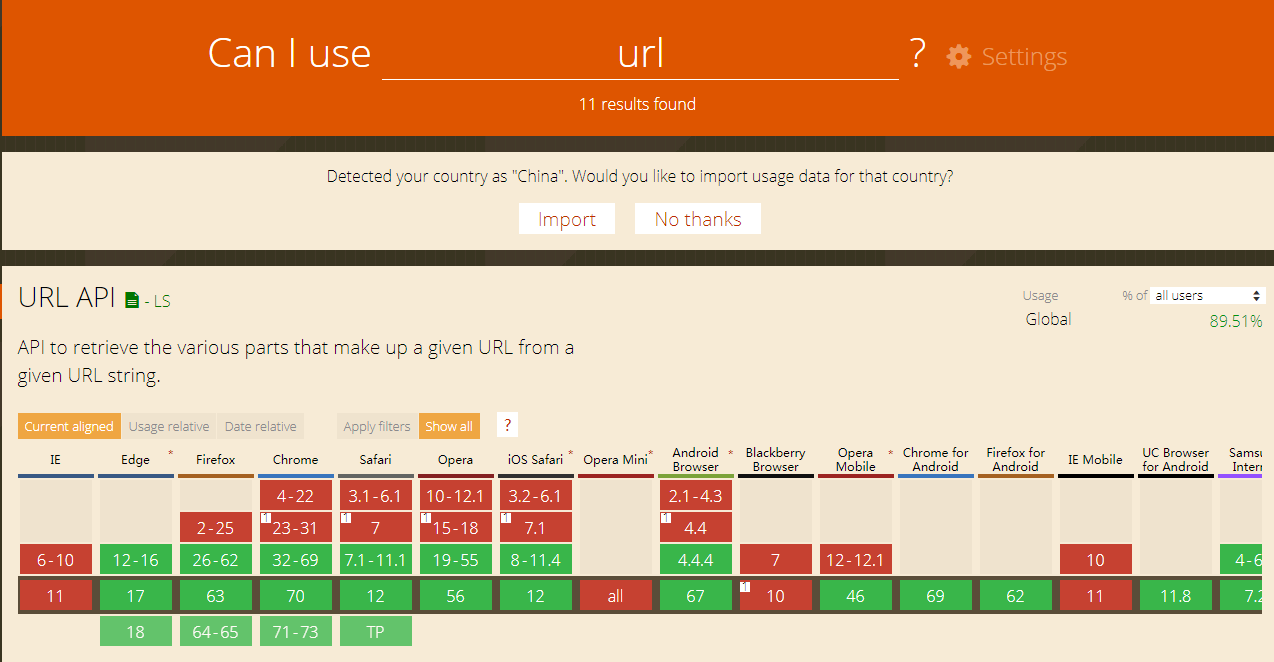
浏览器支持
以上就是本文的全部内容,希望对大家的学习有所帮助,也希望大家多多支持脚本之家。


