
本文实例为大家分享了Unity3D仿写Button面板事件绑定功能的具体代码,供大家参考,具体内容如下
最近在做一个情节引导得项目。其中一个需求特点是:每一步都要显示类似的信息,不同的是,每一次要去引导玩家玩的东西不同。比如:第一步需要显示物体1,第二步需要显示物体2,区别就是在相同的脚本调用不同的函数。我们不可能为了每一次不同的设置写不同的脚本,如果一千多步,难道要写一千多个脚本?突然想要unity 的UGUI中button事件的绑定是一个好的解决方案。于是我上网搜索了button的源代码。如下:
using System;
using System.Collections;
using UnityEngine.Events;
using UnityEngine.EventSystems;
using UnityEngine.Serialization;

namespace UnityEngine.UI
{
 // Button that's meant to work with mouse or touch-based devices.
 [AddComponentMenu("UI/Button", 30)]
 public class Button : Selectable, IPointerClickHandler, ISubmitHandler
 {
  [Serializable]
  /// <summary>
  /// Function definition for a button click event.
  /// </summary>
  public class ButtonClickedEvent : UnityEvent {}

  // Event delegates triggered on click.
  [FormerlySerializedAs("onClick")]
  [SerializeField]
  private ButtonClickedEvent m_OnClick = new ButtonClickedEvent();

  protected Button()
  {}

  /// <summary>
  /// UnityEvent that is triggered when the button is pressed.
  /// Note: Triggered on MouseUp after MouseDown on the same object.
  /// </summary>
  ///<example>
  ///<code>
  /// using UnityEngine;
  /// using UnityEngine.UI;
  /// using System.Collections;
  ///
  /// public class ClickExample : MonoBehaviour
  /// {
  ///  public Button yourButton;
  ///
  ///  void Start()
  ///  {
  ///   Button btn = yourButton.GetComponent<Button>();
  ///   btn.onClick.AddListener(TaskOnClick);
  ///  }
  ///
  ///  void TaskOnClick()
  ///  {
  ///   Debug.Log("You have clicked the button!");
  ///  }
  /// }
  ///</code>
  ///</example>
  public ButtonClickedEvent onClick
  {
   get { return m_OnClick; }
   set { m_OnClick = value; }
  }

  private void Press()
  {
   if (!IsActive() || !IsInteractable())
    return;

   UISystemProfilerApi.AddMarker("Button.onClick", this);
   m_OnClick.Invoke();
  }

  /// <summary>
  /// Call all registered IPointerClickHandlers.
  /// Register button presses using the IPointerClickHandler. You can also use it to tell what type of click happened (left, right etc.).
  /// Make sure your Scene has an EventSystem.
  /// </summary>
  /// <param name="eventData">Pointer Data associated with the event. Typically by the event system.</param>
  /// <example>
  /// <code>
  /// //Attatch this script to a Button GameObject
  /// using UnityEngine;
  /// using UnityEngine.EventSystems;
  ///
  /// public class Example : MonoBehaviour, IPointerClickHandler
  /// {
  ///  //Detect if a click occurs
  ///  public void OnPointerClick(PointerEventData pointerEventData)
  ///  {
  ///    //Use this to tell when the user right-clicks on the Button
  ///   if (pointerEventData.button == PointerEventData.InputButton.Right)
  ///   {
  ///    //Output to console the clicked GameObject's name and the following message. You can replace this with your own actions for when clicking the GameObject.
  ///    Debug.Log(name + " Game Object Right Clicked!");
  ///   }
  ///
  ///   //Use this to tell when the user left-clicks on the Button
  ///   if (pointerEventData.button == PointerEventData.InputButton.Left)
  ///   {
  ///    Debug.Log(name + " Game Object Left Clicked!");
  ///   }
  ///  }
  /// }
  /// </code>
  /// </example>

  public virtual void OnPointerClick(PointerEventData eventData)
  {
   if (eventData.button != PointerEventData.InputButton.Left)
    return;

   Press();
  }

  /// <summary>
  /// Call all registered ISubmitHandler.
  /// </summary>
  /// <param name="eventData">Associated data with the event. Typically by the event system.</param>
  /// <remarks>
  /// This detects when a Button has been selected via a "submit" key you specify (default is the return key).
  ///
  /// To change the submit key, either:
  ///
  /// 1. Go to Edit->Project Settings->Input.
  ///
  /// 2. Next, expand the Axes section and go to the Submit section if it exists.
  ///
  /// 3. If Submit doesn't exist, add 1 number to the Size field. This creates a new section at the bottom. Expand the new section and change the Name field to “Submit”.
  ///
  /// 4. Change the Positive Button field to the key you want (e.g. space).
  ///
  ///
  /// Or:
  ///
  /// 1. Go to your EventSystem in your Project
  ///
  /// 2. Go to the Inspector window and change the Submit Button field to one of the sections in the Input Manager (e.g. "Submit"), or create your own by naming it what you like, then following the next few steps.
  ///
  /// 3. Go to Edit->Project Settings->Input to get to the Input Manager.
  ///
  /// 4. Expand the Axes section in the Inspector window. Add 1 to the number in the Size field. This creates a new section at the bottom.
  ///
  /// 5. Expand the new section and name it the same as the name you inserted in the Submit Button field in the EventSystem. Set the Positive Button field to the key you want (e.g. space)
  /// </remarks>

  public virtual void OnSubmit(BaseEventData eventData)
  {
   Press();

   // if we get set disabled during the press
   // don't run the coroutine.
   if (!IsActive() || !IsInteractable())
    return;

   DoStateTransition(SelectionState.Pressed, false);
   StartCoroutine(OnFinishSubmit());
  }

  private IEnumerator OnFinishSubmit()
  {
   var fadeTime = colors.fadeDuration;
   var elapsedTime = 0f;

   while (elapsedTime < fadeTime)
   {
    elapsedTime += Time.unscaledDeltaTime;
    yield return null;
   }

   DoStateTransition(currentSelectionState, false);
  }
 }
}
代码其实挺简单的,主要是自己new 一个新的unityEvent,然后我们在外界调用。这个UnityEvent通过序列化显示在面板上。我们可以通过两种方式绑定事件。第一种就是在面板绑定,第二种就是AddListener添加事件。于是我们可以照猫画虎择取我们自己需要的部份写我们自己需要的事件绑定。代码如下:
using System.Collections;
using System.Collections.Generic;
using UnityEngine;
using UnityEngine.Events;
using UnityEngine.EventSystems;
using UnityEngine.Serialization;
using System;

namespace MyEvent
{
 public class MyCompotent : MonoBehaviour {

  [Serializable]
  public class MyCompontentEvent:UnityEvent{ }

  [FormerlySerializedAs("MyEvent")]
  [SerializeField]
  private MyCompontentEvent myEvent = new MyCompontentEvent();

  public MyCompontentEvent MyEvent { get { return myEvent; }set { myEvent = value; } }


  //执行绑定的事件
  public void ExcuteEvent()
  {
   MyEvent.Invoke();
  }
 }
}
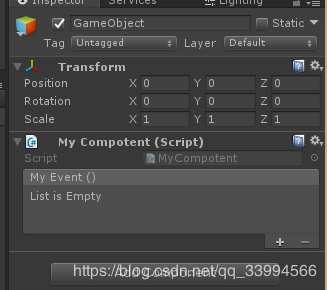
我们将脚本挂到空物体上,效果如下:
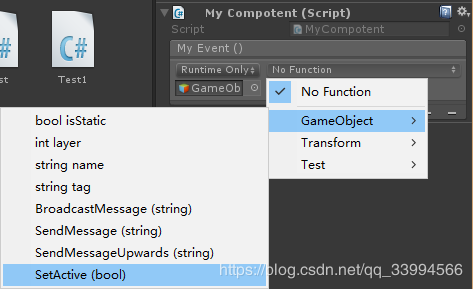
使用方法如下例子:
我们自己写一个步骤设置器,代码如下:
namespace MyEvent
{
 public class StepControl : MyCompotent
 {
  public string Name;
  public int Index;


  private void Start()
  {
   //设置名字
   //设置Index
   //去做每一步应该设置得事情
   ExcuteEvent();
  }
 }
}
我们在StepControl里设置相同的操作。不同的操作通过面板绑定让ExcuteEvent()去执行。使用unity自带的消息事件会让我们开发轻松很多。如果不使用UnityEvent,我们也可以在StepControl声明一个我们自己的委托,但是去调用小的操作的时候会需要多写一点代码。比如 我们想让某个物体隐藏,需要单独写一个脚本设置物体隐藏并且将函数绑定到此StepControl的委托上。而在UnityEvent里可以直接通过面板操作实现。
以上为我的博客内容。有错误欢迎指点!
今年一定要学会代码重新建模+shader效果的初级编写。
以上就是本文的全部内容,希望对大家的学习有所帮助,也希望大家多多支持脚本之家。


