

引用作者原话:Asp.Net的WebApi中使用Swagger作为说明和测试的页面是非常不错的,比起WebApiTestClient来至少在界面上的很大的提升。但是使用Swagger时如果只是一般的控制器直接放到Controller下就可以了,而如果因不同的业务需求而需要分类或者有同名的类名时时则没办法很好的处理。
因为业务需求需要创建域,但是Swagger并未将域添加到接口。所以需要加上以下操作才行。
安装Swagger方法:
为了大家多看微软官方文档、就直接引用Swagger安装及使用方法。以下是微软官方文档。
增加域接口显示方法:
using Microsoft.AspNetCore.Mvc.ApiExplorer;
using System.Collections.Generic;
using System.Linq;
using System.Text.RegularExpressions;

namespace System.Web.Http.Description
{
  /// <summary>
  /// API描述器扩展
  /// </summary>
  public static class ApiDescriptionExtension
  {
    /// <summary>
    /// 获取区域名称
    /// </summary>
    /// <param name="description"></param>
    /// <returns></returns>
    public static List<string> GetAreaName(this ApiDescription description)
    {
      string areaName = description.ActionDescriptor.RouteValues["area"];
      string controlName = description.ActionDescriptor.RouteValues["controller"];
      List<string> areaList = new List<string>();
      areaList.Add(controlName);
      if (!string.IsNullOrEmpty(areaName))
      {
        description.RelativePath = $"{areaName}/{controlName}/{description.RelativePath}";
      }
      return areaList;
    }
  }
}
通过接口描述扩展获取区域及相关信息进行改写扩展。
使用说明:
services.AddSwaggerGen(c =>
      {
        c.SwaggerDoc("v1", new Swashbuckle.AspNetCore.Swagger.Info
        {
          Version = "v1.0.0",
          Title = " API",
          Description = description,
          TermsOfService = "你的公司",
          Contact = new Swashbuckle.AspNetCore.Swagger.Contact { Name = "Blog.Core", Email = "Blog.Core@xxx.com", Url = "https://www.jianshu.com/u/94102b59cc2a" }

        });
        //使用域描述
        c.TagActionsBy(apiDesc => apiDesc.GetAreaName());

        var basePath = PlatformServices.Default.Application.ApplicationBasePath;
        var xmlPath = Path.Combine(basePath, xmlName);//这个就是刚刚配置的xml文件名
        c.IncludeXmlComments(xmlPath, true);//默认的第二个参数是false,这个是controller的注释,记得修改
      });
红色部分加入代码即可。
结果展示:
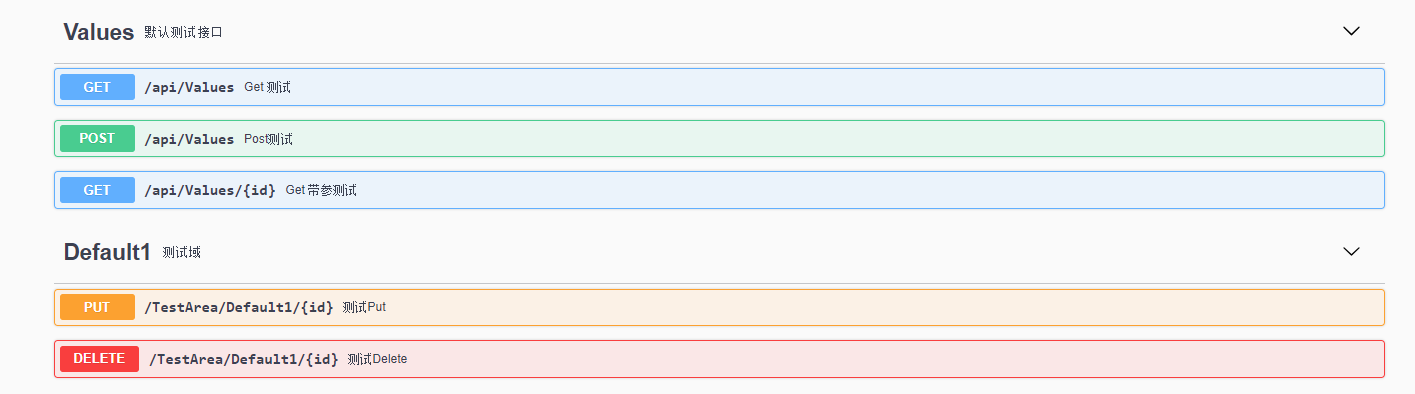
以上就是本文的全部内容,希望对大家的学习有所帮助,也希望大家多多支持脚本之家。


