
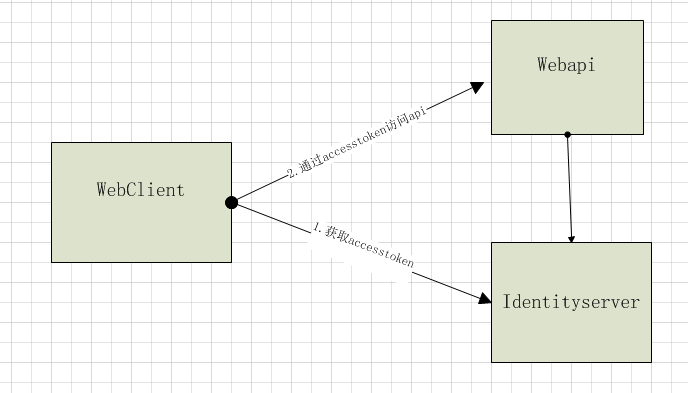
情景如下:一个客户端要访问一个api,不需要用户登录,但是又不想直接暴露api给外部使用,这时可以使用identityserver添加访问权限。
客户端通过clientid和secrect访问identitserver的Token Endpoint,获取accesstoken;
接着客户端再使用accesstoken作为头部验证访问webapi。(webapi已经添加了identityserver的相关验证)。
代码实现:其中 "http://localhost:5000"是identityserver地址,"http://localhost:5001"是api地址
identityserver:在identityserver添加api和客户端,如下所示:定义了一个api1资源,client客户端。client客户端指定为ClientCredentials(客户端凭据)模式,并允许其访问api1。
public class Config
 {
  // scopes define the API resources in your system
  public static IEnumerable<ApiResource> GetApiResources()
  {
   return new List<ApiResource>
   {
    new ApiResource("api1", "My API")
   };
  }
  // clients want to access resources (aka scopes)
  public static IEnumerable<Client> GetClients()
  {
   // client credentials client
   return new List<Client>
   {
    new Client
    {
     ClientId = "client",
     AllowedGrantTypes = GrantTypes.ClientCredentials,
     ClientSecrets =
     {
      new Secret("secret".Sha256())
     },
     AllowedScopes = { "api1" }
    }
   };
  }
 }
在startup配置identityserver如下:
public class Startup
 {
  public void ConfigureServices(IServiceCollection services)
  {
   // configure identity server with in-memory stores, keys, clients and scopes
   services.AddIdentityServer()
    .AddDeveloperSigningCredential()
    .AddInMemoryApiResources(Config.GetApiResources())
    .AddInMemoryClients(Config.GetClients());
  }
  public void Configure(IApplicationBuilder app, IHostingEnvironment env)
  {
   if (env.IsDevelopment())
   {
    app.UseDeveloperExceptionPage();
   }
   app.UseIdentityServer();
  }
 }
WebApi:在api添加identityserver的验证,代码如下,其中定义了同样的api名称,"http://localhost:5000"是identityserver的地址。
public class Startup
 {
  public void ConfigureServices(IServiceCollection services)
  {
   services.AddMvcCore()
    .AddAuthorization()
    .AddJsonFormatters();
   services.AddAuthentication("Bearer")
    .AddIdentityServerAuthentication(options =>
    {
     options.Authority = "http://localhost:5000";
     options.RequireHttpsMetadata = false;
     options.ApiName = "api1";
    });
  }
  public void Configure(IApplicationBuilder app)
  {
   app.UseAuthentication();
   app.UseMvc();
  }
 }
添加一个需要验证的控制器:
 [Route("[controller]")]
 [Authorize]
 public class IdentityController : ControllerBase
 {
  [HttpGet]
  public IActionResult Get()
  {
   return new JsonResult(from c in User.Claims select new { c.Type, c.Value });
  }
 }
客户端:
这里使用里IdentityModel类库
实际请求如下:
1.获取accesstoken:http://localhost:5000/connect/token?client_id=client&client_secret=secret&grant_type=client_credentials&scope=api1
2.请求api1
http://localhost:5001/identity
Headers
Authorization:accesstoken

public class Program
 {
  public static void Main(string[] args) => MainAsync().GetAwaiter().GetResult();
  private static async Task MainAsync()
  {
    //获取identitserver的各个端点地址
   var disco = await DiscoveryClient.GetAsync("http://localhost:5000");
   if (disco.IsError)
   {
    Console.WriteLine(disco.Error);
    return;
   }
   //获取具有api1访问权限的accesstoken
   var tokenClient = new TokenClient(disco.TokenEndpoint, "client", "secret");
   var tokenResponse = await tokenClient.RequestClientCredentialsAsync("api1");
   if (tokenResponse.IsError)
   {
    Console.WriteLine(tokenResponse.Error);
    return;
   }
   Console.WriteLine(tokenResponse.Json);
   Console.WriteLine("\n\n");
   //设置accesstoken为http请求头,并访问api1
   var client = new HttpClient();
   client.SetBearerToken(tokenResponse.AccessToken);
   var response = await client.GetAsync("http://localhost:5001/identity");
   if (!response.IsSuccessStatusCode)
   {
    Console.WriteLine(response.StatusCode);
   }
   else
   {
    var content = await response.Content.ReadAsStringAsync();
    Console.WriteLine(JArray.Parse(content));
   }
  }
 }
ps:
1.这里默认的accesstoken为jwt格式,客户端访问api时,api只需要在启动的时候访问identity获取秘钥即可。若为referencetoken,客户端访问api时,api需要授权访问的都会再请求一次identityserver,,而且api必须设置秘钥,client设置AccessTokenType属性为Reference。
2.可自定义AccessTokenLifetime(token存活时间),默认是3600秒,即一小时
以上所述是小编给大家介绍的IdnentiyServer-使用客户端凭据访问API,希望对大家有所帮助,如果大家有任何疑问请给我留言,小编会及时回复大家的。在此也非常感谢大家对脚本之家网站的支持!


