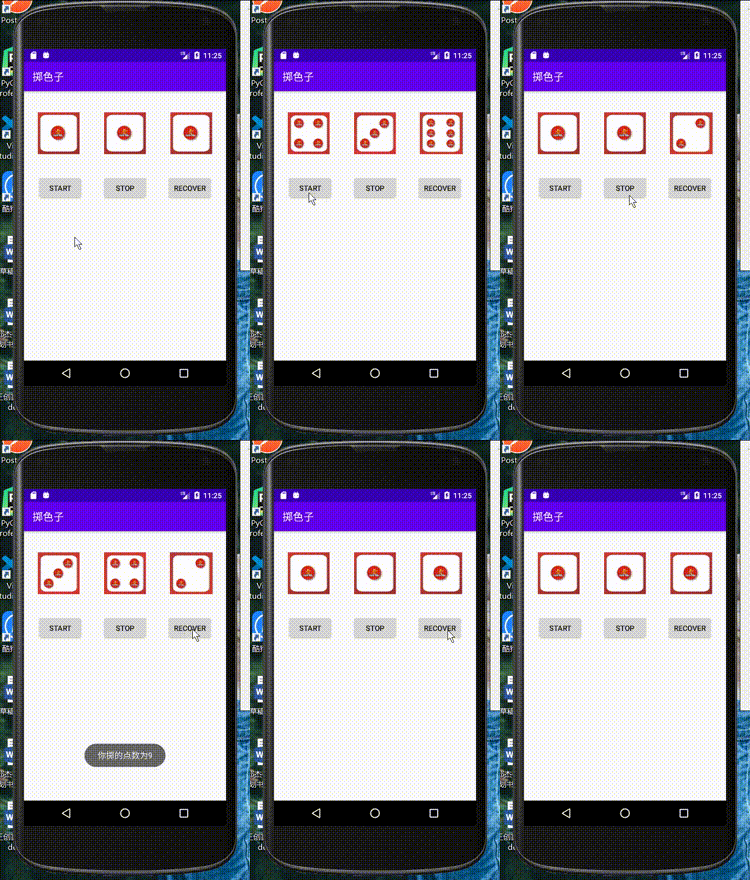
本文实例为大家分享了Android实现掷骰子效果的具体代码,供大家参考,具体内容如下
利用handler接受子线程的消息完成骰子点数的不断更替
演示
START:开始游戏
STOP:停止游戏
RECOVER:重置色子到初始状态

代码
package com.example.homeworkten;

import androidx.annotation.NonNull;
import androidx.appcompat.app.AppCompatActivity;

import android.os.Bundle;
import android.os.Handler;
import android.os.Message;
import android.view.View;
import android.widget.Button;
import android.widget.ImageView;
import android.widget.Toast;

public class MainActivity extends AppCompatActivity {
 private ImageView imageView1,imageView2,imageView3;
 private Button button1,button2,button3;
 private ImageView[] imageViews;
 private Handler handler;
 //子线程
 private Thread thread;
 //记录每个色子的点数
 private int number[];
 //色子的总点数
 private int count;
 //volatile修饰符用来保证其它线程读取的总是该变量的最新的值
 public volatile boolean isStop = false;
 @Override
 protected void onCreate(Bundle savedInstanceState) {
 super.onCreate(savedInstanceState);
 setContentView(R.layout.activity_main);
 number = new int[3];
 imageView1 = findViewById(R.id.imageView1);
 imageView2 = findViewById(R.id.imageView2);
 imageView3 = findViewById(R.id.imageView3);
 button1 = findViewById(R.id.button1);
 button2 = findViewById(R.id.button2);
 button3 = findViewById(R.id.button3);
 imageViews = new ImageView[]{imageView1,imageView2,imageView3};
 button1.setOnClickListener(new View.OnClickListener() {
  @Override
  public void onClick(View v) {
  //判断线程是否存在
  if (thread != null&&isStop == true){
   isStop = false;
  }
  handler = new Handler(){
   @Override
   public void handleMessage(@NonNull Message msg) {
   super.handleMessage(msg);
   for(int i = 0;i < 3;i++) {
    switch (number[i]) {
    case 1:
     imageViews[i].setImageResource(R.drawable.t1);
     break;
    case 2:
     imageViews[i].setImageResource(R.drawable.t2);
     break;
    case 3:
     imageViews[i].setImageResource(R.drawable.t3);
     break;
    case 4:
     imageViews[i].setImageResource(R.drawable.t4);
     break;
    case 5:
     imageViews[i].setImageResource(R.drawable.t5);
     break;
    case 6:
     imageViews[i].setImageResource(R.drawable.t6);
     break;
    }
   }
   }
  };
  thread = new Thread(new Runnable() {
   @Override
   public void run() {
   while (!isStop) {
    Message message = handler.obtainMessage();
    //总点数归零
    count = 0;
    for (int i = 0; i < 3; i++) {
    try {
     Thread.sleep(50);
    } catch (InterruptedException e) {
     e.printStackTrace();
    }
    //生成随机数
    int random = (int) (Math.random() * 6 + 1);
    number[i] = random;
    count += random;
    }
    handler.sendMessage(message);
   }
   }
  });
  thread.start();
  }
 });
 //停止掷筛子
 button2.setOnClickListener(new View.OnClickListener() {
  @Override
  public void onClick(View v) {
  if(isStop == false) {
   isStop = true;
   try {
   //当子线程执行完以后才继续执行主线程
   thread.join();
   } catch (InterruptedException e) {
   e.printStackTrace();
   }
   //显示掷出的点数
   Toast.makeText(MainActivity.this, "你掷的点数为" + count, Toast.LENGTH_SHORT).show();
  }else {
   Toast.makeText(MainActivity.this, "请点击开始键进行掷色子", Toast.LENGTH_SHORT).show();
  }
  }
 });
 //将色子还原到初始状态
 button3.setOnClickListener(new View.OnClickListener() {
  @Override
  public void onClick(View v) {
  if(isStop == true) {
   for (int i = 0; i < 3; i++) {
   imageViews[i].setImageResource(R.drawable.t1);
   }
  }else {
   Toast.makeText(MainActivity.this, "请先停止游戏,再重新开始", Toast.LENGTH_SHORT).show();
  }
  }
 });
 }
}
<?xml version="1.0" encoding="utf-8"?>
<androidx.constraintlayout.widget.ConstraintLayout xmlns:android="http://schemas.android.com/apk/res/android"
 xmlns:app="http://schemas.android.com/apk/res-auto"
 xmlns:tools="http://schemas.android.com/tools"
 android:layout_width="match_parent"
 android:layout_height="match_parent"
 tools:context=".MainActivity">

 <ImageView
 android:id="@+id/imageView1"
 android:layout_width="100dp"
 android:layout_height="80dp"
 android:layout_marginStart="10dp"
 android:layout_marginLeft="10dp"
 android:layout_marginTop="40dp"
 android:layout_marginEnd="10dp"
 android:layout_marginRight="10dp"
 app:layout_constraintEnd_toStartOf="@+id/imageView2"
 app:layout_constraintHorizontal_bias="0.482"
 app:layout_constraintStart_toStartOf="parent"
 app:layout_constraintTop_toTopOf="parent"
 app:srcCompat="@drawable/t1" />

 <ImageView
 android:id="@+id/imageView2"
 android:layout_width="100dp"
 android:layout_height="80dp"
 android:layout_marginStart="10dp"
 android:layout_marginLeft="10dp"
 android:layout_marginTop="40dp"
 android:layout_marginEnd="10dp"
 android:layout_marginRight="10dp"
 app:layout_constraintEnd_toStartOf="@+id/imageView3"
 app:layout_constraintStart_toEndOf="@+id/imageView1"
 app:layout_constraintTop_toTopOf="parent"
 app:srcCompat="@drawable/t1" />

 <Button
 android:id="@+id/button1"
 android:layout_width="wrap_content"
 android:layout_height="wrap_content"
 android:layout_marginStart="10dp"
 android:layout_marginLeft="10dp"
 android:layout_marginTop="40dp"
 android:layout_marginEnd="10dp"
 android:layout_marginRight="10dp"
 android:text="start"
 app:layout_constraintEnd_toStartOf="@+id/button2"
 app:layout_constraintStart_toStartOf="parent"
 app:layout_constraintTop_toBottomOf="@+id/imageView1" />

 <Button
 android:id="@+id/button2"
 android:layout_width="wrap_content"
 android:layout_height="wrap_content"
 android:layout_marginStart="10dp"
 android:layout_marginLeft="10dp"
 android:layout_marginTop="40dp"
 android:layout_marginEnd="10dp"
 android:layout_marginRight="10dp"
 android:text="stop"
 app:layout_constraintEnd_toStartOf="@+id/button3"
 app:layout_constraintStart_toEndOf="@+id/button1"
 app:layout_constraintTop_toBottomOf="@+id/imageView2" />

 <Button
 android:id="@+id/button3"
 android:layout_width="wrap_content"
 android:layout_height="wrap_content"
 android:layout_marginStart="10dp"
 android:layout_marginLeft="10dp"
 android:layout_marginTop="40dp"
 android:layout_marginEnd="10dp"
 android:layout_marginRight="10dp"
 android:text="recover"
 app:layout_constraintEnd_toEndOf="parent"
 app:layout_constraintStart_toEndOf="@+id/button2"
 app:layout_constraintTop_toBottomOf="@+id/imageView3" />

 <ImageView
 android:id="@+id/imageView3"
 android:layout_width="100dp"
 android:layout_height="80dp"
 android:layout_marginStart="10dp"
 android:layout_marginLeft="10dp"
 android:layout_marginTop="40dp"
 android:layout_marginEnd="10dp"
 android:layout_marginRight="10dp"
 app:layout_constraintEnd_toEndOf="parent"
 app:layout_constraintStart_toEndOf="@+id/imageView2"
 app:layout_constraintTop_toTopOf="parent"
 app:srcCompat="@drawable/t1" />

</androidx.constraintlayout.widget.ConstraintLayout>
以上就是本文的全部内容,希望对大家的学习有所帮助,也希望大家多多支持脚本之家。