

本文实例为大家分享了android自定义Dialog弹框和背景阴影显示的具体代码,供大家参考,具体内容如下
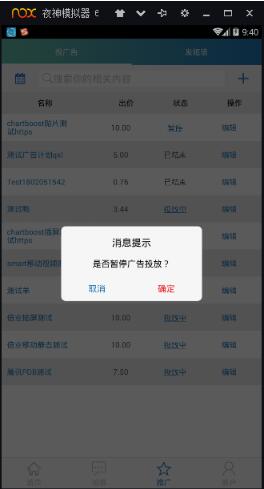
首先需要自定义一个类,继承Dialog
import android.app.Dialog;
import android.content.Context;
import android.os.Bundle;
import android.view.View;
import android.view.ViewGroup;
import android.view.WindowManager;
import android.widget.Button;
import android.widget.TextView;

import com.zhiziyun.dmptest.bot.R;

/**
 * Created by Administrator on 2018/1/31.
 */

public class CustomDialog extends Dialog {
 private Button yes, no;//确定按钮
 private TextView titleTv;//消息标题文本
 private TextView messageTv;//消息提示文本
 private String titleStr;//从外界设置的title文本
 private String messageStr;//从外界设置的消息文本
 //确定文本和取消文本的显示内容
 private String yesStr, noStr;

 private onNoOnclickListener noOnclickListener;//取消按钮被点击了的监听器
 private onYesOnclickListener yesOnclickListener;//确定按钮被点击了的监听器

 /**
  * 设置取消按钮的显示内容和监听
  *
  * @param str
  * @param onNoOnclickListener
  */
 public void setNoOnclickListener(String str, onNoOnclickListener onNoOnclickListener) {
  if (str != null) {
   noStr = str;
  }
  this.noOnclickListener = onNoOnclickListener;
 }

 /**
  * 设置确定按钮的显示内容和监听
  *
  * @param str
  * @param onYesOnclickListener
  */
 public void setYesOnclickListener(String str, onYesOnclickListener onYesOnclickListener) {
  if (str != null) {
   yesStr = str;
  }
  this.yesOnclickListener = onYesOnclickListener;
 }

 public CustomDialog(Context context) {
  super(context, R.style.Dialog_Msg);
 }

 @Override
 protected void onCreate(Bundle savedInstanceState) {
  super.onCreate(savedInstanceState);
  setContentView(R.layout.dialog_custom);
  //按空白处不能取消动画
  setCanceledOnTouchOutside(false);

  //初始化界面控件
  initView();
  //初始化界面数据
  initData();
  //初始化界面控件的事件
  initEvent();

 }

 /**
  * 初始化界面的确定和取消监听器
  */
 private void initEvent() {
  //设置确定按钮被点击后,向外界提供监听
  yes.setOnClickListener(new View.OnClickListener() {
   @Override
   public void onClick(View v) {
    if (yesOnclickListener != null) {
     yesOnclickListener.onYesClick();
    }
   }
  });

  no.setOnClickListener(new View.OnClickListener() {
   @Override
   public void onClick(View v) {
    if (noOnclickListener != null) {
     noOnclickListener.onNoClick();
    }
   }
  });
 }

 /**
  * 初始化界面控件的显示数据
  */
 private void initData() {
  //如果用户自定了title和message
  if (titleStr != null) {
   titleTv.setText(titleStr);
  }
  if (messageStr != null) {
   messageTv.setText(messageStr);
  }
  //如果设置按钮的文字
  if (yesStr != null) {
   yes.setText(yesStr);
  }
 }

 /**
  * 初始化界面控件
  */
 private void initView() {
  yes = (Button) findViewById(R.id.yes);
  no = (Button) findViewById(R.id.no);
  titleTv = (TextView) findViewById(R.id.title);
  messageTv = (TextView) findViewById(R.id.message);
 }

 /**
  * 从外界Activity为Dialog设置标题
  *
  * @param title
  */
 public void setTitle(String title) {
  titleStr = title;
 }

 /**
  * 从外界Activity为Dialog设置dialog的message
  *
  * @param message
  */
 public void setMessage(String message) {
  messageStr = message;
 }

 /**
  * 设置确定按钮和取消被点击的接口
  */
 public interface onYesOnclickListener {
  public void onYesClick();
 }

 public interface onNoOnclickListener {
  public void onNoClick();
 }

 @Override
 public void show() {
  super.show();
  /**
   * 设置宽度全屏,要设置在show的后面
   */
  WindowManager.LayoutParams layoutParams = getWindow().getAttributes();
  layoutParams.width= ViewGroup.LayoutParams.MATCH_PARENT;
  layoutParams.height= ViewGroup.LayoutParams.MATCH_PARENT;
  getWindow().getDecorView().setPadding(0, 0, 0, 0);
  getWindow().setAttributes(layoutParams);
 }
}
这是实体类中的style:
<style name="custom_dialog_style" parent="android:Theme.Dialog">
  <item name="android:windowFrame">@null</item>
  <item name="android:windowIsFloating">true</item>
  <item name="android:windowIsTranslucent">false</item>
  <item name="android:windowNoTitle">true</item><!--除去title-->
  <item name="android:backgroundDimEnabled">true</item><!--半透明-->
  <item name="android:windowBackground">@color/transparent</item><!--除去背景色-->
  <item name="android:radius">10dp</item>
</style>
其中@color/transparent是一个透明色
<color name="transparent">#00000000</color>
然后是布局
<?xml version="1.0" encoding="utf-8"?>
<RelativeLayout xmlns:android="http://schemas.android.com/apk/res/android"
 android:layout_width="match_parent"
 android:layout_height="match_parent"
 android:background="#A5000000">

 <LinearLayout
  android:layout_width="260dp"
  android:layout_height="wrap_content"
  android:layout_centerInParent="true"
  android:background="@drawable/shape_dialog_msg"
  android:orientation="vertical">

  <TextView
   android:id="@+id/title"
   android:layout_width="wrap_content"
   android:layout_height="wrap_content"
   android:layout_gravity="center"
   android:layout_margin="15dp"
   android:gravity="center"
   android:text="消息提示"
   android:textColor="@color/colorBlack"
   android:textSize="@dimen/title_text_size" />

  <TextView
   android:id="@+id/message"
   android:layout_width="wrap_content"
   android:layout_height="wrap_content"
   android:layout_gravity="center"
   android:layout_marginLeft="@dimen/padding_left_right4"
   android:layout_marginRight="@dimen/padding_left_right4"
   android:text="提示消息"
   android:textColor="@color/colorBlack"
   android:textSize="@dimen/textsizi3" />

  <View
   android:layout_width="match_parent"
   android:layout_height="1px"
   android:layout_marginTop="15dp"
   android:background="#E4E4E4" />

  <LinearLayout
   android:layout_width="match_parent"
   android:layout_height="@dimen/buttom_height"
   android:orientation="horizontal">

   <Button
    android:id="@+id/no"
    android:layout_width="match_parent"
    android:layout_height="match_parent"
    android:layout_weight="1"
    android:background="@null"
    android:gravity="center"
    android:singleLine="true"
    android:text="取消"
    android:textColor="@color/blue"
    android:textSize="@dimen/textsizi3" />

   <Button
    android:id="@+id/yes"
    android:layout_width="match_parent"
    android:layout_height="match_parent"
    android:layout_weight="1"
    android:background="@null"
    android:gravity="center"
    android:singleLine="true"
    android:text="确 定"
    android:textColor="@color/red"
    android:textSize="@dimen/textsizi3" />

  </LinearLayout>
 </LinearLayout>

</RelativeLayout>
下面是shape_dialog_msg的代码
<?xml version="1.0" encoding="UTF-8"?>
<selector xmlns:android="http://schemas.android.com/apk/res/android">
 <item android:state_pressed="false">
  <shape android:shape="rectangle" >
   <!-- 填充的颜色 前两位是透明度-->
   <solid android:color="#f7f6f6"></solid>
   <!-- 设置按钮的四个角为弧形 -->
   <!-- android:radius 弧形的半径 -->
   <corners android:radius="8dip" />
   <!-- padding:Button里面的文字与Button边界的间隔 -->
   <padding android:bottom="2dp" android:left="2dp" android:right="2dp" android:top="2dp" />
  </shape>
 </item>
</selector>
准备工作都做好了,下面就是如何使用了
//点击弹出对话框
  final CustomDialog customDialog = new CustomDialog(getActivity());
  customDialog.setTitle("消息提示");
  customDialog.setMessage("是否暂停广告投放?");
  customDialog.setYesOnclickListener("确定", new CustomDialog.onYesOnclickListener() {
    @Override
    public void onYesClick() {
    //这里是确定的逻辑代码,别忘了点击确定后关闭对话框
    customDialog.dismiss();
    }
  });
 customDialog.setNoOnclickListener("取消", new CustomDialog.onNoOnclickListener() {
@Override
  public void onNoClick() {
   customDialog.dismiss();
    }
   });
 customDialog.show();
以上就是本文的全部内容,希望对大家的学习有所帮助,也希望大家多多支持脚本之家。


