

本文实例为大家分享了Android自定义控件ViewGroup实现标签云的具体代码,供大家参考,具体内容如下
实现的功能:
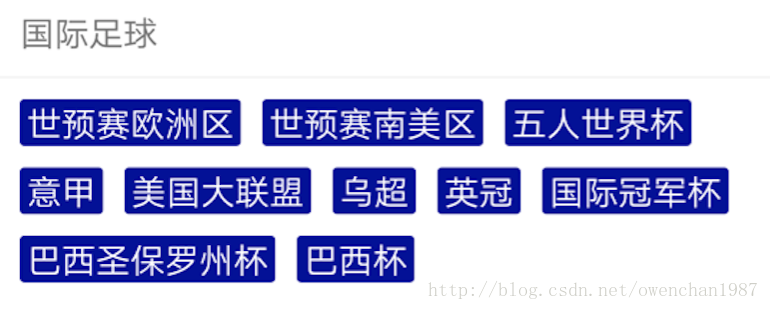
基本绘制流程:
构造函数获取自定义属性
onMeasure()方法,测量子控件的大小
onLayout()方法,对子控件进行布局
1、自定义属性
<resources>

  <declare-styleable name="TabsViewGroup">
    <attr name="tabVerticalSpace" format="dimension" />
    <attr name="tabHorizontalSpace" format="dimension" />
  </declare-styleable>

</resources>
2、构造函数中获取自定义属性值
public TabsViewGroup(Context context, AttributeSet attrs) {
    super(context, attrs);
    TypedArray attrArray = context.obtainStyledAttributes(attrs, R.styleable.TabsViewGroup);
    if (attrArray != null) {
      childHorizontalSpace = attrArray.getDimensionPixelSize(R.styleable.TabsViewGroup_tabHorizontalSpace, 0);
      childVerticalSpace = attrArray.getDimensionPixelSize(R.styleable.TabsViewGroup_tabHorizontalSpace, 0);
      attrArray.recycle();
    }
  }
3、onMeasure函数测量子控件大小,然后设置当前控件大小
 @Override
  protected void onMeasure(int widthMeasureSpec, int heightMeasureSpec) {
    int widthSize = MeasureSpec.getSize(widthMeasureSpec);
    int heightSize = MeasureSpec.getSize(heightMeasureSpec);

    int widthModel = MeasureSpec.getMode(widthMeasureSpec);
    int heightModel = MeasureSpec.getMode(heightMeasureSpec);

    //输出宽度高度以及测量模式
    Log.i(TAG, "sizeWidth :" + widthSize);
    switch (widthModel) {
      case MeasureSpec.AT_MOST:
        Log.i(TAG, "Width model AT_MOST");
        break;
      case MeasureSpec.EXACTLY:
        Log.i(TAG, "Width model EXACTLY");
        break;
      case MeasureSpec.UNSPECIFIED:
        Log.i(TAG, "Width model UNSPECIFIED");
        break;
    }

    Log.i(TAG, "sizeHeight :" + heightSize);
    switch (heightModel) {
      case MeasureSpec.AT_MOST:
        Log.i(TAG, "Height model AT_MOST");
        break;
      case MeasureSpec.EXACTLY:
        Log.i(TAG, "Height model EXACTLY");
        break;
      case MeasureSpec.UNSPECIFIED:
        Log.i(TAG, "Height model UNSPECIFIED");
        break;
    }
    //左右边距
    int left = getPaddingLeft();
    int top = getPaddingTop();
    //记录每一行的宽度和高度
    int lineWidth = 0;
    int lineHeight = 0;
    // 如果是warp_content情况下,记录宽和高
    int containerWidth = 0;
    int containerHeight = 0;
    // 遍历每个子元素
    for (int index = 0; index < getChildCount(); index++) {
      View child = getChildAt(index);
      if (child.getVisibility() == GONE) {
        continue;
      }
      measureChild(child, widthMeasureSpec, heightMeasureSpec);
      MarginLayoutParams params = (MarginLayoutParams) child.getLayoutParams();

      int childWidth = child.getMeasuredWidth() + params.leftMargin + params.rightMargin + childHorizontalSpace;
      int childHeight = child.getMeasuredHeight() + params.topMargin + params.bottomMargin + childVerticalSpace;

      if (lineWidth + childWidth > widthSize - getPaddingRight() - getPaddingLeft()) {
        containerWidth = Math.max(lineWidth, childWidth);
        lineWidth = childWidth;
        containerHeight += lineHeight;
        lineHeight = childHeight;
        Rect rect = new Rect(left,
            containerHeight + top,
            left + childWidth - childHorizontalSpace,
            containerHeight + top + child.getMeasuredHeight());
        child.setTag(rect);
      } else {
        Rect rect = new Rect(lineWidth + left,
            containerHeight + top,
            lineWidth + left + childWidth - childHorizontalSpace,
            containerHeight + top + child.getMeasuredHeight());
        child.setTag(rect);
        lineWidth += childWidth;
        lineHeight = Math.max(lineHeight, childHeight);
      }
    }

    containerWidth = Math.max(containerWidth, lineWidth) + getPaddingLeft() + getPaddingRight();
    containerHeight += lineHeight + getPaddingTop() + getPaddingBottom();
    containerHeight -= childVerticalSpace;
    setMeasuredDimension(widthModel == MeasureSpec.EXACTLY ? widthSize : containerWidth,
        heightModel == MeasureSpec.EXACTLY ? heightSize : containerHeight);
}
4、onLayout函数对所有子控件重新布局
@Override
  protected void onLayout(boolean changed, int l, int t, int r, int b) {
    int childCount = getChildCount();
    for (int i = 0; i < childCount; i++) {
      View child = getChildAt(i);
      if (child.getVisibility() == GONE) {
        continue;
      }
      Rect location = (Rect) child.getTag();
      child.layout(location.left, location.top, location.right, location.bottom);
    }
}
使用方法
1、布局问自己中直接引用
<?xml version="1.0" encoding="utf-8"?>
<LinearLayout xmlns:android="http://schemas.android.com/apk/res/android"
  xmlns:owen="http://schemas.android.com/apk/res-auto"
  android:id="@+id/activity_main"
  android:layout_width="match_parent"
  android:layout_height="match_parent"
  android:background="#ffffff"
  android:orientation="vertical">

  <TextView
    android:layout_width="wrap_content"
    android:layout_height="wrap_content"
    android:padding="10dp"
    android:textSize="16sp"
    android:text="国际足球"/>

  <View
    android:layout_width="wrap_content"
    android:layout_height="0.1dp"
    android:background="#e0e0e0"/>

  <com.ownchan.tabviewgroup.view.TabsViewGroup
    android:id="@+id/tabs_view"
    android:layout_width="match_parent"
    android:layout_height="wrap_content"
    android:padding="10dip"
    owen:tabHorizontalSpace="10dp"
    owen:tabVerticalSpace="10dp" />

</LinearLayout>
2、代码添加标签
@Override
  protected void onCreate(Bundle savedInstanceState) {
    super.onCreate(savedInstanceState);
    setContentView(R.layout.activity_main);
    initView();
  }

  private void initView() {
    TabsViewGroup tabsViewGroup = (TabsViewGroup) findViewById(R.id.tabs_view);
    LinearLayout.LayoutParams params = new LinearLayout.LayoutParams(ViewGroup.LayoutParams.WRAP_CONTENT,
        ViewGroup.LayoutParams.WRAP_CONTENT);
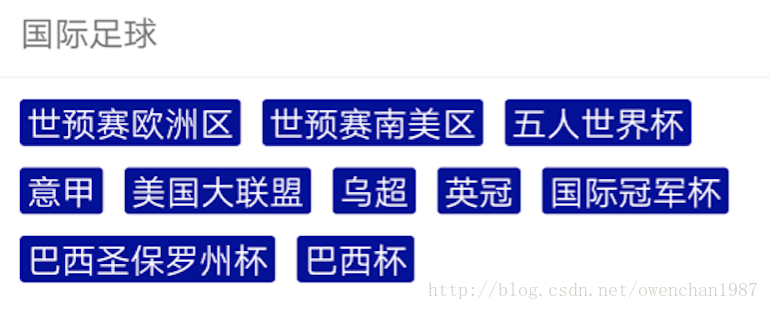
    String[] tabs = new String[]{"世预赛欧洲区",
        "世预赛南美区", "五人世界杯", "意甲", "美国大联盟", "乌超", "英冠", "国际冠军杯", "巴西圣保罗州杯", "巴西杯"};
    for (int i = 0; i < tabs.length; i++) {
      TextView textView = new TextView(this);
      textView.setText(tabs[i]);
      textView.setTextColor(Color.WHITE);
      textView.setBackgroundDrawable(getResources().getDrawable(R.drawable.tabs_bg));
      textView.setGravity(Gravity.CENTER);
      textView.setPadding(10, 0, 10, 0);
      textView.setTextSize(16);
      tabsViewGroup.addView(textView, params);
    }
}
效果图:
项目Github地址
以上就是本文的全部内容,希望对大家的学习有所帮助,也希望大家多多支持脚本之家。


