

最近公司项目需要实现类似微信的浮层弹出框。研究发现是用PopupWindow实现的。而且可以自定义位置以及出现和退出时的动画,由于太晚了就不实现动画了,需要得同学请自己研究下。由于本人新手其中的不足和缺点请见谅。
代码如下:
首先是定义顶部按钮的main.xml文件
<LinearLayout xmlns:android="http://schemas.android.com/apk/res/android"
 xmlns:tools="http://schemas.android.com/tools"
 android:layout_width="match_parent"
 android:layout_height="match_parent"
 android:id="@+id/main"
 android:orientation="vertical"
 tools:context=".MainActivity"
 android:background="@color/white" >

 <RelativeLayout
 android:id="@+id/rl_action_bar"
 android:layout_width="match_parent"
 android:layout_height="wrap_content"
 android:layout_gravity="center"
 android:padding="10dip"
 android:background="@color/gold" >

 <Button
  android:id="@+id/more"
  android:layout_width="wrap_content"
  android:layout_height="wrap_content"
  android:layout_alignParentRight="true"
  android:layout_marginRight="10dip"
  android:background="@drawable/more" />
 <Button
  android:id="@+id/add"
  android:layout_width="wrap_content"
  android:layout_height="wrap_content"
  android:layout_marginRight="20dip"
  android:layout_toLeftOf="@+id/more"
  android:background="@drawable/add"
  />
 <Button
  android:id="@+id/search"
  android:layout_width="wrap_content"
  android:layout_height="wrap_content"
  android:layout_marginRight="20dip"
  android:layout_toLeftOf="@+id/add"
  android:background="@drawable/search"
  />
 </RelativeLayout>

</LinearLayout>
其次是定义弹出框PopupWindow的popupwindow_dialog.xml
<?xml version="1.0" encoding="utf-8"?>
<LinearLayout xmlns:android="http://schemas.android.com/apk/res/android"
 android:layout_width="match_parent"
 android:layout_height="match_parent"
 android:background="@drawable/click"
 android:cacheColorHint="#00000000"
 android:orientation="vertical" >
 <ListView
 android:id="@+id/lv_dialog"
 android:layout_width="match_parent"
 android:layout_height="match_parent"
 android:cacheColorHint="#00000000"
 android:listSelector="@drawable/grouplist_item_bg_normal" >
 </ListView>

</LinearLayout>
接着是每一个弹出框显示的文字text.xml
<?xml version="1.0" encoding="utf-8"?>
<LinearLayout xmlns:android="http://schemas.android.com/apk/res/android"
 android:layout_width="match_parent"
 android:layout_height="match_parent"
 android:orientation="vertical" >

 <TextView
 android:id="@+id/tv_text"
 android:layout_width="match_parent"
 android:layout_height="wrap_content"
 android:layout_marginLeft="10dip"
 android:padding="5dp"
 android:textSize="20sp" />

</LinearLayout>
最后是主界面的MainActivity.java
package com.bn.weixindemo;

import android.app.Activity;
import android.graphics.drawable.BitmapDrawable;
import android.os.Bundle;
import android.view.Gravity;
import android.view.LayoutInflater;
import android.view.View;
import android.view.View.OnClickListener;
import android.widget.AdapterView;
import android.widget.ArrayAdapter;
import android.widget.Button;
import android.widget.LinearLayout;
import android.widget.ListView;
import android.widget.PopupWindow;
import android.widget.Toast;
import android.widget.AdapterView.OnItemClickListener;

/**
 *
 *@title 标题
 *@description 仿微信顶部弹出框的popuwindow
 *@author zhengxiaolin
 *@version 1.0
 *@created 2014-5-23 上午12:11:11
 *@changeRecord [修改记录]<br />
 */
public class MainActivity extends Activity implements OnClickListener{
 private Button mBtnMore,mBtnAdd,mBtnSearch;
 private PopupWindow popupWindow;
 private LinearLayout layout;
 private ListView listView;
 private String[] more = {"我的相册","我的收藏","我的银行卡","设置","意见反馈"};
 private String[] add ={"发起群聊","添加朋友","视屏聊天","扫一扫","拍照分享"};
 @Override
 protected void onCreate(Bundle savedInstanceState) {
 super.onCreate(savedInstanceState);
 setContentView(R.layout.main);
 mBtnMore = (Button) findViewById(R.id.more);
 mBtnAdd = (Button) findViewById(R.id.add);
 mBtnSearch = (Button) findViewById(R.id.search);
 setOnClickListener();
 }

 private void setOnClickListener() {
 mBtnMore.setOnClickListener(this);
 mBtnAdd.setOnClickListener(this);
 mBtnSearch.setOnClickListener(this);
 }

 @Override
 public void onClick(View v) {
 // TODO Auto-generated method stub
 switch (v.getId()) {
 case R.id.more:
  mBtnMore.getTop();
  int y = mBtnMore.getBottom() * 3 / 2;
  int x = getWindowManager().getDefaultDisplay().getWidth();
  showMorePopupWindow(x, y);
  break;
 case R.id.add:
  mBtnAdd.getTop();
  int y1 = mBtnAdd.getBottom() * 3 / 2;
  int x1 = getWindowManager().getDefaultDisplay().getWidth();
  showAddPopupWindow(x1, y1);
  break;
 case R.id.search:
  Toast.makeText(getBaseContext(), "搜索", 1).show();
 default:
  break;
 }
 }

 public void showMorePopupWindow(int x, int y) {
 layout = (LinearLayout) LayoutInflater.from(MainActivity.this).inflate(
  R.layout.popupwindow_dialog, null);
 listView = (ListView) layout.findViewById(R.id.lv_dialog);
 listView.setAdapter(new ArrayAdapter<String>(MainActivity.this,
  R.layout.text, R.id.tv_text, more));

 popupWindow = new PopupWindow(MainActivity.this);
 popupWindow.setBackgroundDrawable(new BitmapDrawable());
 popupWindow
  .setWidth(getWindowManager().getDefaultDisplay().getWidth() / 2);
 popupWindow.setHeight(420);
 popupWindow.setOutsideTouchable(true);
 popupWindow.setFocusable(true);
 popupWindow.setContentView(layout);
 popupWindow.showAtLocation(findViewById(R.id.main), Gravity.LEFT
  | Gravity.TOP, x, y);//需要指定Gravity,默认情况是center.
 listView.setOnItemClickListener(new OnItemClickListener() {
  @Override
  public void onItemClick(AdapterView<?> arg0, View arg1, int arg2,
   long arg3) {
  Toast.makeText(getBaseContext(), "您选择了:"+more[arg2], 1).show();
  popupWindow.dismiss();
  popupWindow = null;
  }
 });
 }
 /**
 * 点击+时弹出的popuwindow
 */
 public void showAddPopupWindow(int x, int y) {
 layout = (LinearLayout) LayoutInflater.from(MainActivity.this).inflate(
  R.layout.popupwindow_dialog, null);
 listView = (ListView) layout.findViewById(R.id.lv_dialog);
 listView.setAdapter(new ArrayAdapter<String>(MainActivity.this,
  R.layout.text, R.id.tv_text, add));

 popupWindow = new PopupWindow(MainActivity.this);
 popupWindow.setBackgroundDrawable(new BitmapDrawable());
 popupWindow
  .setWidth(getWindowManager().getDefaultDisplay().getWidth() / 2);
 popupWindow.setHeight(420);
 popupWindow.setOutsideTouchable(true);
 popupWindow.setFocusable(true);
 popupWindow.setContentView(layout);
 popupWindow.showAtLocation(findViewById(R.id.main), Gravity.LEFT
  | Gravity.TOP, x, y);//需要指定Gravity,默认情况是center.
 listView.setOnItemClickListener(new OnItemClickListener() {
  @Override
  public void onItemClick(AdapterView<?> arg0, View arg1, int arg2,
   long arg3) {
  Toast.makeText(getBaseContext(), "您选择了:"+add[arg2], 1).show();
  popupWindow.dismiss();
  popupWindow = null;
  }
 });
 }
}
好了,主要代码就完成了,实现效果如下所示
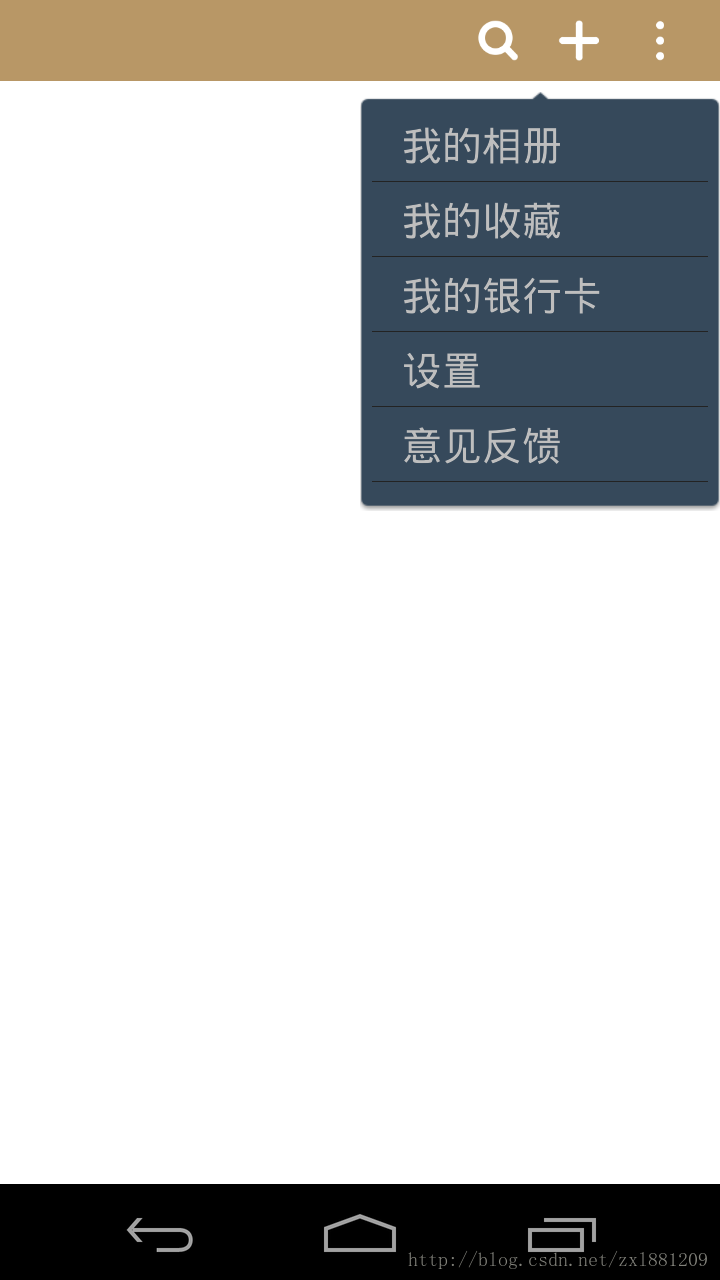
由于本人没有图片,所以弹出框的背景图没有处理,弹出框中的每一项的前面也没有添加图片,有需要得同学可以自行添加。(效果已经出来了,细节没有调整,请大家见谅)
以上就是本文的全部内容,希望对大家的学习有所帮助,也希望大家多多支持脚本之家。


