

在上一节中,我介绍了Android中Service的生命周期以及一些有关知识。在这一节中,我采用代码编写的方式来介绍一下不同程序之间也就是不同进程之间通信采用AIDL方式。
首先我需要解释一下,不同程序进程间采用AIDL方式启动服务,我们可以看作成client客户端与server服务端之间的通信,无非c/s都是安装在了我们的智能手机设备Android系统之上。好了,理解到这里我们就可以继续往下介绍了。
首先我们编写server服务端程序:
1)我们新建一个应用程序S,它的应用程序架构如下:
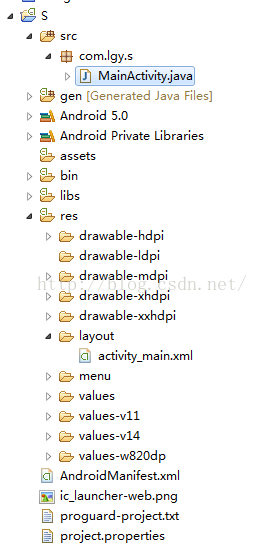
2)我们在com.lgy.s包下编写S.aidl文件,具体代码如下:(aidl编码格式不再叙述)
package com.lgy.s;

interface S{
  String getStr(String name);
}
编写好S.aidl文件我们就可以使用S.stub类下的相关方法。
3)我们可以自定义我们的Service了,具体代码如下:
package com.lgy.s;

import android.app.Service;
import android.content.Intent;
import android.os.IBinder;
import android.os.RemoteException;
import android.util.Log;

public class MyService extends Service {

  private static final String TAG = "MyService";
  private S.Stub server;

  @Override
  public void onCreate() {
    Log.i(TAG, "onCreate");
    server = new S.Stub() {
      @Override
      public String getStr(String name) throws RemoteException {
        Log.i(TAG, name);
        return name;
      }
    };
    super.onCreate();
  }

  @Override
  public boolean onUnbind(Intent intent) {
    Log.i(TAG, "onUnbind");
    return super.onUnbind(intent);
  }

  @Override
  public void onDestroy() {
    Log.i(TAG, "onDestroy");
    server = null;
    super.onDestroy();
  }


  @Override
  public IBinder onBind(Intent intent) {
    Log.i(TAG, "onBind");

    return server;
  }

}
4)我们进行服务端Server最后一步,在AndroidManifest.xml文件中注册服务Service
<service android:name="com.lgy.s.MyService">
      <intent-filter >
        <action android:name="android.lgy.myService" />
      </intent-filter>
    </service>
-----------到此我们服务器端就编写完毕------------------------
下面我们编写客户端client应用程序:
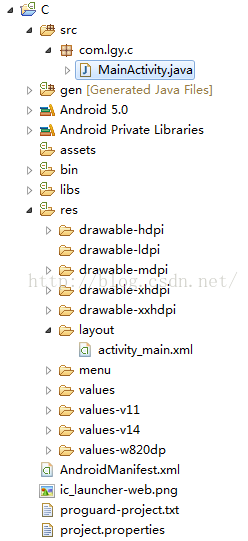
1)我们新建一个应用程序C,具体应用架构如下:
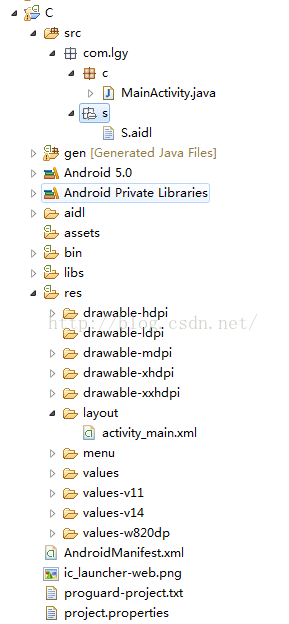
2)我们将在服务器端S写的aidl原封不动的移到客户端C上来(注包文件名都原封不动),移动后架构如下图:
3)我们就可以在客户端MainActivity中直接调用绑定服务器上的服务,具体代码如下:
package com.lgy.c;

import android.app.Activity;
import android.content.ComponentName;
import android.content.Intent;
import android.content.ServiceConnection;
import android.os.Bundle;
import android.os.IBinder;
import android.os.RemoteException;
import android.util.Log;
import android.view.View;

import com.lgy.s.S;

public class MainActivity extends Activity {

  protected static final String TAG = "MainActivity";
  private S s;
  private ServiceConnection conn = new ServiceConnection() {
    @Override
    public void onServiceDisconnected(ComponentName name) {

    }

    @Override
    public void onServiceConnected(ComponentName name, IBinder service) {
      s = S.Stub.asInterface(service);
      Log.i(TAG, "onServiceConnected client");
    }
  };

  @Override
  protected void onCreate(Bundle savedInstanceState) {
    super.onCreate(savedInstanceState);
    setContentView(R.layout.activity_main);
  }

  public void bindBtn(View v){
    Intent mIntent = new Intent("android.lgy.myService");
    bindService(mIntent, conn, BIND_AUTO_CREATE);
  }

  public void greetBtn(View v){
    try {
      Log.i(TAG, s.getStr("client"));
    } catch (RemoteException e) {
      e.printStackTrace();
    }
  }

  public void unbindBtn(View v){
    unbindService(conn);
  }

}
4)MainActivity对应的布局文件代码如下:
<RelativeLayout xmlns:android="http://schemas.android.com/apk/res/android"
  xmlns:tools="http://schemas.android.com/tools"
  android:layout_width="match_parent"
  android:layout_height="match_parent"
  android:paddingBottom="@dimen/activity_vertical_margin"
  android:paddingLeft="@dimen/activity_horizontal_margin"
  android:paddingRight="@dimen/activity_horizontal_margin"
  android:paddingTop="@dimen/activity_vertical_margin"
  tools:context="com.lgy.c.MainActivity" >

  <Button
    android:id="@+id/button1"
    android:layout_width="match_parent"
    android:layout_height="wrap_content"
    android:layout_alignParentLeft="true"
    android:layout_alignParentTop="true"
    android:onClick="bindBtn"
    android:text="绑定服务器Service" />

  <Button
    android:id="@+id/button2"
    android:layout_width="match_parent"
    android:layout_height="wrap_content"
    android:layout_alignLeft="@+id/button1"
    android:layout_below="@+id/button1"
    android:onClick="greetBtn"
    android:text="传递参数给服务器获取返回的数据" />

  <Button
    android:id="@+id/button3"
    android:layout_width="match_parent"
    android:layout_height="wrap_content"
    android:layout_alignLeft="@+id/button2"
    android:layout_below="@+id/button2"
    android:onClick="unbindBtn"
    android:text="解除绑定服务" />

</RelativeLayout>
至此为止客户端代码我们已经编写完毕。
下面我们开始测试:
我们不运行服务器端,而是直接运行客户端的话,相对应的效果会怎么样呢?具体效果如下解析:
第一、我们点击绑定服务的话,系统程序无任何反应,这个时候在客户端服务已经绑定,但是没有连接到服务端。接着我们再次点解读取数据的话,系统将会崩溃。因为没有连接到服务器端方法没有具体实现。
第二、我们点击绑定服务的话,系统程序无任何反应,这个时候在客户端服务已经绑定,但是没有连接到服务端,接着我们点击解除服务绑定的话,系统仍然没有任何反应,我们要是再接着点击解除服务绑定的话,系统就会崩溃,这也就从而再次证明了服务只会绑定一次,多次绑定的话服务不会做出任何反应;服务解除绑定只能仅只能解除绑定一次,多次解除绑定服务的话,系统就会崩溃。
第三、我们直接点击接受数据,系统程序也会崩溃,原因就是在于服务没有绑定,服务端根本就没有连接,相当于数据读取方法没有实现。
第四:我们直接点击解除绑定的话,系统程序也会崩溃,原因就是在于服务一次也没有绑定。
我们现在运行服务器,相对应的效果又会怎么样呢?具体效果如下解析:
第一、我们点击绑定服务,可以观察到后台logcat日志信息:


从日志我们可以看出在客户端C绑定服务同时连接服务端,可以看到服务端Service的启动onCreate和服务Service绑定onBind。
第二、我们点击获取数据,可以观察到后台logcat日志信息:


从日志图中我们可以看出客户端将client字符串数据传递给服务器端,服务器端接受并返回一个字符串数据。
第三、我们点击解除绑定服务,具体logcat如下:

第四:如果我们不点击绑定服务,而是直接点获取数据,或者解除绑定的话,系统都将会崩溃,具体原因前面已经解释清楚,在此不作过多重复。
以上就是AIDL在多进程中通信调用的简单应用(C应用程序启动S应用程序服务Service)。
以上就是本文的全部内容,希望对大家的学习有所帮助,也希望大家多多支持脚本之家。


