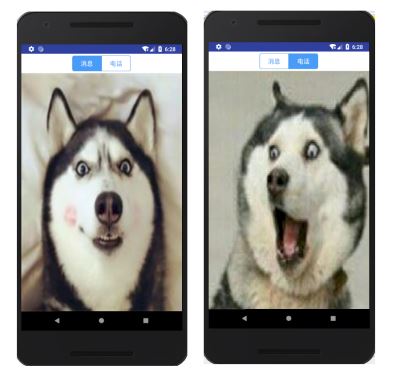
android仿照qq的顶部栏效果,主要就是利用fragment manager把fragment设置显示内容
(1)在activity_main.xml布局中添加控件
<?xml version="1.0" encoding="utf-8"?>
<RelativeLayout xmlns:android="http://schemas.android.com/apk/res/android"
  xmlns:tools="http://schemas.android.com/tools"
  android:layout_width="match_parent"
  android:layout_height="match_parent">
  <LinearLayout
    android:id="@+id/ll_qqtop"
    android:layout_width="match_parent"
    android:layout_height="50dp"
    android:orientation="horizontal"
    android:gravity="center"
    android:background="@color/whites">
    <LinearLayout
      android:id="@+id/common_constact"
      android:layout_height="40dp"
      android:layout_width="150dp"
      android:orientation="horizontal"
      android:layout_centerHorizontal="true"
      android:layout_alignParentTop="true">
      <Button
        android:id="@+id/constact_group"
        android:layout_height="match_parent"
        android:layout_width="0dp"
        android:layout_weight="1"
        android:padding="5dp"
        android:textSize="16sp"
        android:button="@null"
        android:checked="true"
        android:background="@drawable/qq_contact_group"
        android:textColor="@drawable/qq_constact_font"
        android:text="消息"/>
      <Button
        android:button="@null"
        android:id="@+id/constact_all"
        android:layout_width="0dp"
        android:layout_height="match_parent"
        android:layout_weight="1"
        android:textSize="16sp"
        android:padding="5dp"
        android:background="@drawable/qq_contact_all"
        android:textColor="@drawable/qq_constact_font"
        android:text="电话"/>
    </LinearLayout>
  </LinearLayout>
  <FrameLayout
    android:id="@+id/id_content"
    android:layout_width="match_parent"
    android:layout_height="match_parent"
    android:layout_below="@+id/ll_qqtop" />
</RelativeLayout>
(2)在drawable中添加样式文件,包括字体颜色和背景
2.1.在drawable文件夹中新建一个文件:qq_contact_group.xml,这个是左边按钮的背景样式xml
<?xml version="1.0" encoding="utf-8"?>
<selector xmlns:android="http://schemas.android.com/apk/res/android">
  <item android:state_enabled="false"><shape>
    <corners android:bottomLeftRadius="5dp" android:bottomRightRadius="0dp" android:topLeftRadius="5dp" android:topRightRadius="0dp" />
    <solid android:color="@color/blue" />
    <stroke android:width="1dp" android:color="@color/blue" />
  </shape>
  </item>
  <item android:state_pressed="true"><shape>
    <corners android:bottomLeftRadius="5dp" android:bottomRightRadius="0dp" android:topLeftRadius="5dp" android:topRightRadius="0dp" />
    <solid android:color="@color/whites" />
    <stroke android:width="1dp" android:color="@color/whites" />
  </shape>
  </item>
  <item><shape>
    <corners android:bottomLeftRadius="5dp" android:bottomRightRadius="0dp" android:topLeftRadius="5dp" android:topRightRadius="0dp" />
    <solid android:color="@color/whites" />
    <stroke android:width="1dp" android:color="@color/blue" />
  </shape>
  </item>
</selector>
2.2在drawable文件夹中新建一个文件:qq_contact_all.xml,这个是右边按钮的背景样式xml
<?xml version="1.0" encoding="utf-8"?>
<selector xmlns:android="http://schemas.android.com/apk/res/android">
  <item android:state_enabled="false"><shape>
    <corners android:bottomLeftRadius="0dp" android:bottomRightRadius="5dp" android:topLeftRadius="0dp" android:topRightRadius="5dp" />
    <solid android:color="@color/blue" />
    <stroke android:width="1dp" android:color="@color/blue" />
  </shape>
  </item>
  <item android:state_pressed="true"><shape>
    <corners android:bottomLeftRadius="0dp" android:bottomRightRadius="5dp" android:topLeftRadius="0dp" android:topRightRadius="5dp" />
    <solid android:color="@color/blue" />
    <stroke android:width="1dp" android:color="@color/blue" />
  </shape>
  </item>
  <item><shape>
    <corners android:bottomLeftRadius="0dp" android:bottomRightRadius="5dp" android:topLeftRadius="0dp" android:topRightRadius="5dp" />
    <solid android:color="@color/whites" />
    <stroke android:width="1dp" android:color="@color/blue" />
  </shape>
  </item>
</selector>
3.在drawable文件夹中新建一个文件:qq_constact_font.xml,这个是两个按钮的文字样式xml,不选中为白色,选中为蓝色
<?xml version="1.0" encoding="utf-8"?>
<selector xmlns:android="http://schemas.android.com/apk/res/android" >
  <item android:state_pressed="true" android:color="@color/whites"/>
  <item android:state_enabled="false" android:color="@color/whites"/>
  <item android:color="@color/blue"/>
</selector>
(3)在MainActivity中设置按钮的选中情况,并且在fragmentManager中调用fragment
public class MainActivity extends Activity implements View.OnClickListener {
  //参考网址:https://blog.csdn.net/u010585448/article/details/48543883
  private Button title_left_btn , title_right_btn;
  /**
   * Fragment管理器
   */
  private android.app.FragmentManager mFragmentManager;
  private FragmentTransaction mTransaction;
  /**
   * 两个Fragment
   */
  private LeftFragment mLFragment ;
  private RightFragment mRFragment;
  @Override
  protected void onCreate(Bundle savedInstanceState) {
    super.onCreate(savedInstanceState);
    setContentView(R.layout.activity_main);
    initView();
  }
  private void initView() {
    // TODO Auto-generated method stub
    title_left_btn = (Button)findViewById(R.id.constact_group);
    title_right_btn = (Button)findViewById(R.id.constact_all);
    title_left_btn.setOnClickListener(this);
    title_left_btn.performClick();//模拟点击事件,使左边按钮被点击
    mFragmentManager = getFragmentManager();
    mTransaction = mFragmentManager.beginTransaction();
    mLFragment = new LeftFragment();
    mTransaction.replace(R.id.id_content, mLFragment);
    mTransaction.commit();
    title_right_btn.setOnClickListener(this);
  }
  @Override
  public void onClick(View v) {
    // TODO Auto-generated method stub
    switch (v.getId()) {
      case R.id.constact_group:
        if(title_left_btn.isEnabled()){
          title_left_btn.setEnabled(false);
          title_right_btn.setEnabled(true);
        }
        mFragmentManager = getFragmentManager();
        mTransaction = mFragmentManager.beginTransaction();
        if(mLFragment == null){
          mLFragment = new LeftFragment();
        }
        mTransaction.replace(R.id.id_content, mLFragment);
        mTransaction.commit();
        break;
      case R.id.constact_all:
        if(title_right_btn.isEnabled()){
          title_left_btn.setEnabled(true);
          title_right_btn.setEnabled(false);
        }
        mFragmentManager = getFragmentManager();
        mTransaction = mFragmentManager.beginTransaction();
        if(mRFragment == null){
          mRFragment = new RightFragment();
        }
        mTransaction.replace(R.id.id_content, mRFragment);
        mTransaction.commit();
        break;
    }
  }
}
最后,简单贴一下fragment吧
public class LeftFragment extends android.app.Fragment {
  @Override
  public View onCreateView(LayoutInflater inflater, ViewGroup container,
               Bundle savedInstanceState) {
    return inflater.inflate(R.layout.left_fragment, container , false);
  }
}
实现效果图:

以上所述是小编给大家介绍的Android仿qq顶部消息栏效果,希望对大家有所帮助,如果大家有任何疑问请给我留言,小编会及时回复大家的。在此也非常感谢大家对脚本之家网站的支持!