

在使用手机时,当有未接来电或者是新短消息时,手机会给出相应的提示信息,这些提示信息通常会显示到手机屏幕的状态栏上。Android也提供了用于处理此类信息的类,他们是Notification和NotificationManager。其中,Notification代表的是具有全局效果的通知;而NotificationManager则是用于发送Notification通知的系统服务。
使用Notification和NotificationManager类发送和显示通知也比较简单,大致可分为以下4个步骤。
(1)调用getSystemService()方法获取系统的NotificationManager服务。
(2)创建一个Notification对象,并为其设置各种属性
(3)为Notification对象设置事件信息
(4)通过NotificationManager类的notify()方法发送Notification通知
下面通过一个具体的实例说明如何使用Notification在状态栏上显示通知:
res/layout/main.xml:
<?xml version="1.0" encoding="utf-8"?>
<LinearLayout xmlns:android="http://schemas.android.com/apk/res/android"
  android:orientation="vertical"
  android:layout_width="fill_parent"
  android:layout_height="fill_parent"
  android:id="@+id/layout1"
  android:gravity="center_horizontal"
  >
  <Button android:id="@+id/button1"
    android:layout_width="wrap_content"
    android:layout_height="wrap_content"
    android:text="显示通知"/>
  <Button android:id="@+id/button2"
    android:layout_width="wrap_content"
    android:layout_height="wrap_content"
    android:text="删除通知"/>
</LinearLayout>
这个是点击通知跳转的页面main2.xml:
<?xml version="1.0" encoding="utf-8"?>
<LinearLayout xmlns:android="http://schemas.android.com/apk/res/android"
android:layout_width="match_parent"
android:layout_height="match_parent"
android:orientation="vertical" >

<TextView android:layout_width="wrap_content"
android:layout_height="wrap_content"
android:text="这里是详细内容"/>
</LinearLayout>
在中AndroidManifest.xml添加一下两个权限,并在<application>标签中注册ContentActivity:
<!-- 添加操作闪光灯的权限 -->
  <uses-permission android:name="android.permission.FLASHLIGHT"/>
<!-- 添加操作震动器的权限 -->
  <uses-permission android:name="android.permission.VIBRATE"/>
<application>
<activity android:name=".ContentActivity"/>
</application>
MainActivity:
package com.example.test;

import android.app.Activity;
import android.app.Notification;
import android.app.NotificationManager;
import android.app.PendingIntent;
import android.content.Intent;
import android.os.Bundle;
import android.view.View;
import android.view.View.OnClickListener;
import android.widget.Button;

public class MainActivity extends Activity {
   public static int NOTIFYID_1=1,NOTIFYID_2=2;
  @Override
  public void onCreate(Bundle savedInstanceState) {
    super.onCreate(savedInstanceState);
    setContentView(R.layout.main);

    //获取通知管理器,用于发送通知
    final NotificationManager notificationManager=(NotificationManager)getSystemService(NOTIFICATION_SERVICE);

    Button button1=(Button) findViewById(R.id.button1);//获取"显示通知"按钮
    //为"显示通知"按钮添加单击事件监听器
    button1.setOnClickListener(new OnClickListener() {

      @Override
      public void onClick(View arg0) {
        Notification notify=new Notification();//创建一个Notification对象
        notify.icon=R.drawable.in;
        notify.tickerText="显示第一个通知";
        notify.when=System.currentTimeMillis();//设置发送时间(设置为当前时间)
        notify.defaults=Notification.DEFAULT_ALL;//设置默认声音、默认震动和默认闪光灯
        notify.setLatestEventInfo(MainActivity.this, "无题", "每天进步一点点", null);//设置事件信息
        notificationManager.notify(NOTIFYID_1,notify);//通过通知管理器发送通知

        //添加第二个通知
        Notification notify1=new Notification(R.drawable.music,"显示第二个通知",System.currentTimeMillis());
        notify1.flags=Notification.FLAG_AUTO_CANCEL;//打开应用程序后图标消失
        Intent intent=new Intent(MainActivity.this,ContentActivity.class);//设置为跳转页面准备的Intent
        //针对意图的包装对象,在下面就是通知被点击时激活的组件对象(上下文,请求码,意图对象,标识符)
        PendingIntent pendingIntent=PendingIntent.getActivity(MainActivity.this, 0, intent, 0);
        //设置通知的内容  (上下文对象,标题, 内容, 指定通知被点击的时候跳转到哪里,激活哪个组件)
        notify1.setLatestEventInfo(MainActivity.this, "通知", "查看详细内容", pendingIntent);
        notificationManager.notify(NOTIFYID_2,notify);//通过通知管理器发送通知
      }
    });

    Button button2=(Button) findViewById(R.id.button2);//获取"删除通知"按钮
    //为"显示通知"按钮添加单击事件监听器
    button2.setOnClickListener(new OnClickListener() {


      @Override
      public void onClick(View arg0) {
        notificationManager.cancel(NOTIFYID_1);//清除ID号为常量NOTIFYID_1的通知
        notificationManager.cancelAll();//清除全部通知
      }
    });
  }
}
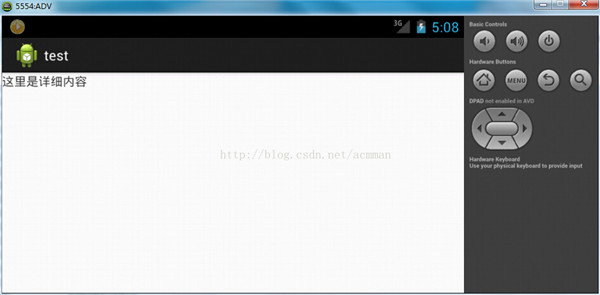
运行本实例,单击"显示通知"按钮,在屏幕的左上角将显示第一个通知,如图-4.2.2.a.jpg所示,过一段时间后,该通知消失,并显示第二个通知,再过一段时间后,第二个通知消失,这时在状态栏上将显示这两个通知的图标,如图-4.2.2.b.jpg所示,单击通知图标,将显示如图-4.2.2.c.jpg所示的通知列表,单击第一个列表项,可以查看通知的详细内容,如图-4.2.2.d.jpg所示,查看后,该通知的图标将不在状态栏中显示。单击"删除通知"按钮,可以删除全部通知。
图-4.2.2.a.jpg:
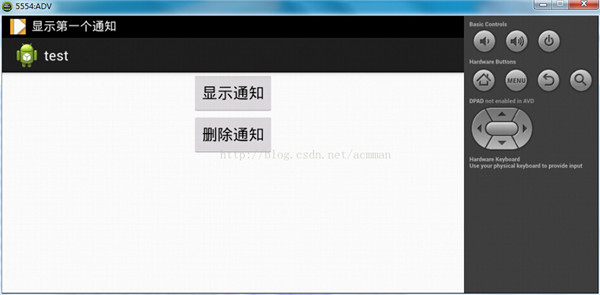
图-4.2.2.b.jpg:
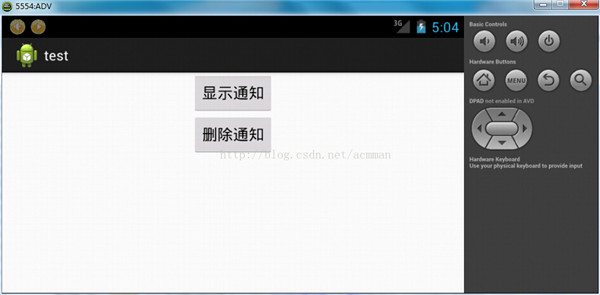
图-4.2.2.c.jpg:
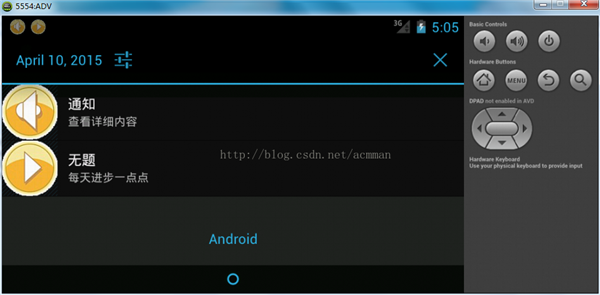
图-4.2.2.d.jpg:
以上就是本文的全部内容,希望对大家的学习有所帮助,也希望大家多多支持脚本之家。


